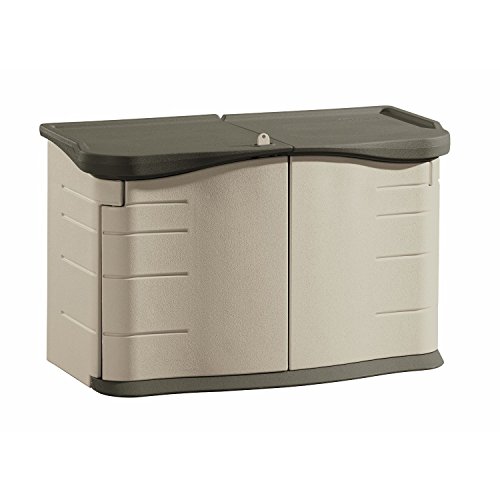
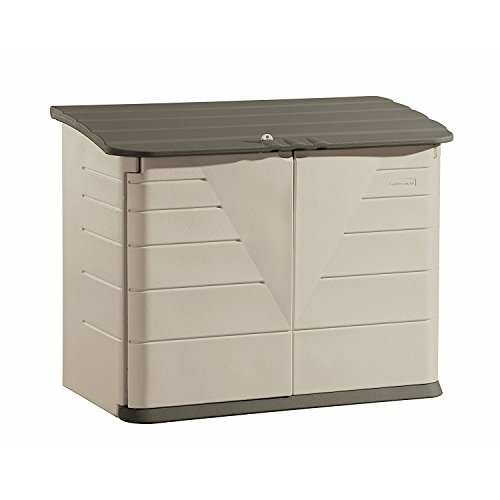
Rubbermaid Large Horizontal Resin Weather Resistant Outdoor Storage Shed, 32 cubic ft., Olive Steel/Sandstone, for Garden/Backyard/Home/Pool


Key features
- •Double-walled resin construction for durability
- •Leak-, dent- and weather-resistant for year-round use
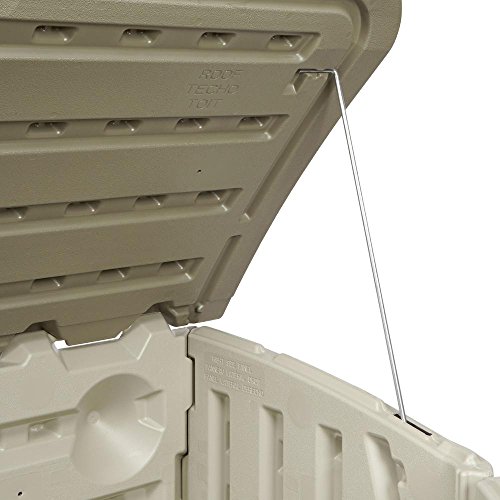
- •Hinged roof provides easy access to items
- •Lockable for added security (lock sold separately); heavy-duty floor mat included
- •Outside Dimensions: 5' L x 2'8 W x 3'11 inches. Inside Dimensions- 4'3 w x 2'd x 3'6 h inches
BrandRubbermaid
CategoryStorage Sheds
Size32 cubic ft
ColorOlive/Sandstone
Warranty1 year limited warranty
Rubbermaid Large Horizontal Resin Weather Resistant Outdoor Storage Shed, 32 cubic ft., Olive Steel/Sandstone, for Garden/Backyard/Home/Pool
List Price: $619.82$557.84DEALYou Save: $61.98 (10%)
Free shippingFree Returns – 30 daysFree Order CancellationSecure Payment2–3 Days DeliveryGet It June 24, 2026In Stock (3)No marketing spamNo account requiredFulfilment by FedEx / Amazon / UPS / ShipwirePayPal / Card Buyer Protection
Customer Reviews
Reviews sourced from verified Amazon purchasers4.1
out of 5
Based on 10 reviews
5★
30%
4★
40%
3★
20%
2★
0%
1★
10%
Great shed if you ignore the instructions on assembly
Bradley Smith•August 25, 2017
When you get it assembled, it is a great storage shed. However, I am amazed that Rubbermaid continues to send an instruction sheet that is flat out wrong. It tells you to slide the two back sides directly together. That won't work. You have to connect them by lifting the one side with its latches and sliding it into the other side's slots.
I am giving it 3 stars due to this. This would be able to be assembled in 5 minutes if they had the instructions correct.
I am giving it 3 stars due to this. This would be able to be assembled in 5 minutes if they had the instructions correct.
Kept my papers dry enough, even in the back yard.
Live Band•April 3, 2017
This storage unit has survived well in the back yard under the Pacific coast's moist, foggy, sometimes rainy skies. I did put a tarp over the top. The papers I stored there in cardboard boxes were not compromised, or wet or soggy, when I removed them. I may revisit this review and raise the 4 star rating I'm now giving it.
Had one just like this one for 18 years
Stuart A. Joynt•August 7, 2016
Had one just like this one for 18 years. We keep pool chemicals in it and it has worked out very well. Would still have the other one but in the spring time our city was devastated by basketball and softball sized hail. This product actually withstood the hailstorm better then I ever expected, but one big basketball sized hail stone broke one of the Rubbermaid hinges on one of the doors. Had that hailstone missed by an inch either way I would still be using it. I live in North Texas and my other container stayed out in the extreme weather for 18 years without any problems. This new one is just a little off being squared but I think the heat will make it right. Seems like the older one was this way at first also. It also had a small hole on the outside of one of the back panels but this looks like something hit it in transit. I used some 80 year calk and filled the hole. If this one is anywhere near as tough as the other one, it will out live me. I recommend this product!!
it's safe to say that Rubbermaid should be glad I'm not the suing (legal) type
capn gary•May 5, 2015
Well, it's safe to say that Rubbermaid should be glad I'm not the suing (legal) type. Let me start by saying that every one of the piece of this unit had razor sharp 'casting flash' around the edges. Sufficiently that the first large piece I took out of the box slipped and I ended up with razor cuts on the fingers of both hands. Nice deep ones that required a bit of cleaning, patching and medicating.
So: wear a pair of gloves or be especially careful not to cut yourself.
With that much said, let me also say that what flash had been cut off must have been cut off with a dull butter knife.
So before you even consider starting assembly, take your own razor knife and sand paper to the edges--or you'll have something with lots of REALLY sharp edges for you & the kids to cut yourselves on.
Next, do yourself a favor and go buy a package of 6 #8 x 1 1/2" sheet metal screws at your friendly hardware store. Use 2 of them to hold the back pieces in place after you've slid them together. Trust me--they come apart a lot easier than they'll go together. (I used a rubber mallet for assistance.) Get the two pieces in place, then drill a pilot hole through at the junction points on the top and bottom. You'll understand when you get this far.
Once you've gotten the next step done, which is sliding the sides onto the bottom/base (which would be easier done with 2 people), stand the unit up on it's back, and once again apply a bit of force to convince the base to slide all the way into the rear pieces. Now is the time to add 2 more screws. I put one on each side at the very front of the base to hold the side pieces in place. I also applied the rubber mallet to insure that each side was, indeed, seated all the way down before putting in the screws. Stand the unit up so the back is facing up and put in your last two screws to hold the back in place, since it doesn't really lock in. I put the screws in the center connectors.
These six screws cost me about a buck because they were stainless, but they'll inhibit the rust. All of the 'handyhardware stores' carry stainless screws either in bags or in open stock.
Next, I had hoped for some kind of metal reinforced lock hasp. Nope. just plastic. So tomorrow, before I start adding stuff inside the storage unit, I'm back off to the hardware store to buy hasps (a pair of them, I think) and some more stainless steel screws, nuts & fender washers. (Those are the really large diameter washers with little holes--they spread the load out, and will make it a bit harder for a thief. I'm a big fan of that.) I'm going to put one hasp inside on the doors, and the other on the outside lip of the roof. A bit of effort and a few more bucks, but that plastic hasp would take about 5 seconds to cut off with any kind of saw blade. Sorta useless unless you're just trying to keep the 'coons out of your trash.
Other than the casting flash and wannabe-Keystone Cop assembly, this unit should do fine. Stuff that doesn't get a lot of use but wants to be more or less out of the weather will be fine. I'm going to hang what used to be known as a 'Shell No-Pest Strip' inside to keep the mud daubers, ants, spiders, etc. away. This thing is not sealed tightly. If you want absolutely waterproof, you'll have to get creative with some weatherstripping. Or something. Don't expect it to live a hundred years in direct sunlight. If you're gonna put it on a dock as a MAJOR dock-box, shoot a couple of screws through the bottom into the dock. This plastic is slippery enough that a real blow might move it. (I always screw my dock boxes to the dock--just because.)
If I remember, I'll edit this after the first good squall to let everyone know how well it does.
I bought this product. I followed the instructions for ...
Cooper Macco•April 25, 2015
I bought this product. I followed the instructions for installation and found major resistance. I could not understand why the floor wasn't staying together. I took Rubbermaid's recommendation and attempted to use a rubber mallet to push it in all the way. The mallet messed up the front of the floor and it still not together. I took it apart and realized it the holes where the floor clips in were not punched out in the factory. The floor was just pushed up against it. I had to use thick garden shears to clip out the holes, and the whole thing is slightly messed up due to damage from the mallet.
Very disappointed
Very disappointed
Page 1 of 2