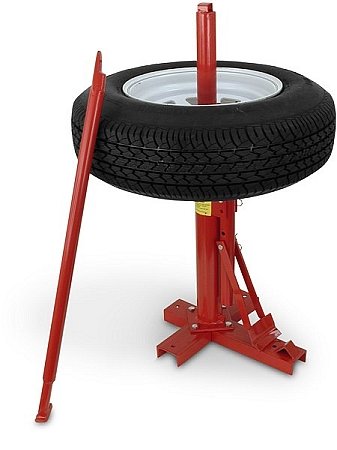
PowerLift Manual Tire Changer Base, 15-3/8-18-1/2"

Key features
- •Base: 15-3/8" x 181/2"
- •Rugged steel construction
- •Handles tires from 8 inch to light truck
PowerLift Manual Tire Changer Base, 15-3/8-18-1/2"
List Price: $98.34$88.51DEALYou Save: $9.83 (10%)
Free shippingFree Returns – 30 daysFree Order CancellationSecure Payment2–3 Days DeliveryGet It June 23, 2026In Stock (2)No marketing spamNo account requiredFulfilment by FedEx / Amazon / UPS / ShipwirePayPal / Card Buyer Protection
Customer Reviews
Reviews sourced from verified Amazon purchasers4.0
out of 5
Based on 10 reviews
5★
60%
4★
40%
3★
0%
2★
0%
1★
0%
Just like 60 years ago on the farm
Sabayon Linux User✓ Verified Purchase•October 6, 2023
Wow! there was one of these on the farm 60 years ago, and they have not changed at all, that I can see. First, it has to be bolted down to something substantial. Second, there is no protection for Alloy wheels, but you can make pads from a 5 gallon plastic bucket. Third, use lots of water base tire lube. A great upgrade is the tire "Mount/De-mount Bar" from No-Mar. Unfortunately the No-Mar Bar costs more than this changer. As is, it still beats using two tire spoons, or waiting half a day to get a tire changed at the service center. There are lots of videos online concerning this tool. Watch one or more before you buy one. You need an air compressor too.
good investment
teamwayne✓ Verified Purchase•October 1, 2023
This is a good investment for anyone. It eliminates waiting for long periods of time @ major tire centers while they totally ignore your business and think your tire replacements are not important. Then charge you a lot of money.
Make sure the changer is bolted to the floor before use. Use pleanty of lub on the tire, soap and water.(mix liquid soap and water in a spray bottle,this is a must)
Purchase a No-Mar Yellow thing or hand clamp to keep the tire beed from moving while your mounting and dismounting the tire...see No-Mar web site.
This is good for Drag racers in changing their slicks. Be careful with light weight aluminum rims so you don't scratch the edge or bend the rim with the tire spoon they provide, use extreme care and patience.(15x14 & 15x3)Also place 3 or 4 shop rags over the lower pointed bead breaker to reduce scratches(Once mounted use xtra seal bead sealer around the edge of the tire..#14-101 for a tighter seal)also use metal valve stems for lasting results.(use only the bottom rubber seal and top metal ring on metal valve stems)
Purchase the bubble balancer to go with this. I check some of my spun balance tires against it and it proved it's right on the money..can you believe that!!!
Buy your tires on line with free shipping change and balance them your self and quit being a slave to the tire centers!!
FYI;High performance cars with (15,16 & 17,18 ") rims are harder to seat the tire bead to the rim after mounting due to low profile tires and harder side walls, tire and rim width should be close to the same size. Also rubber valve stems work the best with these rims (small outside stem openings) use the rubber valve stem tool for this sold on line.(Gemplers)
If your having a problem with mounting sometimes just going to a different location on the wheel/tire(sweet spot) will make a big difference. why? It changes the angle of the tire spool to the rim/wheel. Also with some wide tires and extra large rims(over 17") you may need another person to hold up the other side of the tire to seat the tire to the rim. (inflate the tire)
Having a problem with inflation? After you have mounted the tire on the rim use the tire spoon and tap(push) the inside lower bead down all the way around as far as possible (push down on the upper inside to get to the lower inside) this will help seat the bottom bead, then pull up on the tire and inflate the tire ,pull the tire up to eliminate the gap in the top bead, the bottom bead should hold since you tapped(pushed) it downward. Once again be very careful with aluminum rims so not to bend, scratch up,break the lip off and totally damage it. Use all precautions to prevent this. Use duct tape over parts of the outside of the wheel where needed (Cobalt SS/plated/ polished rim) to prevent nicks and scratches, even on the tire iron end (spoon) if possible. Do not,do not,do not try to dismount the tire if it is not fully unseated from the rim all the way around, this will cause damage to aluminum rims. You should see the bead all the way around the tire when it is fully unseated from the rim. Try not use metal tire clamps on aluminum rims. (no-mar Yellow Thing for your tire clamp, maybe use more than one if needed) "You got this"
Para uso moderado
Amazon Customer✓ Verified Purchase•September 3, 2023
Lo compre para las llantas de mi máquina de cortar pasto, pero creo le falta un adaptador para rines de eje más chico
A Trick to mounting ATV Tires
Shawn✓ Verified Purchase•August 24, 2023
I bought this to change out a bunch of 4 wheeler (ATV) tires. It unbeaded them just fine. It was also pretty easy to get the old ones off the wheels. The main problem I encountered was with trying to mount the GBC Gators. Every time I would start to pull the bar around, the tire would just back up off the wheel.....Everyone said it couldn't be done cause of the stiffness in the new tires' sidewalls....After about an hour of this I figured out a quick trick. Take a motorcycle strap and hook it under the wheel onto the post, get the tires started on the wheel, pull the strap up over the started section of tire and hook onto the post at the top. Pull tight. this way the tire can't back off the wheel when you start rotating around the post. I mounted the rest of the tires and averaged about 15 minutes a tire after I started doing this.
I had so much fun with my new trick that I ordered four more tires for another ATV of mine....just so I could mount them. This things cool.....BTW, order the tire spoon. Not gonna happen without it.
Shawn
I had so much fun with my new trick that I ordered four more tires for another ATV of mine....just so I could mount them. This things cool.....BTW, order the tire spoon. Not gonna happen without it.
Shawn
why i bought it.
Jesse E. Shaw✓ Verified Purchase•August 17, 2023
A friend who does a lot of construction yard work uses one of these and said it works for him. So I bought it as the price was right.
Do not think for one second that this tool will break beads when the tire has been in place on a rim for 40 years as there will be rubber permanently on the rim ripped off the tire no matter how you do it. For that job I use a farm jack and the bumper of my jeep which still takes a lot of up and down work followed by wire brush on a 4.5 inch Makita angle grinder to remove the transferred rubber. For magnesium and aluminum rims you need to chemically soften the transferred rubber as the metal is too soft to safely power brush.
minimum bill of fare for an otherwise awkward job. This is not going to make the job easy but it will make the job possible and greatly reduce the effort as well as the likelihood of injury. Do not expect the instructions to tell you how to get the job done as not all tires of the same specifications require the same methods.
Example:
Hankook tires are very flexible and install easily with minimal or no tools. but inflating them is another matter without some means of using gravity to get the second bead to pick up. Lincoln magnesium rims are also difficult for the same reason with any tire but the band method will work. This tool gets the rim high enough to allow the tire to drop to where the incline side of the rim to engage the tire bead. You will be hard pressed to do that on the garage floor and a band method will not work because the tire will simply buckle before expanding.
Page 1 of 2