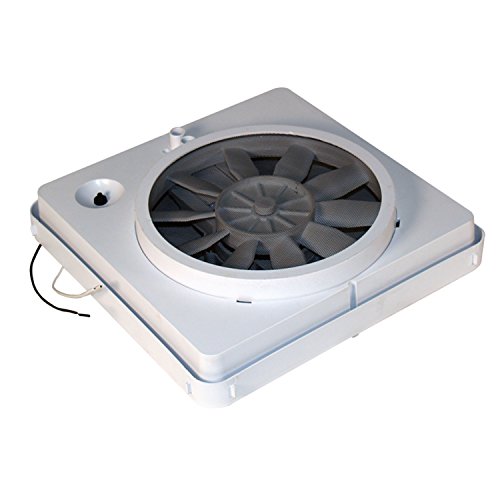
HENG’S INDUSTRIES Vortex I RV Vent Fan Kit | 12V | White | 14"x14" | High-Performance Replacement for Heng's, Ventline, Jensen, & Elixir Vents | 90043-CR


Key features
- •V
- •e
- •n
- •t
- •s
HENG’S INDUSTRIES Vortex I RV Vent Fan Kit | 12V | White | 14"x14" | High-Performance Replacement for Heng's, Ventline, Jensen, & Elixir Vents | 90043-CR
List Price: $117.78$106.00DEALYou Save: $11.78 (10%)
Free shippingFree Returns – 30 daysFree Order CancellationSecure Payment2–3 Days DeliveryGet It June 23, 2026In Stock (5)No marketing spamNo account requiredFulfilment by FedEx / Amazon / UPS / ShipwirePayPal / Card Buyer Protection
Customer Reviews
Reviews sourced from verified Amazon purchasers4.3
out of 5
Based on 10 reviews
5★
50%
4★
20%
3★
10%
2★
10%
1★
10%
Nice, looks good, but don't turn it on.
MN. JONES•March 13, 2017
This particular item was defective. I guess. I had purchased one previously and had to return it. This time I bought two to replace the vent fans in my RV. I tried to install the first of the two replacements today. The first one is just as noisy as the one I returned a few weeks ago. The blades aren't hitting wires or housing. All screws are tight. The motor is the problem, and without the blade the sound is amplified. It really sounds like the motor has no lubrication. I can't believe that all motors in these fans are this noisy. Otherwise how can it be said to be, "quiet?" I posted a video and you can see (hear) for yourself.
PS. I am tired today, so I will attempt to install the second in this batch, tomorrow. If it doesn't work, I'll edit this post to indicate the continued problem.
UPDATE: Today, I installed the second fan (one I ordered by mistake by inadvertently hitting one-click, by mistake and thinking I had cancelled it) and it is extremely balanced and quiet. I am sure Heng's has a quality control issue with their motor supplier. I have requested a prepaid shipping label to exchange the defective item--or credit it, however, the reseller wishes to proceed. I do want to keep the accidental order as I will install it in the RV dining area.
Great Product, Rough Installation
ChrisKindle•July 10, 2016
I gave this fan 5 stars based on how well it works. If I were rating the ease of installation I'd give it a 1.
I'm pretty handy and good with tools, so maybe it was some weird alignment in the stars that made this one of the most difficult things I've ever installed or assembled. It didn't help that it was over 100 degrees with high humidity in my RV the entire time (due to no hookups and a broken generator) It took me HOURS to install. I'd be embarrassed to admit how many! I hit a glitch on every single step. I only had help for a short while, and it was extremely difficult for me to hold my arms up long enough to get things in place and screw them in. Even my friends, who are also very handy, couldn't believe how hard it was to install. Having said that, I would still buy it again. I'm not a glutton for punishment, it's just a good fan once you've got it working.
Removing the old fan was easy, and the instructions were good for that. The installation instructions on the back of the box are written clearly, though there aren't any picture references other than the final image. Then there's a single page of instructions inside the box that you MUST refer to in the middle of the assembly, as there are differing instructions depending on which model fan you're replacing. That page is completely illegible and has blurry, impossible to decipher images that are necessary to understand. (Heads up: the gear box it refers to is on the fan itself, It is NOT the gear knob that remains on your vent after you remove the old fan.)
Other aids:
1) Use a magnetized, long screwdriver. Trust me.
2) Have a helper to hold the fan in place as you attach wires, screw in the screws, line up the gears, etc....
3) Remove the fan blade like it suggests. That way you can line up the gears, attach the fan (harder than you'd think) and THEN connect the wires.
4) If you hook it up and the fan blows onto you instead of pulling air out, just switch the wires you connected.
5) Attach the gear knob BEFORE you install the fan. It helps you line up the gears when you get to that step
6) Have various sizes of wire nuts on hand before you start. The little blue one it comes with wasn't big enough (my old fan wires were thicker than the new fan wires) and there was only one included. You need two.
7) If your installation goes the way mine did, try to keep a sense of humor. I had bouts of sobbing, shaking my fist at the sky, wanting to give up and still lots of laughs. It helps to have a good friend show up when you're ready to quit.
Nice upgrade, half the price of Fantastic Fan
Johhny80s•January 22, 2016
This is nice upgrade that anyone with a little diy knowledge can install. You will need a longer Phillips screw driver and maybe a pair of wire strippers. The process is easy and the directions are good. I bought this because I have a fantastic fan in my old toy hauler and it worked great to evacuate a smelly bathroom. I did not want to go through all the trouble and over twice as much cost to put in a fantastic fan so I thought I would try the Heng's fan. I've worked with the folks at Heng's before and they are super nice and helpful. As stated in other reviews this is a single speed fan were the fantastic fan is multiple speeds. The Heng's fan has plenty of speed and does great job of evacuating the room in case somebody releases a biological weapon in your rv bathroom. It took me about 30 minutes to install it. Another reviewer mention the screen hitting fan and yes that can happen but I pushed in on both sides of the screen and it popped out. For the price and effort you can't beat this fan. If you want the best go with a fantastic fan. If you want something that works well, is less than half the price of the fantastic fan and easy to install with out having to break the seal on the roof then the Heng's fan is for you.
A real pain in the Asssssssss
William R. Hyde•December 6, 2015
I was looking for a better vent fan for my shower. I picked this single speed because of all the problems I read about with the multi speed model.
My fifth wheel is a 2003 NuWa Hitchhiker. The vent opening is the standard 14 inch with a 6 to eight inch thick ceiling.
Once you get this fan installed it works pretty well, not to noisy and moves a lot of air. I had major problems with my install. First I had to make several changes to the metal frame of the existing fan box, next the plastic spacers on the edges of the fans frame had to be removed and longer screws where required to mount the fan to the existing cross bar below the vent cap.
The biggest issue was the existing vent crank extender was about half a long as it needed to be. After searching around I finely found a longer crank shaft for the handle replacement at a major RV parts and sales store, which added another $8.00 to the cost.
Tech Support: When I finally got connected to the manufacturers go-to tech, I found him pleasant but not very useful. He basically told me I needed to get on the roof, remove all the existing hardware and replacement it with something to would fit his product. Of course he didn't really know what that something was.
this fan sucks... but in a good way!
TechnoScribe•September 15, 2015
This is an excellent product and it really does work as described -- once you get it installed. However, the installation is not quite as push-pull-click-click as they make it sound. There are "condensed" directions on the outside of the box referring to detailed directions in the box. The detailed directions were not in the box! If the seller knew the directions were missing or this is an "opened box" type discounted product, the seller should make that clear in the product description. The directions on the outside of the box mentioned that it is easy to remove the fan blades with the enclosed tool (a small Allen wrench was all I could find). I never did figure out how to remove the fan blades. Having that piece out of the way would have made connecting the power wires much easier. Further, one wire nut was included and three are needed. Make sure you have a supply on hand before starting the install. Have a supply of flat-blade screwdrivers to hold it up into the hole while you drive the support screws.
Page 1 of 2


