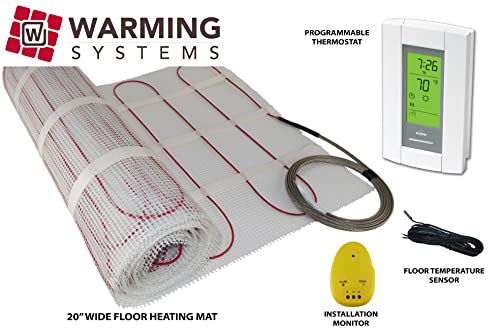
20 Sqft Mat, Electric Radiant Floor Heat Heating System with Aube Digital Floor Sensing Thermostat, Includes Installation Monitor and Floor Temperature Sensor


20 Sqft Mat, Electric Radiant Floor Heat Heating System with Aube Digital Floor Sensing Thermostat, Includes Installation Monitor and Floor Temperature Sensor
List Price: $333.20$299.88DEALYou Save: $33.32 (10%)
Free shippingFree Returns – 30 daysFree Order CancellationSecure Payment2–3 Days DeliveryGet It June 24, 2026In Stock (1)No marketing spamNo account requiredFulfilment by FedEx / Amazon / UPS / ShipwirePayPal / Card Buyer Protection
Customer Reviews
Reviews sourced from verified Amazon purchasers4.7
out of 5
Based on 10 reviews
5★
90%
4★
10%
3★
0%
2★
0%
1★
0%
nice addition
Henry G.✓ Verified Purchase•September 14, 2023
I had to redo my bathroom floor and was on the fence about the fear of installation on this radiant floor heating. We decided to bite the bullet and try it. I am very glad we did. Here is what we learned.
get a reliable Volt ohm meter. I used a fluke, but any decent one will do. Measure the resistance. (Touch the ends of the wires with the black and red leads from the multi-meter while on the setting that looks like a horseshoe). Just note the number. You don't have to do anything except make sure the wires don't get damaged. (If they do get damaged, the number will change when you check it again later). I wrote the number down on the drywall behind the medicine cabinet, so I could always retrieve it if needed. (make sure you get the number for the heat cord AND temperature sensor)
Here is the second issue that came up often on the web research I did. You have to bury the mat under a coat of thin set mortar (tile mortar). People complained that the mat would rise to the surface and create problems when they tried to lay down the tile. So here is where I tried something new. I found a product that 3M makes for gluing corner bead on walls when you drywall. I know the adhesive has to be strong, so I bought a bottle of that and sprayed the floor where the mat would sit. I also sprayed the back of the mat. The adhesive was so good, that it made ripping sounds on the soles of my shoes when i would walk in the area after I was done. One more note. The kit comes with a thermocouple. (What is that you say? It's a little temperature sensor attached to a couple wires. you just install that in the middle between two heat cords in the floor and run the wires to the junction box where you install the thermostat). It's not pre-installed so you can place it in the best spot for your particular floor.
I also used the Schluter Ditra decoupling membrane on the floor. (My substrate was concrete by the way, not cement board or plywood). I did the Ditra as I did the mortar for the radiant heat. I am a big fan of modified mortar knowing how well it adheres so I used that under the Ditra. I learned that isn't recommended, but in retrospect I don't know why. It worked great. (They said it wouldn't cure, that it might take weeks to cure, but I was in no hurry. It seemed to be rock solid in a couple days). I used a 3/8 notched trowel for the first step. I figure more mortar is better than too little. MAKE SURE you don't damage the radiant heat cord. That sounds like no big deal, but it's easy to do. The tendency is to bang the side of the trowel on the floor to knock the excess mortar off of it. If you do that on the cord you could break the insulation. I found I did it 3-5 times without thinking. (trust me, its easy to forget when you are in the moment) luckily, I did not hit the cord.
I used flexible conduit in the wall to run the heat cord to the junction box (It says to make sure you use metal conduit). I wish I had used a bigger rigid conduit. The flexible stuff I used was barely big enough to pull the wires through and almost messed up the job. After that, just install the tile. Wait a couple weeks and power everything up. ( The only part I am leaving out is that you have to install a double gang box with a single gang box reducer on it for the thermostat in the wall. The double gang box gives you plenty of space to stuff wires and the single gang box reducer holds the thermostat). I guess I also assumed you know the whole unit will need a 110 volt GFCI power source. I just used the extra leads on my GFCI bathroom outlet. Depending on the amount of mats you use you may need some real amperage, but for this unit I used a single 15 amp breaker in the main power box for the house.
We waited a few weeks for everything to settle checked the resistance in the wires. (Both the thermocouple and the heat mat cord to make sure the numbers hadn't changed). and powered everything up. It took almost 48 hours for the floor to heat. ( I was pretty nervous when the floor didn't get warm right away, but after web scouring I found that was normal). Concrete is quite a heat sink, but heat can only go up, so eventually the floor got warm and it's something I will be happy I did for the rest of the life of the bathroom.
One more note if you aren't too bored yet. I used epoxy grout for the first time. I used spektra lock. I was nervous about it, not knowing if I was going to ruin the tile, (many people said it's difficult to clean off the tiles when applied) but if you follow the directions, it was very easy to do and NEVER needs sealing. (you just need vinegar and hot clean water). This grout is the stuff they use on tile floors in commercial kitchens for stain and chemical resistance. I'm really happy I used this. I spilled a little water on the floor when I was looking over the tile job and it beaded up on the grout in little spheres. (Yes!) Regular grout is by nature absorbent and you don't want that in a mildew and mold attraction environment. Another thing you will be happy you spent the extra 40 bucks on.
Thank you so much for your time. I know that was long, but I found that information very difficult to find and I thought I would consolidate it here for you.
and I couldn't be more pleased.
Thomas M Kenyon✓ Verified Purchase•September 8, 2023
A little trepidation installing this product due to the warnings about checking the resistance. I kept thinking, "is it really that fragile?!" No, I don't think it is - I assume the people who have had trouble installing this in the past are simply very careless with their tools. Minor annoyance installing it - the corners of the mat on the back curled up a bit here and there, poking out of the self-leveling compound I poured over it - a tiny dab from a hot glue gun might have solved it, but I was reluctant to use anything. Still, that had no effect on the final product. If I did it again, I wouldn't get the mat type - I'd get the type with metal connectors that could be secured to the floor, with the heating element wound back and forth between these connectors. Overall, very simple to install. The programmable thermostat allows a ton of flexibility. First time I've installed such a product, and I couldn't be more pleased.
Great and cheaper than the rest!
Justin✓ Verified Purchase•September 2, 2023
I purchased two of these warming mats about a year ago and installed them in January of 2012. It is recommended that a curing period of 1 month be observed for the thin set to dry completely so I did not get to use them much last year as we had a warm spring. As mentioned I bought two mats and did two bathrooms. I felt like I was taking a bit of a risk with no reviews on this product and limited information but they were cheaper than I could find the mat and thermostat anywhere else. The math may have changed by now but these were a bargain and I see the price remains the same now (nov-2012) as when I purchased them. I did do a lot of research before going this route and came to the conclusion that the real value in these kits is in the controller and in this case this is an absolutely great controller/thermostat. It is easy enough to set up and offers all the programmable options I wanted. Aube is a high quality brand even if they are not as well known in the mainstream as some others. I went with the mats because they worked well for my bathrooms but depending on design I would not hesitate to use the cable. The mat was well made and relatively easy to install. This was my 5-6 tile job and it does add a little difficulty to the job but nothing an experienced DIY'er can't handle. The biggest concern is getting the tile with the mat under it to sit at the same height as the tile without mat under it. I used thin set to set mine on top of backer board and just was conscious to use more thin set (different trowel) on the tiles without mat under it and it turned out fine. The other option is to use self leveling compound but that would have added more height to the floor and I wanted perfect transitions to the surrounding floors. I am capable of doing the electrical and did so but if you are not familiar with household wiring, GFCI's etc I would recommend this part be farmed out to someone who can. Just follow the directions locate the temperature sensor correctly and be careful of the wire as you work and you should be fine.
This year I have been using them more and more as we get into the winter months and boy do I love these. They start giving noticeable heat to your feet in 15-30 minutes but should be left on for about an hour to get the full effect. I do not try to use them to warm the room so can't comment on that. With the controller it makes it easy to have the floor all warmed up for a morning shower without having to do a thing.
To summarize:
Great product, relatively simple install, awesome controller, mat works well to aid install, and the end result is simply fantastic. My bathrooms were always a little cool and getting out of the shower onto a warm floor while I shave or whatever is just great. There are a lot of options when it comes to a floor warming system but for my money I think Warming systems Inc had the best value I could find and a great product.
I will be doing 4-5 more bathrooms this winter for family/friends and will be using this product again where a warm floor is wanted.
Best Thing I Installed Over 8 Years ago
ErNoVa2112✓ Verified Purchase•August 28, 2023
This review is from a product I had installed in August 2014. This was probably the best decision I made to have it installed in a small upstairs bathroom where I did not have any type of heat source. At the time I did not really care that there was no heat in this small bathroom, but in hindsight realize it was the best decision I made, because it has worked so far flawlessly for over eight years. It was also relatively easy to install.
just installed, first impression good.
L. Sandino✓ Verified Purchase•August 13, 2023
So I got this about a week ago and just installed it this past weekend (11/9/19).
I followed the instructions and laid it out, cut the mesh and flipped it then had to cut some more to make fit (see pictures). The double sided tape helped the wire stick to the floor but you really have to rub it in... if ya know what I mean. I suggest using a bit of hot glue to help stick it down (you need glue anyways for the main wire and sensors). Looked good so I put two sensors down (main and spare) and glued those in place. Then made a hole in the wall under the trim (so I didn't have to patch) and pushed the wires up. I was able to tap off of the GFCI outlet already in the room instead of running a whole new line like my original plan. I tested both sensors and they seem to work. Default goes to 82 degrees, I put it to 84 and it seems to work okay, need to run more / test to see how warm it actually gets. (Seems to heat up fast according to thermostat). Anywho.... so far 5 stars hoping it stays that way. Oh almost forgot, make sure to use enough mud!
I followed the instructions and laid it out, cut the mesh and flipped it then had to cut some more to make fit (see pictures). The double sided tape helped the wire stick to the floor but you really have to rub it in... if ya know what I mean. I suggest using a bit of hot glue to help stick it down (you need glue anyways for the main wire and sensors). Looked good so I put two sensors down (main and spare) and glued those in place. Then made a hole in the wall under the trim (so I didn't have to patch) and pushed the wires up. I was able to tap off of the GFCI outlet already in the room instead of running a whole new line like my original plan. I tested both sensors and they seem to work. Default goes to 82 degrees, I put it to 84 and it seems to work okay, need to run more / test to see how warm it actually gets. (Seems to heat up fast according to thermostat). Anywho.... so far 5 stars hoping it stays that way. Oh almost forgot, make sure to use enough mud!
Page 1 of 2


