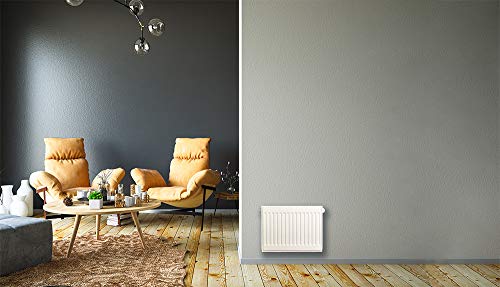
Warming Systems 50 Sqft Electric Radiant Floor Heating Mat – 120V Heated Tile Floor System with Programmable Thermostat (TH115), Floor Sensor, Installation Monitor & 25 Year Warranty, USA Made


Key features
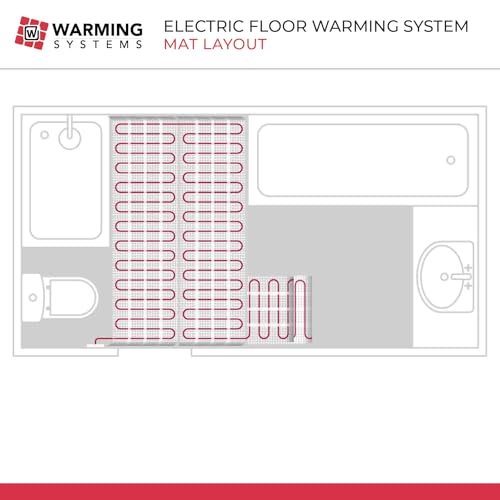
- •50 Square Foot Under Tile Heating Mat, Mat is 20" Wide x 30' Long, 120 Volts
- •Highest Quality Heating Cable, Twisted Pair for Zero EMF, Single Cold Lead, Very Thin
- •Mesh can be cut (do not cut wire) to heat other shapes.
- •Includes Honeywell/Aube Digital Floor Sensing Thermostat with Floor Sensor Wire(model TH115-AF-120S)
- •UL LISTED for USA and Canada.
Warming Systems 50 Sqft Electric Radiant Floor Heating Mat – 120V Heated Tile Floor System with Programmable Thermostat (TH115), Floor Sensor, Installation Monitor & 25 Year Warranty, USA Made
List Price: $451.05$405.95DEALYou Save: $45.10 (10%)
Free shippingFree Returns – 30 daysFree Order CancellationSecure Payment2–3 Days DeliveryGet It June 24, 2026In Stock (30)No marketing spamNo account requiredFulfilment by FedEx / Amazon / UPS / ShipwirePayPal / Card Buyer Protection
Customer Reviews
Reviews sourced from verified Amazon purchasers4.5
out of 5
Based on 10 reviews
5★
70%
4★
30%
3★
0%
2★
0%
1★
0%
Great product and cheaper than the rest!
Justin✓ Verified Purchase•October 4, 2023
I purchased two of these warming mats about a year ago and installed them in January of 2012. It is recommended that a curing period of 1 month be observed for the thin set to dry completely so I did not get to use them much last year as we had a warm spring. As mentioned I bought two mats and did two bathrooms. I felt like I was taking a bit of a risk with no reviews on this product and limited information but they were cheaper than I could find the mat and thermostat anywhere else. The math may have changed by now but these were a bargain and I see the price remains the same now (nov-2012) as when I purchased them. I did do a lot of research before going this route and came to the conclusion that the real value in these kits is in the controller and in this case this is an absolutely great controller/thermostat. It is easy enough to set up and offers all the programmable options I wanted. Aube is a high quality brand even if they are not as well known in the mainstream as some others. I went with the mats because they worked well for my bathrooms but depending on design I would not hesitate to use the cable. The mat was well made and relatively easy to install. This was my 5-6 tile job and it does add a little difficulty to the job but nothing an experienced DIY'er can't handle. The biggest concern is getting the tile with the mat under it to sit at the same height as the tile without mat under it. I used thin set to set mine on top of backer board and just was conscious to use more thin set (different trowel) on the tiles without mat under it and it turned out fine. The other option is to use self leveling compound but that would have added more height to the floor and I wanted perfect transitions to the surrounding floors. I am capable of doing the electrical and did so but if you are not familiar with household wiring, GFCI's etc I would recommend this part be farmed out to someone who can. Just follow the directions locate the temperature sensor correctly and be careful of the wire as you work and you should be fine.
This year I have been using them more and more as we get into the winter months and boy do I love these. They start giving noticeable heat to your feet in 15-30 minutes but should be left on for about an hour to get the full effect. I do not try to use them to warm the room so can't comment on that. With the controller it makes it easy to have the floor all warmed up for a morning shower without having to do a thing.
To summarize:
Great product, relatively simple install, awesome controller, mat works well to aid install, and the end result is simply fantastic. My bathrooms were always a little cool and getting out of the shower onto a warm floor while I shave or whatever is just great. There are a lot of options when it comes to a floor warming system but for my money I think Warming systems Inc had the best value I could find and a great product.
I will be doing 4-5 more bathrooms this winter for family/friends and will be using this product again where a warm floor is wanted.
Does a great job........
JC2✓ Verified Purchase•October 2, 2023
I'm sort of a closet This Old House guy who can do pretty much anything, as long as no one is watching me do it, so when the wife decided that she would like our new tile floors in the remodeled north facing kitchen to be heated, I thought sure................I can do that. After a lot of research I decided on the warming systems mat package with thermostat.
Wow! What a job! NO fault with the product though............my issues were more with the prep of the floor. According to the company's technical assistance guy (who was excellent to deal with), you need to install over concrete backer board and then tile over the mat or pour a self leveling mortar mix over it to to encapsulate the mat. If you go the self leveling route, you then lay the tile over the cured mortar base, creating a virtual heat sink once it all warmed up. Lots of work as you have to be careful not to nick or damage the wires once they are down.
The instructions that came with the mat were clear and concise, the product was easy to trim and layout to fit our floor and the electrical connections were as easy as anything I've dealt with. The only caveat is that you have to make sure all of the micro switches in the thermostat are set properly.
After getting the whole project completed, I turned on the power and then the thermostat and .......nothing happened! As it turned out, two of the micro switches were in the wrong setting. Once that was fixed, all systems were go and the floor heated to 82 degrees in about an hour. The programmable thermostat made sure the floor was warm when we got up in the am and turned itself down at night. The floor didn't really feel warm until you touched a tile where no heating elements were present. What a HUGE difference in the temperature and what a HUGE difference this product made in the comfort of our home!
This was money well spent and the product is very cost competitive, especially compared to the systems available at the big box stores.
As advertised
Kevin Lammert✓ Verified Purchase•September 25, 2023
Basement bathroom
Works well, good deal with thermostat
A. Newhouse✓ Verified Purchase•September 21, 2023
Summary: I purchased this for a bathroom remodel, installation went smoothly, and I'm very happy with the result. My wife's cold toes are even happier with it!
More detail: This is the first time I've installed a heat mat of any sort, and in fact the first time I've tiled a whole room on my own. Despite my beginner status, the whole process went smoothly. I did all the wiring first (power to the heat mat, thermostat control to sensor), then installed cement backer board. I put this heat mat directly on the backer board, using plenty of staples on the mesh part (not over wires) to hold it in place. (If you have an air compressor, I highly recommend a Surebonder 9600A, Heavy Duty Staple Gun with Case any time you do a lot of stapling. Much faster and less tiring.) You have to know the exact size and location of all your bathroom fixtures at this point, so the mat doesn't extend underneath anything permanent. Don't forget to place the thermostat sensor on the floor between wires at this stage also. I cut a little gouge in the backer board, so the end of the thermostat sensor wouldn't stick up so far. After I got all the tiles cut, I put thinset over the top of the mat. This is a little tricky, because you want a thin layer of thinset on top of the mat itself, being careful not to gouge the heat wires with your trowel, and then you want a thicker layer outside the heat mat, so the tile ends up level. Just be aware of it, and make sure you have plenty of thinset on hand. I didn't have any problems using a metal trowel over the heat mat; just be gentle and don't scrape through the wire. It's also tricky to apply thinset & place tiles after the heat mat is in place, because you need to be very gentle walking/kneeling on the heat mat. Then finish tiling as you normally would.
I have not used this through a whole winter yet, but we've had several chilly fall days and it has worked wonderfully. As with most complex timer thermostats, he thermostat programming is not especially intuitive, so keep the instruction manual handy. But the instructions are clear, and once you get it set up it works well with the various automatic / timer modes.
Overall, I have no complaints about this product, and it was the best deal I could find if you also intend to buy an auto/timer thermostat.
Happy feet!
Sebas✓ Verified Purchase•September 12, 2023
Every morning I go into my new bathroom I think: "NICE"! And it is indeed! This is also a very good value - you get the mat, the sensor, and the thermostat.
I installed this mat in my basement bathroom directly on the cement slab. Before installation measure the resistance and make sure it is within the range specified on the wire tag. Also, measure the sensor resistance and also make sure it is working properly. I installed one extra sensor Honeywell AC112-01 Electric Heat Floor Sensor just in case the first one dies out (imagine installing everything and having no heat because of a busted sensor).
It is fairly easy to lay it down, and to cut the netting (not the red wire!) and arrange on the floor. However, the wire tends to lift at every corner when changing the direction. If you have wood subfloor you can staple the net, but in my case I was able to make it stay flat brushing it under and then over with the primer for the self-leveling concrete (my floor was very uneven). I put about 1/2" of self-leveling over, then I placed the sensor under the tile (not with the mat) as I wanted the temperature reading to be more realistic. It takes less than 30 minutes to get from 68F to 76F.
They specify that you need conduit, so I had some old 12/3 wire with metallic jacket, I pulled the wires out and used the conduit from the floor (through the stud) to the connection box. From the connection box to the thermostat I used regular 14/2 wire (this thing is drawing 3A, uses 360Watt and it requires a GFCI breaker).
The thermostat is not the best - you can program 4 different time periods per day but only 2 temperature setting (?!?!). Night time, with day time share the same temperature, as do morning and evening (you can use only 2 periods if needed: day and night). What if I am home the whole day and want some heat but not as low as during the night? What if I want a different temperature in the evening vs the morning? Tough luck. Well, this is the thermostat issue, not a heat mat issue, so I don't want to deduct any stars here even though I feel compelled to...
I have it at 76 in the morning and evening, and I have an infrared thermometer and it is spot on. The thermostat cycles on and off pretty quietly, and not too often.
I purchased the 30ft mat, but in all honesty the 20ft one would have been enough (only 240 watt). They mention that you should not install the mat too close to the wall or under fixtures anyway. When making the decision which one to get, think where your feet are touching the floor, and where would you actually appreciate the heat. For me it's too late to change now...
All in all I am very happy with it. Would I purchase it again? Definitely. But If I had just a tad more money, I would look into the Ditra Heat. Just saying...
Page 1 of 2