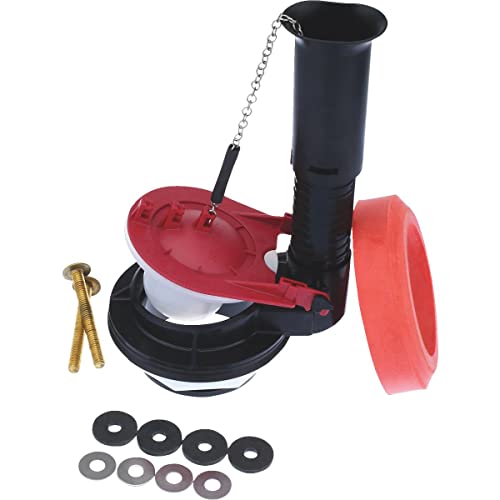
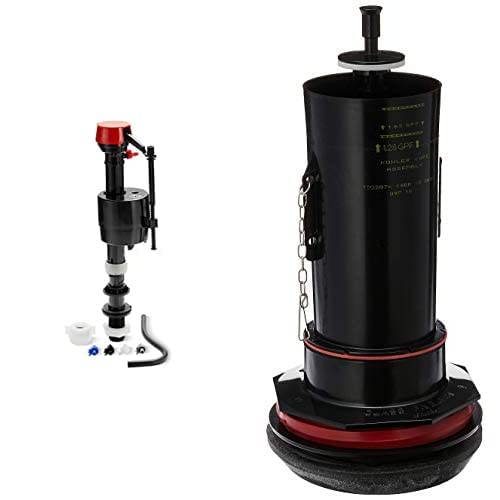
KOHLER GENUINE PART 87998 Toilet Flush Valve Kit, Compatible with Gabrielle, Santa Rosa, and other Kohler toilets, Corrosion resistant


Key features
- •Protect the warranty on KOHLER products, always look for the KOHLER GENUINE PARTS logo
- •Flush valve kit for Gabrielle, Santa Rosa, and other KOHLER toilets
- •Compatible with the following KOHLER models: Santa Rosa 3323, 3803, 11899, Gabrielle 3322, 14257, 14258, 14286, Kathryn-3324, 14268 and other various models
- •Corosion resistant
KOHLER GENUINE PART 87998 Toilet Flush Valve Kit, Compatible with Gabrielle, Santa Rosa, and other Kohler toilets, Corrosion resistant
List Price: $35.99$32.39DEALYou Save: $3.60 (10%)
Free shippingFree Returns – 30 daysFree Order CancellationSecure Payment2–3 Days DeliveryGet It June 25, 2026In Stock (15)No marketing spamNo account requiredFulfilment by FedEx / Amazon / UPS / ShipwirePayPal / Card Buyer Protection
Customer Reviews
Reviews sourced from verified Amazon purchasers4.4
out of 5
Based on 10 reviews
5★
40%
4★
40%
3★
10%
2★
0%
1★
10%
Hard to install but does the job
Mr. Analog✓ Verified Purchase•September 23, 2017
In principle it's easy as pie, just push down and twist. But as others have said it is difficult to install. You need to apply 100-150 pounds of downward force to compress the gasket. I put a towel over the hole and leaned on it with as much of my body weight as I could direct to it. With the other hand I twisted it, which got it partway turned. With weight applied I got it to turn the rest of the way by lightly tapping the back with a small hammer. Do use dishwashing soap on the gasket as other have suggested.
If you are small, you will probably need to get some help.
If you are small, you will probably need to get some help.
Here's how to install the thing.
Mark✓ Verified Purchase•April 29, 2017
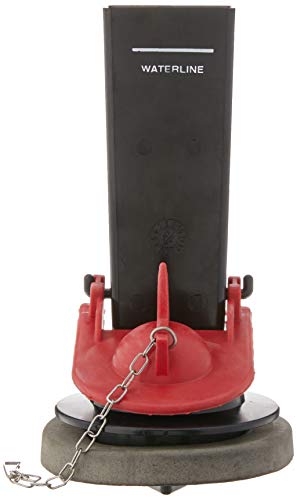
Perfect fit for my Kohler toilet. I installed 3 of them. (My wife used some of those drop in the tank cleaner things that destroyed the old ones). Installation wasn't bad. Rotate the old one to get it out. It doesn't matter which direction. Go with the easiest. Then to install the new one, put a little liquid soap on the plastic where the large seal will go. Install the large seal. REMOVE the flapper. This allows you to grip the unit with your thumbs and index finger knuckles as you push down hard and rotate it into place. Install the flapper and start flushing.
NO INSTRUCTIONS - read the reviews to see how to install - otherwise, it works as intended.
Bill✓ Verified Purchase•February 3, 2017
Please make sure to read the reviews about how to install this item. It does not come with ANY instructions and there is not much on the internet, other than the Amazon reviews that tell you how to install it. Many of the reviews talk about how difficult it is to install. However, if you follow the advice in the reviews it goes in very easily. That advice is: 1. put the grey gasket in a sandwich bag and then in the freezer for 30-60 minutes or so (I forgot and left it in for about an hour). 2. Remove the red flapper from the black valve. 3. After the grey gasket has been in the freezer for about an hour, coat both the top AND bottom of the gasket with vegetable/olive oil. 4. Put the gasket on the bottom of the valve. 5. Align the triangle tabs with the triangle hole and press down on the unit and turn until the back of the valve is parallel to the back of the toilet tank. 6. Install the red flapper; 7. Hook up the chain to the handle and, voila, you're done! It took about 5 minutes after I took the valve out of the freezer and it works great now (the toilet had been running every couple of hours because the old gasket leaked). I took off one star because the valve does not come with any instructions.
hard to install, but otherwise a perfect replacement
J. York✓ Verified Purchase•December 14, 2016
This was a perfect fit for my Kohler Santa Rosa 1.6gpf toilet. As other reviews have indicated, this part is an absolute beast to install. Like others, I recommend you put some sort of vegetable oil or other lubricant on the side of the gasket that faces the tank as well as on the plastic tines that will clamp to the underside of your tank. Hopefully this will last me another 10+ years!
Well made, perfect fit, needs instructions
Joe D✓ Verified Purchase•September 17, 2016
Well made, perfect fit as a replacement part, but really should include instructions in deference to the DIYs, the likely customer for this kit. The foam seal needs to be heavily compressed for the flush valve to seat and twist into position and it is difficult to get the right leverage to apply enough force. I ended up placing the seal in the freezer for half an hour to compress it before installation, which made the job easy.
Page 1 of 2