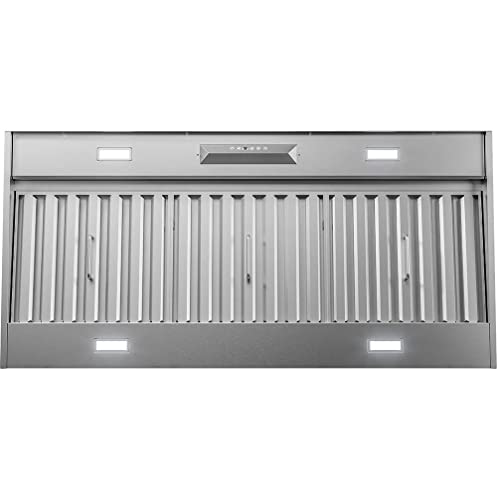
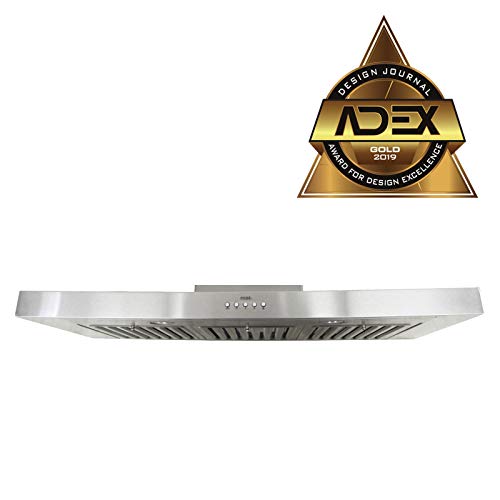
KOBE Range Hoods RAX2130SQB-1 30 Inch Under Cabinet Range Hood, 30-Inch, Stainless Steel


Key features
- •Durable commercial grade stainless steel with seamless design and satin finish
- •Product dimensions – 29.75" L x 20" W x 12.18" H | Thickness – 2.37" | Exhaust – Top 6" round | Duct cover – 10.62" | Min/max clearance from appliances – 26/30 inches | Noise rating – 40 dB | Internal blower – 750 CFM
- •3-speed mechanical push button with QuietMode, low, and high. CFM / Sone-440 / 2.2 / Low
- •Bright 3W (x2) LED lights to vividly illuminate your cooktop | Consumption/Ampere – 300 W / 2.5 A
- •KOBE unique design, which includes easy to empty catch areas and smooth hood surface, lets you clean the fans without disassembling the hood | The hood has a thin body suitable for taller cabinets where the motor can insert into
KOBE Range Hoods RAX2130SQB-1 30 Inch Under Cabinet Range Hood, 30-Inch, Stainless Steel
List Price: $638.92$575.03DEALYou Save: $63.89 (10%)
Free shippingFree Returns – 30 daysFree Order CancellationSecure Payment2–3 Days DeliveryGet It June 24, 2026In Stock (1)No marketing spamNo account requiredFulfilment by FedEx / Amazon / UPS / ShipwirePayPal / Card Buyer Protection
Customer Reviews
Reviews sourced from verified Amazon purchasers4.1
out of 5
Based on 10 reviews
5★
30%
4★
70%
3★
0%
2★
0%
1★
0%
Very sleek
Dania Marthens✓ Verified Purchase•November 8, 2023
Set out to look for a vent hood that was slim enough to sit just underneath the upper cabinet above our stove. The existing one installed by the builder was large and hung so low that anytime I cooked on the stove, I had to duck otherwise I would get a severe head injury. The existing hood - knowing I was utterly clumsy - was bound and determined to leave a nice indent in my head. RUDE!
The Kobe hood took care of any future injuries I may have endured. This is a great hood and worth every penny! It's sleek, has good lighting (that doesn't heat up - LED!), good suction with different speeds, quiet mode is super - you guessed it - quiet, and restaurant style baffle filters that are easy to clean.
The only issue was losing space and making a larger hole in the upper cabinet to accommodate for the hood mechanicals/duct work.
The only one that fit our slim requirements
David Kieras✓ Verified Purchase•October 13, 2023
This really was the only range hood that fit our slim fit requirements. Yes, we had to do a little creative cabinetry to fit the motor in the cabinet. And the wall mounting and cabinet mounting could have been a bit more robust. The exterior portion really flexes a little and we had to drill a couple of additional mounting holes so it didn't sag. Occasionally the motor makes a little noise but a little whack on the motor shuts it up...I am sure a little realignment would help.
Noise: yeah, no matter what you do, moving that much air is gonna be noisy. That being said, we were just happy to have an exhaust vent and tolerate the noise. We have a direct vertical 6" round exhaust through the roof so there are no restrictions. If you use the highest setting, you will need to crack a window if your kitchen is small. That speaks well of its ability to move volumes of air.
The unit looks nice and performs well. We really have found no need for the lights so we don't know whether we might have the same issue as others. The filters are easily cleaned.
Based on code calculations, I think this also is one of the few units that pulls the required CFM for our new stove. I can't remember how I came up with those calculations but a Google search will do you well.
The reason I rated this 4 instead of 5 stars is because the mounting could have been better designed with some extra mounting locations for fasteners.
One really nice thing is that their instructions are available online.
The finish seems very nice and the buttons feel good. It's a little slow to start if you start it on the Quiet setting.
That being said, despite the small flaws, an enterprising person with the need for a super-slim installation should do well with this unit.
Working nicely
Jeff Engel✓ Verified Purchase•September 10, 2023
We needed a new range hood that would be more powerful and higher above our stovetop, and this was the best option. The blower motor fits up in the cabinet "“ be sure you look at the schematic diagram because the photos on this listing don't show how massive that part is. It takes up most of the bottom shelf of the cabinet, and the 6" duct pipe takes up most of the top shelf. It was tricky fitting this into the cabinet because our cabinet was just barely big enough front-to-back.
The unit is entirely supported by two sturdy metal straps or tabs that can be seen in the schematic (labeled "8-3/8"). I had to cut out part of the thin back wall of the cabinet to run a horizontal board against the wall and secure it to the wall studs, so that I could secure the straps to that board, because otherwise only one of the straps would have been over a stud and the other just over sheet rock.
There are some locknuts sticking up from the apron right next to the blower tower (not shown in the diagram) that would prevent the apron from coming up flush with the bottom of the cabinet, but I used a chisel to carve out slots for them to fit up into (you could also use a drill for this if you are great at measuring). In the end, the apron seemed to sag a bit at the corners, meaning that there was a very slight gap between the bottom of the cabinet and the top of the apron at the sides "“ either because the sheet metal isn't quite stiff enough or because the unevenness of the cabinet bottom pushed it down. I used an angle brace under one side (where it was next to another cabinet) and on the other side I took out the grease filter and drilled through the sheet metal into the cabinet edge and screwed a mending brace on the underside of the sheet metal (inside the apron where it doesn't show unless you remove the grease filter) and that snugged it up nicely.
One tip is to run the blower a few times before completing the duct work. There were lots of little styrofoam beads in it because of the way it's packaged for shipment, and those all got blown out after a few tries. Otherwise if your duct cover has mesh, all the styro beads will get trapped on the inside when you finally turn on the hood.
Made very cheaply but good bargain
Kevin W✓ Verified Purchase•September 7, 2023
This is a pretty good bargain if you buy the scratch and dent version from Amazon for $200. Ours came in greate condition, the only problem was a small scratch in an area you can't see once it's installed anyway so who cares? If I had to pay more than $200 for this I would be a bit unhappy due to the quality or lack thereof for the unit. The LED lights are a bit harsh and have a terrible color temperature and flicker slightly. This is VERY easy to modify and remote the blower in the attic if you were so inclined. I did that and it's great, makes for much quieter experience. You will need to lengthen the control wires, and you will need to fabricate a small metal plate to cover the hole once you remove the fan housing. You're going to need another metal plate for the side of the fan housing. You will need two rectangular to 6" adapters to attach to the top of the collection unit and to the fan housing. I suggest you also get a couple eye hooks with 1/4" threads to hang the fan assembly once you've remoted it, as well as some HVAC noise dampening hangers to hang from.
Requires surgery on your cabinets
Jonathan✓ Verified Purchase•September 7, 2023
Just one thing to clarify, in case it's not obvious from the other reviews: this isn't really an under cabinet range hood. It's wall mount. You could add a vent cover and use it free standing and it would look great.
Everyone seems to buy it to mount under a cabinet though, and based on the description and the reviews, that's why we bought it too. And it can work great as an under cabinet exhaust hood. We're really happy.
What you need to know: it mounts to the back wall. If you want to mount it under a cabinet, you will have to cut away the back of the cabinet to expose the wall. And I don't mean just cutting a hole. You have to remove a big portion of the the back and bottom of the cabinet, structurally altering it, so that the entire body of the range hood can touch the back wall. You will need tools, like an oscillating saw or a dremel, plus a drill.
Once you've done that, you can hang it on the back wall with two screws. Chances are that you won't have studs located in the right spot, so you'll be using drywall anchors. And then in all likelihood, as other reviewers have noted, it won't fit tightly and evenly against the underside of the cabinet. You'll need to drill holes through the metal underside of the hood and screw it to the bottom of the cabinet. We used four screws.
In our case, the vent opening was a different size than our old exhaust hood, and it was not lined up nicely, so just adding an adaptor did not fix it. No standard duct fitting would connect it to the vent in the back wall, because the angle was too tight. To make it work, we had to do more surgery, modifying the standard duct pieces that you can buy at a hardware store, and taping them up nicely to make an airtight seal. This ended up as a much more complicated job than we'd expected and it pushed the limits of what we can do ourselves.
If that sounds like too much effort for you, a handyman or contractor should be able to get it installed perfectly.
Once you realize that it's not exactly an under cabinet hood, and that you can modify the cabinet to install a wall mounted range hood, well, that opens up some possibilities. A lot of wall mounted range hoods could be installed inside a cabinet with enough carpentry work.
We're really happy. The only minor complaint, apart from the difficulty of installation, is that we wish it had touch controls rather than physical buttons for cleanliness. But that's very minor. We love it.
Page 1 of 2