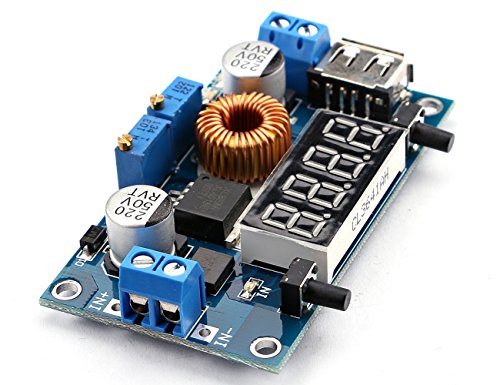
Yeeco DC Buck Converter DC-DC Step Down Voltage Converter 7-36V to 1.25-32V Adjustable Step Down Power Supply Module Volt Regulator Board Buck Transformer with LED Display & CC CV Mode

Key features
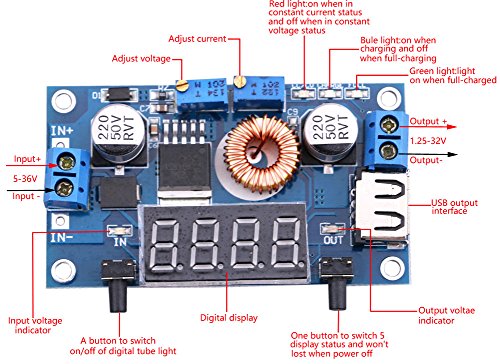
- •Output voltage :1.25-32V continuously adjustable,default output 17V. Output Current : 5A MAX( Please use it within 4.5A)
- •Input voltage:DC7-36V ;Output voltage:DC1.25-32V (Continuously adjustable) 36V to 24V 12V 5V 3.3V 3V
- •Without Input reverse polarity protection, meaning meter will burn when connected reversely
- •Use as battery charger,high power constant current LED drive module,normal Step-down modules with over current protection capability
- •Short circuit protection ,Over temperature protection;Output is more than 3A/35W, please enhance heat dissipation
Yeeco DC Buck Converter DC-DC Step Down Voltage Converter 7-36V to 1.25-32V Adjustable Step Down Power Supply Module Volt Regulator Board Buck Transformer with LED Display & CC CV Mode
List Price: $22.68$20.41DEALYou Save: $2.27 (10%)
Free shippingFree Returns – 30 daysFree Order CancellationSecure Payment2–3 Days DeliveryGet It June 23, 2026In Stock (1)No marketing spamNo account requiredFulfilment by FedEx / Amazon / UPS / ShipwirePayPal / Card Buyer Protection
Customer Reviews
Reviews sourced from verified Amazon purchasers4.0
out of 5
Based on 10 reviews
5★
70%
4★
10%
3★
20%
2★
0%
1★
0%
Pretty cool..well worth it.
Kevin M.✓ Verified Purchase•September 9, 2017
First, keep in mind that it's 15 bucks...So based on that its a 5 star piece for what it does...I personally just bought it to experiment and play around with. Perfect for that and arrived 2 days early.
easy interface, hasn't failed me yet
B&E✓ Verified Purchase•September 1, 2017
Solid unit, easy interface, hasn't failed me yet. I have used this with a wide range of power supplies and current draws. I bought one of this companies cheaper units and it failed OOB but Amazon quickly accepted the return so I bought this beefier unit and it's done right by me.
Nothing to complain about.
mykeowl✓ Verified Purchase•June 3, 2017
Except for the documentation there's really nothing to complain about. I needed it to measure the current been drawn by a project I built for my car and it did it perfectly.
When I first turned it on, the 5.03v on the display read 5.25v on my fluke so it needed to be calibrated. Step 1 in the documentation says
"When power outages, long press left button to access the power supply ".
What does that even mean?
What I did was, 1. Pull the plug, 2. press and hold the left button and plug it back in. The display started blinking and I was now in the calibration mode. 3. Use a good DMM and the two buttons to adjust the display to 5v and you're done.
I also put my meter in series with it to measure the displayed current and it was pretty accurate.
It's small, looks nice and like a few other reviewers, I use an old laptop PS with a 19.5v output and I can adjust down to just about any voltage I want.
Since I'm only drawing 20ma I can't speak to the regulation but I'd certainly recommend it.
HOW TO SET CONSTANT CURRENT (AMPERAGE)
Jerry✓ Verified Purchase•May 23, 2017
Works great.
For those wondering how to set a constant current (amperage) for your load, first power it and set a low output voltage such as 12v then connect the two output terminals (yes the positive and negative output terminals). It brings up a different screen then you can adjust the "ADJ-I" potentiometer to set your desired current (amperage) load make sure your input amperage can support a little more what you desire on the output. Disconnect the connection between the outputs and then reconnect to your load, then you can adjust to whatever voltage output you need to power your device the higher you go the more amps it will draw up until the limit you set it at, you will notice the CC SMD LED slightly glow sometimes because its working!
For those wondering how to set a constant current (amperage) for your load, first power it and set a low output voltage such as 12v then connect the two output terminals (yes the positive and negative output terminals). It brings up a different screen then you can adjust the "ADJ-I" potentiometer to set your desired current (amperage) load make sure your input amperage can support a little more what you desire on the output. Disconnect the connection between the outputs and then reconnect to your load, then you can adjust to whatever voltage output you need to power your device the higher you go the more amps it will draw up until the limit you set it at, you will notice the CC SMD LED slightly glow sometimes because its working!
Five Stars
Raul M. Rojas✓ Verified Purchase•May 17, 2017
son used it in his special project, got an A
Page 1 of 2