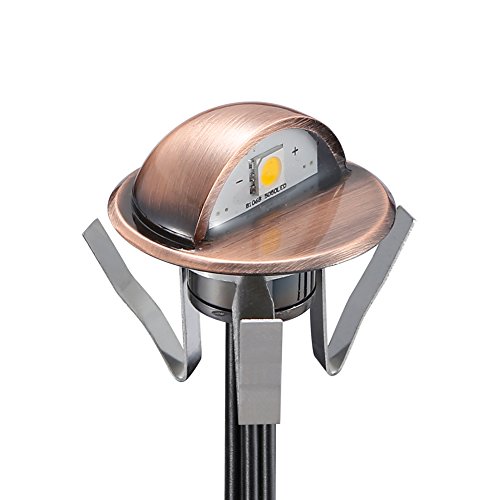
FVTLED Low Voltage LED Deck Lights kit Φ1.38 Outdoor Garden Yard Decoration Lamp Recessed Landscape Pathway Step Stair Warm White LED Lighting, Bronze


Key features
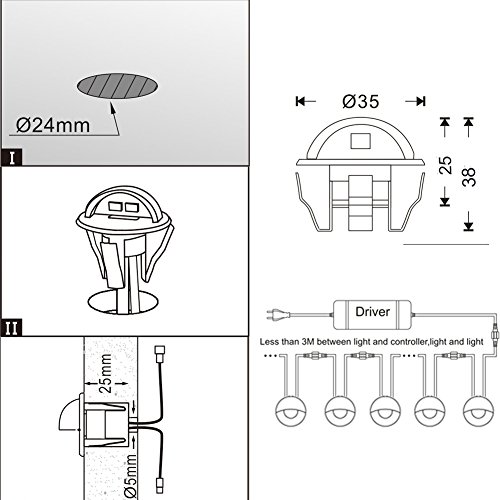
- •Item Dimension: Φ(diameter)35mm(1.38")*H(height)25mm(0.98"). Unique retro and stylish bronze surface with Half-moon shape
- •LED deck lights are IP65 waterproof, safe for indoor and outdoor use.
- •Work with 12 volts (low voltage) DC power supply, energy saving and environment friendly. Hardware & plastic integrated design.
- •It is designed to illuminate your outdoor walkways, stairs and decks, all while adding extra safety and security to your home.
- •Can also used in commercial places like shopping malls, square, hotels as decoration or lighting.
FVTLED Low Voltage LED Deck Lights kit Φ1.38 Outdoor Garden Yard Decoration Lamp Recessed Landscape Pathway Step Stair Warm White LED Lighting, Bronze
List Price: $23.26$20.93DEALYou Save: $2.33 (10%)
Free shippingFree Returns – 30 daysFree Order CancellationSecure Payment2–3 Days DeliveryGet It June 24, 2026In Stock (1)No marketing spamNo account requiredFulfilment by FedEx / Amazon / UPS / ShipwirePayPal / Card Buyer Protection
Customer Reviews
Reviews sourced from verified Amazon purchasers4.6
out of 5
Based on 10 reviews
5★
90%
4★
10%
3★
0%
2★
0%
1★
0%
These are amazing!!
Dara✓ Verified Purchase•September 7, 2023
They are much brighter and better than I was expecting! Great price, not too bad to install. We added another switch inside and now our deck is fancy
very good lights well made versatile
smartchicolena✓ Verified Purchase•August 26, 2023
super nice lights, well made, just the right brightness and color spectrum, to me they look like the high end places that are installed professionally .Great for stairs and deck posts or railing, not sure they would be bright enough to highlight plants, may choose a spotlight for that. They are set up to be used as a closed circuit with its own inline transformerr that you plug into a regular 110 outlet, kinda like christmas lights, so for someone that is not going to get a separate transformer and run low voltage wiring, and the distance beteween the lights will work ( i think its 3 feet tops- but you can buy extensions...) it would be awesome. I DO have a transformer for low voltage so I cut the connections off ( too bad because theyre nice; but i could not find the lights at this price without them) and because the distances between the lights didnt work with my deck. Piece of cake wiring them, doesnt matter which direction, its low voltage, so polarity didnt seem to be important. Taped the unused lead and hid them under the railing, WELLA! Hopefully they stand the winter around here, its pretty bad. Every light worked, I bought 2 boxes of 10. Do the deck lights, theyre cool
Use a NEW CR2025 Battery
Charles I.✓ Verified Purchase•July 24, 2023
Remote would not connect to the receiver and I got very frustrated. Customer service responded quickly with some suggestions but nothing would work. They sent a new receiver with remote but nothing changed. A couple of months passed and I tried again with customer service, this time they recommended a new battery for the remote and offered to refund the cost of the battery (CR2025 watch battery $5).
Well, IT WORKED and looks great! I am especially appreciative of their quick response every time I wrote and of their generous supply of another remote with receiver and their offer to refund the cost of the new battery. Well, hats off to the customer service crew at FVTLED, as they made me feel like I truly mattered, and that's saying a lot these days. The lights are also pretty cool and exactly what I was looking for.,
Well, IT WORKED and looks great! I am especially appreciative of their quick response every time I wrote and of their generous supply of another remote with receiver and their offer to refund the cost of the new battery. Well, hats off to the customer service crew at FVTLED, as they made me feel like I truly mattered, and that's saying a lot these days. The lights are also pretty cool and exactly what I was looking for.,
Look great, 4 stars for now. Tied inline to existing low voltage landscape lights
TheTruth✓ Verified Purchase•July 15, 2023
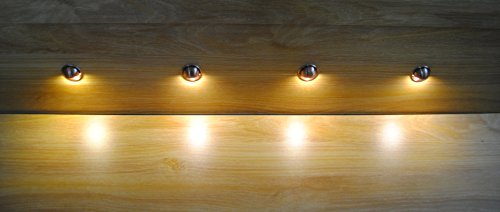
I am currently replacing our deck stairs and figured I'd light the treads while I was at it since I have an existing low voltage landscape line that runs underground by these stairs. I couldn't find the exact and specific answer on here on how to do this so figured that I would show some pictures of exactly what I did and hope that it helps you as well. I don't know if this is the right way to do this but the lights work and almost all of my other landscaping lights that are connected on the same run are LED or I replaced them with LED bulbs so I figured why not.
Some info: the treads are 36" wide with two 5/4 deck boards. The risers are 1x8x10 cut to 36" wide so about 7.25" high and 3/4" thick. The lip is about 1-1.5" overhanging each step.
So, I started with a guide. I made a practice hole using a 3/4 spade bit. Then I lined up the template guide and notched it halfway (hard to see notch in picture), in this case 18" for center and drilled my template hole as a guide about an inch inch and half from the top. I made sure that I left room for the outside metal frame of the light to fit with a little space under each stair lip. Another thing too is that I made sure that every riser and tread was screwed in before I started drilling a hole and installing the lights. The 3/4 spade works good and the lights fit snug with just enough to turn them and straighten, if needed. I fed each wire through the hole and the metal springs were snug but did not go all the way past the 3/4 thickness of the riser. I didn't try to pull those out but I guess you could if you wanted. They are snug with the right amount of tension from the metal to the hole interior of the riser so I didn't bother messing with it.
So, after I installed the lights into each board, I then connected them all together. Hopefully, you can see where I only connected one wire from the top step light and connected down and repeated to each light to the last step on the bottom. The lonely wire from the start (or top step) is not connected and there is an extra cap in the box to screw on and protect it from rain, etc.
I literally just did these lights last night so I haven't secured the wires on connected the screw caps on each connection. When I got to the last step, here is what I did. This is the part that I couldn't find a good, solid answer on.
Here is my transformer which turns on about 20 LED lights and 5 incandescent lights all connected together by your typical 16 AWG landscaping wire. It turns on at dusk and turns off after X hours depending on how I have it set up. Usually, longer in the summer, shorter in the winter.
So, you see the pic with the provided DC transformer? Not the outlet plug side, but on the round cable side with the 2 pin connector is where I cut that wire completely off and away from the transformer. Cut closer to the square transformer to leave yourself plenty of wire to work with. Inside that round cable are two little wires. I stripped those two wires and then connected them to a low voltage connector as you can see in the picture (the raw wires not taped yet, lol). Then, I connected the low voltage connector to my existing low voltage underground wire. Then, I plugged in the 2-pin round connector into the last stair light and bam, they turned on!
As you can see, they put off enough beautiful warm light for 36" treads.
Again, I don't know if this is the right way to do it or how long these will last, but I've had the other LED-based lights and the incandescent fixtures that I replaced with LED bulbs all going on about 5 years now without any issues.
The 4 stars is because I've only had these running for a day so I want to wait and see how they perform and appear after some rain, etc. But, needless to say, I am impressed with the ease of installation and the glow of these lights without being to bright and blinding
I sincerely hope this helps someone in the same situation or similar because I bought these on a whim and got lucky. Thanks.
Great
Kindle Customer✓ Verified Purchase•June 26, 2023
Smaller than expected but works well and looks great ðŸ‘
Page 1 of 2