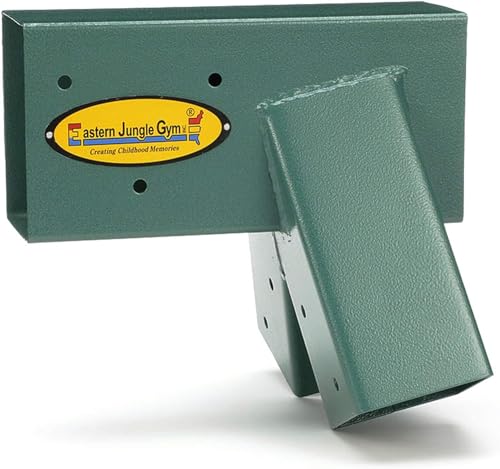
Eastern Jungle Gym Easy 1-2-3 A-Frame 2 Brackets for Swing Set with All Mounting Hardware, Green


Key features
- •Includes 2 (TWO) A-Frame Swing Set Brackets and 2 (TWO) sets of A-Frame Bracket Hardware – EVERYTHING you need to construct a Free-Standing A-Frame Swing Set
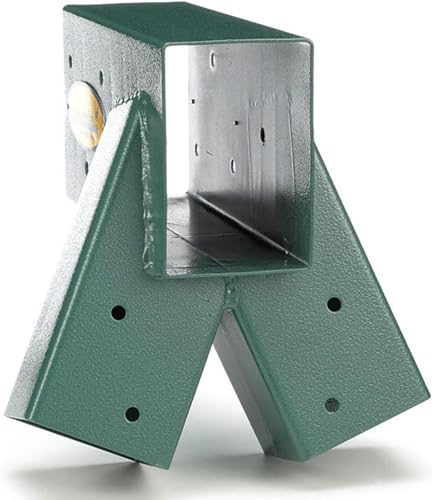
- •Our brackets are a solid, one-piece design, open-ended and constructed with heavy-duty steel and welded seems for the strongest and safest construction; each bracket weighs 10 pounds!
- •Brackets are finished in a power-coated green color and Eastern Jungle Gym's signature yellow tag to ensure 100% authenticity and our warranty. PLEASE NOTE: Eastern Jungle Gym and Amazon.com are the only authorized sellers of this product. Purchasing from a third party seller voids the EJG warranty and is not guaranteed authentic.
- •Includes all hardware needed to build a DIY A-Frame Swing Set. We provide all the hardware needed to install both swing set brackets (28 – 5/16" x 3" zinc-coated steel lag bolts and 28 – washers)
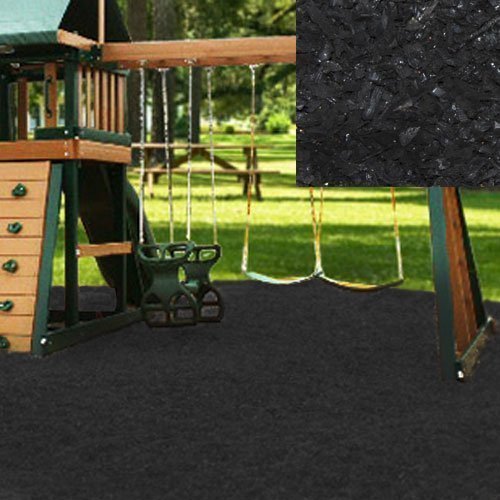
- •Lumber is not included in this kit. We recommend using one 4x6 96" top beam and four 4x4 96" side support legs to construct a basic A-Frame with the finished dimensions of 12'Lx8'Dx7'8"H
Eastern Jungle Gym Easy 1-2-3 A-Frame 2 Brackets for Swing Set with All Mounting Hardware, Green
List Price: $119.53$107.58DEALYou Save: $11.95 (10%)
Free shippingFree Returns – 30 daysFree Order CancellationSecure Payment2–3 Days DeliveryGet It June 23, 2026In Stock (30)No marketing spamNo account requiredFulfilment by FedEx / Amazon / UPS / ShipwirePayPal / Card Buyer Protection
Customer Reviews
Reviews sourced from verified Amazon purchasers4.8
out of 5
Based on 10 reviews
5★
100%
4★
0%
3★
0%
2★
0%
1★
0%
Durable it seems
Stacey Salinas✓ Verified Purchase•September 20, 2023
Appears to be good quality.
Super easy to install, don’t be fooled by the bad reviews
Joseph ✓ Verified Purchase•September 1, 2023
This product is super simple to install, all you need is a power drill. I ended up using a power drill to drill my pilot holes and a impact drill to drive the lag bolts but this could be done with some old fashioned elbow grease. My local home depot didn't have 4x6x10's so I had to settle for a 4x6x12 and use my miter saw to cut down to my desired length of 10ft. So if you want to avoid having to cut either see if the lumber yard will cut it for you or just find the 4x6x10. Anyways back to installation, a lot of people who have rated it bad state that the lumber they bought didn't fit in the brackets and they had to spend all afternoon forcing the lumber or manually reducing the size to make it fit. Save yourself the trouble and wait to buy the lumber after you have received the brackets so you can take them to the lumber yard and verify they fit. After that you literally slide the the lumber into the brackets, drill pilot holes and screw the lag bolts in. I'd look at instructions on their website and watch a few videos on YouTube to see how other people built theirs so you can learn from their mistakes or successes. I decided to attach the brackets to the 4x6x10 first, then measured and attached all my swing hangers to the correct spacing while on the ground. I wouldn't wait to do this or you'll be doing this on the ladder measuring from below which makes things more difficult. After that I moved the 4x6x10 to its final location in the back yard, this step is also important, there's no need to work in the hot sun if not necessary, do all this in your shaded garage then finish out in the yard. Next thing I did was lay the top support on its side and insert the 4x4x8s into the slots, drill my pilot holes and drive my lag screws in. You'll need to do this 1 at a time and then flip the top support over and repeat on the side. I did this all on my own, the only thing that required the most effort was lifting it up on all 4 legs. It was heavy and a bit tricky but I was able to do it. If you have a friend have them help you. My daughter and son love it and honestly upset I didn't build this sooner. Definitely recommend.
Worth it!
DTJ✓ Verified Purchase•August 29, 2023
I wasn't looking to buy the dreaded backyard playground set. I almost let the wife bring home the Costco set until I saw the labor time for the build. This was a lifesaver. Best part if the kid doesn't use it anymore after a year I don't have to complain like all the other dads do whenever guests are over lol.
6 Years later these are still working fine in the yard
Omnimed✓ Verified Purchase•July 2, 2023
6 Years later these are still working fine in the yard
A 34 y/o woman, mom, biochemist just built a swing set BY HERSELF in 3 hours thanks to these! DIY heaven!
Kelly✓ Verified Purchase•July 1, 2023
Before I start my review, you should know a few things. First and foremost I did NOT receive this item for free or at a discount. Second, I am a 34 year old woman who has no experience building anything like a swing set before. I hadn't even used a ratchet before now. I am a biochemist eye disease researcher and mother of a 4 year old boy with autism. My son, like many kids with autism loves to swing. And when I say "loves" that is a major understatement. His birthday is coming up and I wanted to get him a swing set. We just moved into a new house. Our old house had great trees for swings and this house doesn't. However, nice swing sets are SO EXPENSIVE to buy, so I started looking into the possibility of building one. While I don't have much experience doing anything like this, I'm all about trying! That's when I stumbled upon these brackets and decided I could do it.
I'm glad I saw the "kit" version instead of just buying two of the brackets themselves. It saved me a lot of time and trouble buying the right hardware as well. This kit comes with everything you need to assemble the A frame except the wood and tools. I ended up making a basic A frame with a 10' top beam and 10' legs (they recommend 8' legs but I wanted to have a larger swing arc). Here's what I needed to complete the project:
- This kit (which comes with two brackets and 28 appropriately sized lag bolts and washers)
- One 10 foot 4x6 beam (Home Depot) for the top (be sure to get pressure treated lumber so it will last and won't degrade in contact with the ground)
- Four 10 foot 4x4 beams (Home Depot) for the legs (can be anywhere from 8 to 12 feet but I recommend going longer, especially if you plan to anchor the legs in concrete or bury them in the ground. I opted not to bury them but just get some screw in ground anchors.
- A drill and drill bit smaller than the lag bolts to pre-drill the holes (already had). I don't know what size exactly I used but it was one that came standard with my drill.
- 2 swings. I already had this Deluxe Platform Swing by HearthSong that I bought on Amazon last year and my son loves it. I hung it in our tree using the yellow swing ties that you see pictured - also bought on Amazon. I decided to use them since I already had them. I bought the half bucket swing on Amazon for this project from Swing Set Stuff.
- Safe-Kidz heavy duty swing anchor kit (again, Amazon) which came with two anchors, two clips, a drill bit and 4 lag bolts and screws.
- Two 80" lengths of zinc chain (Home Depot). I guessed at this amount before building the swing set but only ended up needing about 70" for the half bucket. It all depends on what type of swing you're hanging and the age of the children.
- Two Quick Links (Home Depot) to connect the chain ends to the swing
- Ratchet and appropriate size bit (again, one that came standard with my ratchet that I already had)
With all of this stuff I was able to complete this swing ENTIRELY BY MYSELF in just a couple hours time and that includes the shopping and loading/unloading!! The brackets take all the guess work and careful measuring out of the equation for you. Just slide the wood into the bracket, pre-drill the holes for the lag bolts and ratchet them down and your A frame is finished! A note about inserting the beams into the brackets. Other reviewers mentioned tight squeezes and having to sand or lubricate the beams and then beat them in with a rubber mallet to get them to fit. I was prepared with my orbital sander, dish soap and rubber mallet to do whatever it took but none of that was needed! The beams I bought slid right in with no effort whatsoever. It literally could not have been easier. I guess it depends on where you get your wood, but if it's TRULY 4x4 and 4x6 they should slide in to these brackets NO PROBLEM without sanding or lubricating.
Before I stood it up (I actually did need help with that part) I measured and installed the mounting hardware for the half bucket swing in the top beam. The manufacturers of the hardware suggest measuring at least 15" away from the nearest structural element of the swing set. I went a little further than that. They also recommend spacing the hardware wider than whatever swing they will be holding. For standard swings 16" should be fine. That's what I did. Once I stood it up I hung and adjusted the platform swing using my ladder and tested it out myself to be sure it was sturdy. Holy cow this thing isn't going ANYWHERE! Even without being anchored to the ground (which I will do anyway) I was able to swing pretty high laying on the platform without the A frame even wiggling a tiny bit under my 130lb weight!
When my husband and son got home from their daddy day that afternoon they were both blown away that I had done it myself and my boy was ECSTATIC!! He LOVES his new swing set and I love how easy it was and that it saved me money! So here's the final price tag on the one I built if it helps:
Wood - $100
Bracket/hardware kit - $79
Half bucket swing - $40
Chain - $30
Swing mounting hardware - $28
I already had the platform swing and swing ties but they were $130 and $25 respectively
That was only $277 out of pocket and a few hours on a Saturday morning for me which is basically amazing. Total cost including the stuff I already had would put it at $432.
For a swing set of this height and sturdiness you would be hard pressed to find something cheaper. Also, this would be very easy to add on to! I intend to add wood planks to the side of the A frame and build a climbing wall on one side and add a slide to the other! Plus I'm so proud of myself that I did this. I love sticking it to gender roles! I'm telling you, if I could do this, anyone could do this!
I have nothing but the highest praise for these brackets and highly recommend them to anyone who thinks swing sets are too expensive or is contemplating building their own! One more free tip for you newbies like me: When working with pressure treated lumber, WEAR GLOVES!!!! Splinters from pressure treated wood are NASTY and will get infected really quickly so save yourself the pain and trouble and just wear gloves from the start. I really hope this helps someone else! Good luck and have fun building!
Page 1 of 2