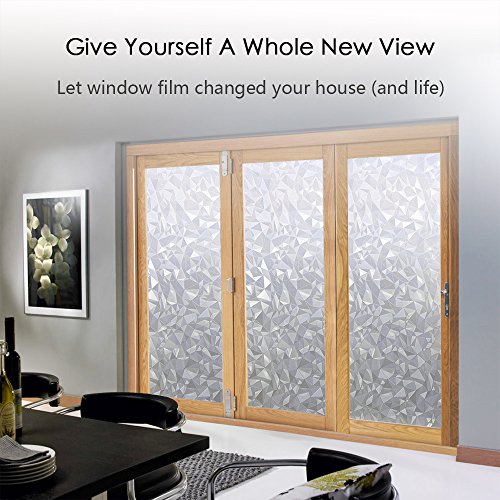
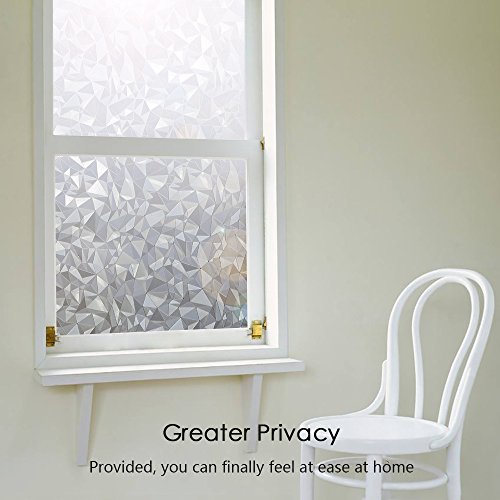
Frosted Window Film, Anumit Privacy Static Cling Vinyl Decorative Glass Film Diamond Pattern, Non-Adhesive Static Privacy Anti-UV for Home Heat Control 17.7in By 78.7in

Key features
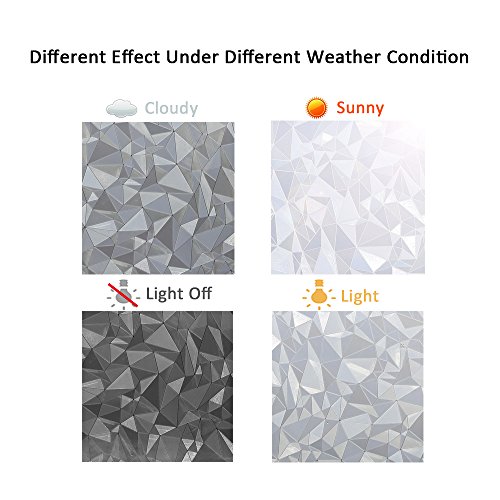
- •PROVIDES PRIVACY: Instantly increases the privacy of your shower door and any window in the home, at the office or at your place of business.Privacy Level : ★★★★★ Top Private Window Films
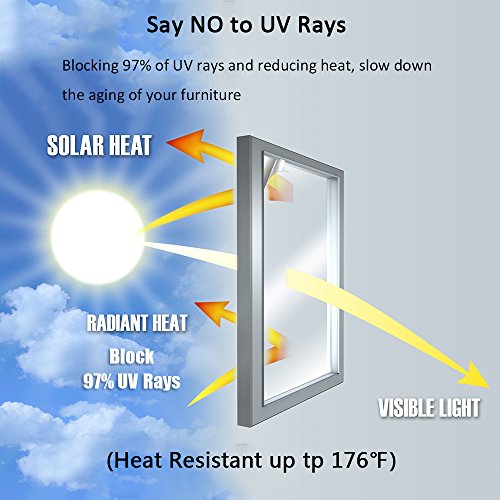
- •ANTI-UV: Window Film has solar control design, decorative cut-glass look gives a gemstone facet effect to reduce glare and effects of harmful UV rays.
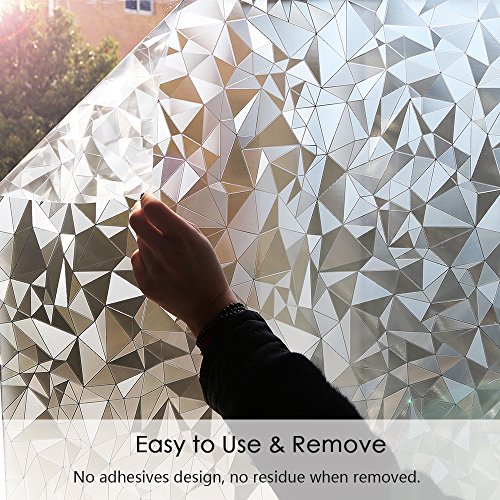
- •ADHESIVE-FREE: Requires absolutely no adhesive, so you can rest assured knowing the film will never damage your windows or leave behind a sticky residue
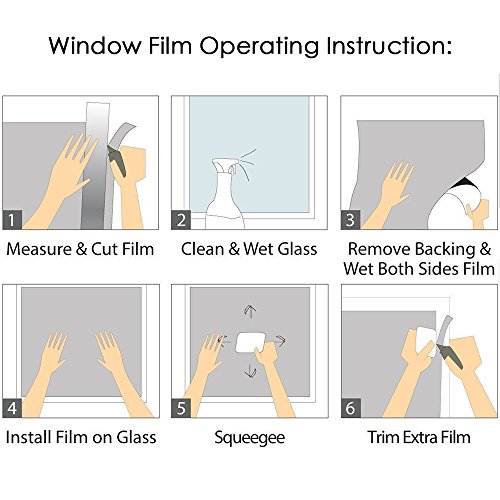
- •EASY APPLICATION: Apply the film to your window in just a few short minutes with the use of a small squeegee
- •AFFORDABLE: An inexpensive alternative to those costly frosted windowpanes and walk-in shower doors
Frosted Window Film, Anumit Privacy Static Cling Vinyl Decorative Glass Film Diamond Pattern, Non-Adhesive Static Privacy Anti-UV for Home Heat Control 17.7in By 78.7in
List Price: $15.50$13.95DEALYou Save: $1.55 (10%)
Free shippingFree Returns – 30 daysFree Order CancellationSecure Payment2–3 Days DeliveryGet It June 25, 2026In Stock (1)No marketing spamNo account requiredFulfilment by FedEx / Amazon / UPS / ShipwirePayPal / Card Buyer Protection
Customer Reviews
Reviews sourced from verified Amazon purchasers2.8
out of 5
Based on 10 reviews
5★
40%
4★
0%
3★
0%
2★
10%
1★
50%
Will not stick to a clean painted wall.
Seth Mitchell✓ Verified Purchase•December 31, 2017
I had very high hopes to use this as a replacement for my daughters white board which had started to come apart. The application was relativity easy to do, and the paper was easy to cut to the correct dimensions due to the grid lines on the paper backing. However It will not stay stuck to the wall. I cleaned the wall beforehand and gave it plenty of time to dry. The Decal rolled out easily and seemed to stick well. Unfortunately the next morning when she woke up, the decal had started to peel. We pressed it back onto the wall but it wouldn't stay fully stuck for more than a few hours. I would never recommend this to anyone. Fortunately for me I only bought two rolls so I am only out $20. But I advise you to stay far far away from this product.
Child Therapist Approved
Christine Pierozzi- Matusek✓ Verified Purchase•December 18, 2017
I am a Child / Adolescent Therapist who has a dry erase table in my office. I have been using dry erase paint for years. To paint with dry erase paint which is fairly expensive about $20 a small can . I have to sand the table and use the paint which only works for an hour after you open it. No really chances for extra jobs or 3 coats.Also as you can see on my before pictures of my own table I have to repaint it several times a year because I often have kids mix up the markers and use non dry erase markers which really then don't come off even erased. I have been so tired of sanding and repainting I thought I would give this a try. Its worked out well!!I would recommend when you do the peel and stick go slow and have a credit card ready to smooth down so it will help to avoid air bubbles. I also tried to use a non dry erase marker on it as a small test and it didn't even adhere to it. Even came with a nice drawing marker and top erases. For this price and convenience I would really recommend it!
Awesome dry erasable wall decal
David C.✓ Verified Purchase•October 12, 2017
The package comes with a roll of dry erasable wall decal and a single non-permanent marker with an eraser tip. The application is fairly straight forward, it's similar to applying screen protector on a smart phone. You start off from the edge first, move inward and squeeze out all air. This cycle continues until you finished the application. My wall is white so I didn't apply directly onto the wall because I am afraid that I might accidentally draw on the wall surface. What I ended up doing is to lay down the dry erasable wall decal on top of card board and then use 3M command adhesive to stick it onto the wall. The whole process went very smooth and no issue what so ever. I am loving it! There still plenty left after my application so I can use it for some future projects.
Not even good for 1 use
Briggs✓ Verified Purchase•October 7, 2017
Garbage.
Prepared surface as directed. Removed backing and carefully stuck to a painted wall. I made sure there were no bubbles and spent time "wiping" it to ensure complete contact all around.
It stayed on less than 30 minutes.
During the short time it stayed on, I wrote in it with the marker that was included. It left a very noticeable ghost when erased. Even if it had stuck it probably would have been usable a handful of times before the "erased" writing rendered it useless.
It sticks to itself quite well when it falls off the wall. Despite the challenge, I got it all apart and tried sticking to the wall again. It stayed on less than 10 min.
Its next stop was the trash can.
As you can see in my photo the edges never stuck and constantly peeled enough to the point of it not looking good and ultimately removed it from the wall and tossed ...
Antonio✓ Verified Purchase•October 3, 2017
Lacks required stickiness.
Let get any prep questions out of the way first. This went on a standard drywall surface in my office (not a textured bumpy wall). I wiped down the wall prior to installation to remove any possible dust and then let the wall dry thoroughly. As you can see in my photo the edges never stuck and constantly peeled enough to the point of it not looking good and ultimately removed it from the wall and tossed it in the garbage. This is due to several issues I think. The product isnt "sticky" enough and I also think because it was so tightly wound from packaging the edges kept wanting to fold over. Try something else or buy an actual whiteboard to mount on the wall.
Let get any prep questions out of the way first. This went on a standard drywall surface in my office (not a textured bumpy wall). I wiped down the wall prior to installation to remove any possible dust and then let the wall dry thoroughly. As you can see in my photo the edges never stuck and constantly peeled enough to the point of it not looking good and ultimately removed it from the wall and tossed it in the garbage. This is due to several issues I think. The product isnt "sticky" enough and I also think because it was so tightly wound from packaging the edges kept wanting to fold over. Try something else or buy an actual whiteboard to mount on the wall.
Page 1 of 2