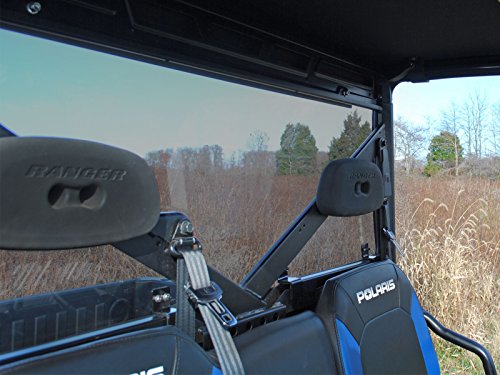
SuperATV Rear Windshield For 2017-2022 Polaris Ranger XP 1000/Crew (See Fitment) 1/4" Light Tint Polycarbonate 250x Stronger Than Glass & 25x Stronger Than Acrylic (Not Scratch Resistant) USA Made


Key features
- •100% Fitment guaranteed ✔️ Fits Polaris Ranger XP 1000 / Crew - Must be installed on a stock roll cage
- •Confirm fitment to machine before removing plastic film from windshield in order to prevent void of warranty.
- •💥 Protects rider from flying debris and shifting material - Comes complete with all hardware and instructions for an easy install
- •Can be used with soft and hard tops (may need to be removed for install)
- •Made in Madison, Indiana, USA ❗
BrandSuperATV
CategoryWindshields
SizeStandard Light Tint - No Print
Colorlight tint
WarrantySuperATV offers the premium product on the market and extends the industry's best warranty to go with it. Each windshield carries a 1 year warranty to the original purchaser that each windshield be free from manufacturer's defects.
SuperATV Rear Windshield For 2017-2022 Polaris Ranger XP 1000/Crew (See Fitment) 1/4" Light Tint Polycarbonate 250x Stronger Than Glass & 25x Stronger Than Acrylic (Not Scratch Resistant) USA Made
List Price: $232.73$209.46DEALYou Save: $23.27 (10%)
Free shippingFree Returns – 30 daysFree Order CancellationSecure Payment2–3 Days DeliveryGet It June 25, 2026In Stock (1)No marketing spamNo account requiredFulfilment by FedEx / Amazon / UPS / ShipwirePayPal / Card Buyer Protection
Customer Reviews
Reviews sourced from verified Amazon purchasers4.7
out of 5
Based on 10 reviews
5★
80%
4★
20%
3★
0%
2★
0%
1★
0%
rear windshield needed for UTV to remove seasonally
PT✓ Verified Purchase•January 21, 2024
We have a new Polaris Ranger XP 1000 and prefer to have it open until the cold weather season. So we needed removable windshields.
Installation required us to remove the dealer installed Polaris roof in order to attach it given the bottom brackets it sets upon and to get the screws aligned in the holes at the top. Not difficult but an extra step and cannot be done easily out on the trail. The nuts for the larger screws at the top section that hold the metal bracket were very hard to turn as they were very tight fit onto the screws, requiring Allen wrench and open ended wrench. Plus do not fully tighten them until you fit the window against the frame holes for proper alignment. Then press hard so the screw is long enough to reach the knob that needs to hold it in place.
The instructions do not describe the actual tools needed so do this close to your tool box. You have to look closely at the diagrams and photos on the web to know how to install the lower brackets They screw onto the inner surface of the window (facing the cab) and then the lower part of the bracket hangs inside the cab with the middle horizontal part setting upon the frame. Given it is nonreturnable you would not want to remove all the plastic until you are sure about the fit and are therefore careful and concerned not to scratch it while you try it against its positions to ensure it will work. Ours lined up well.
Peel back the protective plastic coating on both sides of the window in order to attach the rubber molding and screw in the brackets - for just a few inches around the edges and when finished installing the window then remove the plastic.
The instructions would have been better if they suggested using a rubber mallet to install the rubber molding around the edges - this was a great tip I read in a review. Note there is a thin metal strip running in the inner portion on either side of the U-shaped rubber channel = the part that attaches to the edge of the window - so you need metal shears to cut the rubber molding to size.
Useful tools = Allen wrenches, open ended wrenches (I think # 11 and #13), rubber mallet, metal shears
Finally what is not in the advertisements is the warning to not drive on an open trailer with the windshields installed - wow that would be a hassle to remove them every time you want to use the vehicle! It says you can add straps around the front windshield for securing it (which is not screwed in like the rear window).
Overall it looks good and well designed, and we are so far happy with it, but it will take longer than some reviewers stated to install it. Now that we know what to do, it will be easier next time.
Perfect fit for a 2022 Polaris Ranger
Amazon Customer✓ Verified Purchase•January 16, 2024
Online videos more helpful than instructions. May not fit easily with all roofs. After I loosened the roof, the window installed easily. Great fit with no rattles.
Great Company
Lane Mueller✓ Verified Purchase•December 21, 2023
Great company to deal with. Fast response and very professional! Would order from SuperATV again!
Awesome rear window
Harold✓ Verified Purchase•December 20, 2023
Installed on a 2023 Polaris 1000 crew. Was not a big challenge to install. Maybe took a hour. I'm very pleased.
Good secure window, scratches very easily
Lance Cockerell✓ Verified Purchase•December 16, 2023
The good. Fits my 2020 Ranger xp 1000 perfect,no rattle or aqueeking, the light tent is nice to keep the sun out, reduced the wind tremendously and dust wich is what I was looking for. The bad. Scratches very easily. I bought the cheeper one my fault. While installing the seal on the outside I noticed the window rubbing on my jeans was putting a haze on it. I removed the protective film, I recommend peeling the edges of the protective layer so you can install the seal and window,then remove the film from the center parts of the window after install.
Page 1 of 2