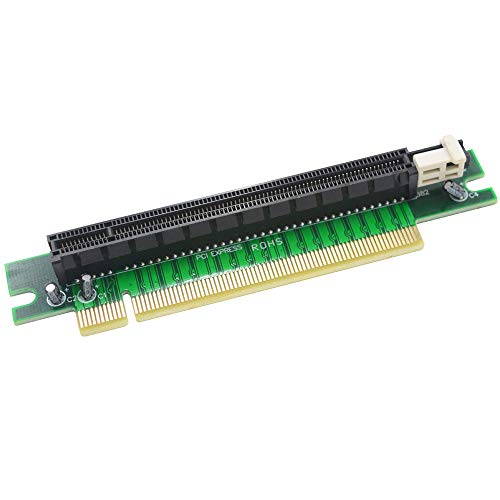
GODSHARK PCI-Express 16x Riser Card 90 Degree Right Angle Riser Adapter Card 1U 2U


Key features
- •Gold-plated fingers with excellent EMI characteristics
- •PCI-E 16X 90-degree horizontal adapter
- •Ideal for Small Computer & Server Case, Like 1U & 2U.
- •Support Up to 256 GT/s on Sixteen Lanes(x16) PCI Express Date Rate
- •Size : 116 mm x 41 mm x 13 mm(approx.) Weight: 19g(approx.)
BrandGODSHARK
CategoryGraphics Cards
GODSHARK PCI-Express 16x Riser Card 90 Degree Right Angle Riser Adapter Card 1U 2U
List Price: $17.44$15.70DEALYou Save: $1.74 (10%)
Free shippingFree Returns – 30 daysFree Order CancellationSecure Payment2–3 Days DeliveryGet It June 22, 2026In Stock (30)No marketing spamNo account requiredFulfilment by FedEx / Amazon / UPS / ShipwirePayPal / Card Buyer Protection
Customer Reviews
Reviews sourced from verified Amazon purchasers4.0
out of 5
Based on 8 reviews
5★
88%
4★
13%
3★
0%
2★
0%
1★
0%
Works well
Josh Struble✓ Verified Purchase•November 16, 2023
I needed something like this for my unconventional arcade build. I have the GPU mounted next to the motherboard so everything can fix with a riser cable running from the gpu to the MB. I did not like the stress the angle was putting in the cable so I bought this little guy and it is working great! No issues at all still getting the same speeds as before and no worries that the cable might break now.
Overall very happy with this purchase
Overall very happy with this purchase
Usefull specialty part, well made.
Cooper✓ Verified Purchase•October 21, 2023
This a rather specialist part and the lack of the standard lock tail makes me think this is a clone of a server part. As another reviewer mentions, the pcb fouls the locking tab on most PCIe slots; However, if you're using this, you're already doing something custom. I used it along with a straight riser cable in a proprietary SFF chassis, and just popped the slider off the cable. I needed a 90 degree riser with the opposite chirality of a normal one to replace the PCI backplane in the riser cage. Using this with a straight cable actually made it easier to secure everything to the cage, so the GFX card didn't flop around. Worked fine with an RX 550 plugged into it.
This part does exactly what it claims, but look at the pictures carefully and make sure it's what you need.
This part does exactly what it claims, but look at the pictures carefully and make sure it's what you need.
Just works. Fantastic. However...
Sean Mignosa✓ Verified Purchase•October 10, 2023
Just works. Fantastic.
However,
The only thing to keep in mind is that the latch tab on the male end of the connector will not fit in most female connectors' latches, so in many cases you will not be able latch the connector securely. However, there is nothing in that section of the PCB, so if you're willing to, you can cut the profile of the latch tab further back on the PCB to fit your connector. If this is something you want to do, just make sure to use a fine blade and a very fast cut rate, or a fine abrasive to slowly cut the material away. I sandwiched the board with small offcuts of pine, and then removed most of the material with a coping saw, and finally finished up to the line of the pattern with a Dremel tool and a hand sand with 440 grit to remove any tool marks. This method ensures that there is no de-layering of the PCB when you cut it. Once you have the shape that you want, coat the exposed cut with a thin layer of CA glue to give the exposed edge of the PCB some stability, and allow it to dry completely.
Great Camera and Great Price
Amazon Customer✓ Verified Purchase•August 2, 2023
I own several of these and have had no issues
it done its job and done it well the color is ugly
Amazon Customer✓ Verified Purchase•July 31, 2023
It did do exactly what I needed it to do but couldn't have made it black this color is an eyesore
Page 1 of 2