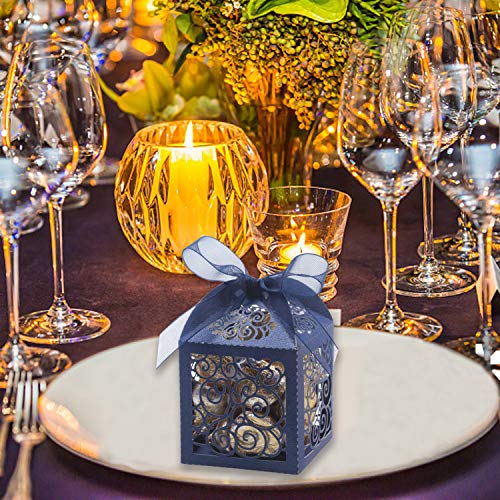
KPOSIYA 100 Pack Wedding Favor Boxes Laser Cut Boxes Party Favor Box Small Gift Boxes Lace Candy Boxes for Wedding Bridal Shower Baby Shower Birthday Party Anniverary with Ribbons (Navy, 100)


Key features
- •Fill with favorite candy, chocolate, jewelry to make a surprise for your guests and friends.
- •Perfect for any special occasion,Will create a beautiful atmosphere your wedding, birthday party, bridal shower party,christmas party,anniverary ,other happy occasions, etc.
- •Material: Pearlescent Art Paper,Hollow out design favor boxes, come with free ribbon.
- •All gift boxes are flat packed and need yourself assemble. Fold and open easily.
- •Dimension: 2 x 2 x 3.15inch / 5 x 5 x 8cm (L x W x H). Ribbon length:40mm
KPOSIYA 100 Pack Wedding Favor Boxes Laser Cut Boxes Party Favor Box Small Gift Boxes Lace Candy Boxes for Wedding Bridal Shower Baby Shower Birthday Party Anniverary with Ribbons (Navy, 100)
List Price: $29.08$26.17DEALYou Save: $2.91 (10%)
Free shippingFree Returns – 30 daysFree Order CancellationSecure Payment2–3 Days DeliveryGet It June 25, 2026In Stock (1)No marketing spamNo account requiredFulfilment by FedEx / Amazon / UPS / ShipwirePayPal / Card Buyer Protection
Customer Reviews
Reviews sourced from verified Amazon purchasers3.9
out of 5
Based on 10 reviews
5★
40%
4★
60%
3★
0%
2★
0%
1★
0%
Lovely and elegant! Prepare for assembly time - 5 mins each.
Ebby✓ Verified Purchase•October 11, 2023
These are so elegant and lovely. Very good quality with limited bits of paper to remove, perfectly cut/perforated, each one in perfect condition. WARNING: at peak efficiency these took me 5 minutes each to assemble. It's relaxing and a fun thing to do as you sit and talk or watch tv but keep in mind that this is only 12 per hour. I spent about 6 hours assembling 50 of them. Just plan accordingly. I put a tea bag and small honey sachet in each and tied with a snowflake charm and large white tag as holiday gifts for co-workers. Delighted!
TIPS FOR ASSEMBLY - 1. Use a sturdy standard size american business card for the folding. It's the exact same size as the sides which making the folding a little quicker and a business card is thin enough to get a crisp fold over (a credit card would be too thick). 2. Wrap a bit of tape around the end of each ribbon (shoe lace style) to assist with threading through the slots and then just snip it off after tying the bow.
TIPS FOR ASSEMBLY - 1. Use a sturdy standard size american business card for the folding. It's the exact same size as the sides which making the folding a little quicker and a business card is thin enough to get a crisp fold over (a credit card would be too thick). 2. Wrap a bit of tape around the end of each ribbon (shoe lace style) to assist with threading through the slots and then just snip it off after tying the bow.
Exactly as described!
Helen Valles-Caraveo✓ Verified Purchase•September 30, 2023
I have uses this type of favor box in the past so I knew what to expect. These are hard to assemble and take patience. The ribbon is difficult to put through the slots so make a lot of time to assemble these. This is normal with this type of favor box. These fit 2 Ferrero Roche chocolates perfectly. They are approximately 3 inches when assembled (2nd picture). Perfect for weddings or any event you want to make favors for.
Extremely cute but a pain
Kindle Customer✓ Verified Purchase•September 26, 2023
This product was extremely cute and pretty durable. I'm using the boxes to hold candy as wedding favors, and I'm in love with how they look. The only problem is they are a nightmare to put together. The creases are not the easiest to fold, the ribon frays easily and is too thick for the holes, and without directions it took me a couple tries to figure out how to fold the bottom so it doesn't fall apart. Definitely don't wait til the last minute to build, took 3 people around 4 hours to build and fill 75. Either buy new ribbon to tie the boxes, or use an lighter to singe the end to make it easier to thread. Overall for the price if you are willing to put in the time and effort I think they are worth it.
Very detailed and pretty
Jocelyn Perez✓ Verified Purchase•August 22, 2023
Smaller than I expected, and a bit hard to assemble because the intricate design weakens the box a little. But overall it is what I expected just slightly smaller
Gorgeous. A lot of work. But, worth it!
MickeyChick ✓ Verified Purchase•August 19, 2023
These are absolutely GORGEOUS favor boxes. I hope this review will help you and save you time from what I learned assembling them. My instructions may seem extremely time-consuming and like they won't be worth the bother. But, don't let them discourage you. I thought they were worth every effort.
The pros:
The color is accurate in the product photos. I would call this more of a coral, peachy pink than a true pink or blush pink. Fortunately, I was using many different shades of a light pink, coral pink, blush pink, and baby pink, so they went together with my decor beautifully. They have a beautiful, pearl shimmer finish.
They are absolutely gorgeous and rich looking. Even though they are small boxes, they actually hold a lot.
They can hold 18 Hershey Kisses, which shocked me. I thought they'd only hold, maybe, 5. So, I had to go and buy a ton more Kisses. Ha! I only placed 16 in each box because I felt that the Kisses were settling and pushing out on the delicate sides. I was afraid they would tear. 16 seemed to be the magic number.
A few cons:
They are VERY delicate and VERY flimsy. You have to be extremely careful in the folding process. It's easy to damage, rip, tear the cutout scroll work. But, once they're assembled, filled, and tied, they hold up extremely well.
Like another reviewer said, they take a long time to assemble. A LONG TIME TO ASSEMBLE. That reviewer said that it took 5 minutes for each one. I found that to be accurate, but I was able to streamline the process and got the time down to 3.5 minutes per box. I had 60 boxes to assemble and did this two weeks ahead of the event. It took about 3.5-4 hours. So, if you have several to do, pop on your favorite series to binge watch and plan to be there for a while. Maybe even plan to do these over the course of a weekend or two. Just saying.
I tried to post a photo of each step of the box assembly for you. May I suggest this process:
*BEFORE YOU GET STARTED WITH THE FOLDING PROCESS* The top, angled "roof" edges of each box have cut work that will probably need weeded! They will need the cut out piece removed that didn't fall out during production at the factory. This process was tedious and you have to be careful not to just pull the excess out. Some of them were still significantly attached and I ripped the box and couldn't use it. Learn from my mistake and save yourself the heartache. Ha.
1. Grab a sturdy credit card ( I actually used the Amazon Prime card since it's made of a heavy metal or some space age material"¦ lol) and use it to help you bend all serrated folds. There are 20 folds per box!!!
2. With the box on a hard surface like a table or using a large, hardback book in your lap like I did, place the credit card at the seam. Hold the credit card sturdy at the seam and bend the box side that's sticking out toward you. Fold all box sides first, then bottoms, then the top edges where the tops start to slope to form the top of the favor box. You will have folded 16 of the 20 folds at this point. It's sooooo important that you don't forget to fold any of the edges. I forgot the top edges on a couple of them and only saw it after I had attached the ribbon, filled them, and tied the ribbons. It was impossible to try to bend the top edges at that point without deforming the fold and creasing the box in the wrong place because they're so flimsy. I didn't use those two boxes.
You will fold the box sides, tops, and bottom edges inward toward each other. Flip the box over and bend all of the rounded, angled edges that form the dome of the top section. You will bend them in the opposite direction of the box sides, tops, and bottoms. It will make sense when you put the box together.
3. After you've done an initial bend of each of the 20 folds, go over the entire box and crease each fold you just made so that the folds are sharper, crisper. This all actually goes very fast once you get the hang of it.
4. With the box upside down, fold the box together, joining the bottom first. Reference photo.
5. After the box bottom is connected, carefully insert the tab into the slot on the box side. I had to insert the top of the tab in the slot and then move it up a little in the slot in order to place the bottom edge in, being careful not to rip the box, and shift the tab so it would "catch" in the slot and "lock" in place.
6. I used a wide-eyed embroidery needle to thread the ribbon through the ribbon holes. Pinch top tabs together, two-by-two, and thread the ribbon around. I left about 4 inches of the ribbon out as a tail at the beginning. Reference photo.
7. Leave the ribbon loose so you can fill your boxes.
8. Fill your boxes.
9. Tie ribbons into pretty bows.
10. Angle cut or dovetail your ribbon ends.
Voila!
Finally, if you're not careful in boxing them together for transport, the boxes can become entangled next to each other. I found that out the hard way. As I pulled a box out, it was caught on the one next to it and tore the scrollwork. I couldn't use two boxes that that happened to. I took the time to cut tissue paper into long three-inch strips; and, as I boxed the finished favors, I wove the tissue around the boxes in a serpentine pattern. This kept the box sides from touching and the scrollwork getting intertwined.
I sure hope this review helped you. I wished that the company would've included instructions with them or a video on Amazon showing how to assemble them.
Overall, I was extremely happy with this purchase! I gave the product 4 stars only because the assembly was a bit tedious.
Page 1 of 2