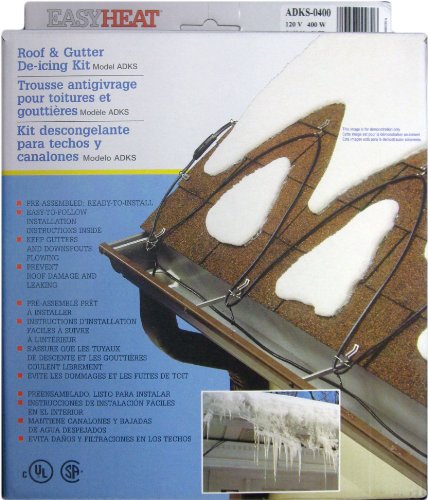
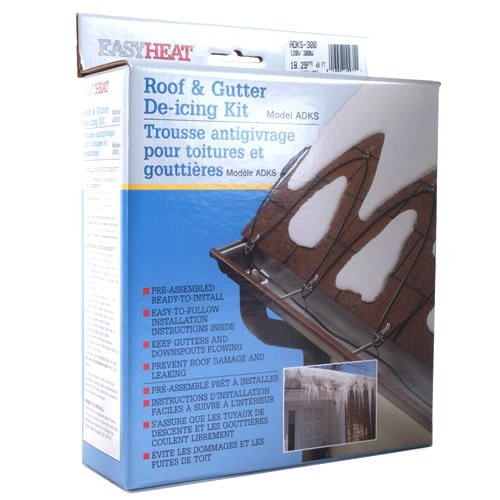
EasyHeat 80' Roof Deicing Cable, For Roof and Gutters, Pre-assembled for Ice and Snow Damage Prevention, 400 Watts
Key features
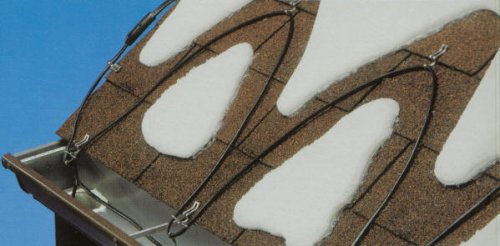
- •Snow de-icing cable prevents winter damage to roof, gutters, and downspouts
- •Provides uninterrupted path for melting water to flow off roof
- •Suitable for most roof and gutter configurations; available in several lengths
- •Easy to install; no maintenance required
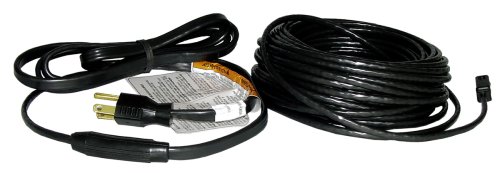
- •Includes 6 clips and 2 mounting screws
- •The cable must be plugged into a 120 volt A/C outdoor receptacle that is grounded. This cable is equipped with a three-prong plug that has a grounding prong.
EasyHeat 80' Roof Deicing Cable, For Roof and Gutters, Pre-assembled for Ice and Snow Damage Prevention, 400 Watts
List Price: $80.51$72.46DEALYou Save: $8.05 (10%)
Free shippingFree Returns – 30 daysFree Order CancellationSecure Payment2–3 Days DeliveryGet It June 24, 2026In Stock (39)No marketing spamNo account requiredFulfilment by FedEx / Amazon / UPS / ShipwirePayPal / Card Buyer Protection
Customer Reviews
Reviews sourced from verified Amazon purchasers4.2
out of 5
Based on 10 reviews
5★
60%
4★
20%
3★
10%
2★
10%
1★
0%
Awesome. The clips are easy to install--and after several ...
Wowzer✓ Verified Purchase•March 5, 2016
I had a major ice dam problem on the north/west part of my roof. Each winter, I would get drizzling and icicles whenever a large snow landed on my roof. I insulated my roof, but to no avail...the sun would melt the top of the snow and cause icicles to develop as the snow would form up over my gutter. Furthermore, as the snow melts, the gutter and downspout would become iced up completely. Of course, at the next sunrise, the ice would melt, causing a slippery and hazardous condition at the front entrance. What a disaster!
I installed this unit this year (2015-2016) and ran the deicer inside the gutter and inside the downspout to below the ground. When the snow came, I turned on my exterior power for a few hours...voila! No more ice dam. Awesome.
The clips are easy to install--and after several major high wind alerts, the cabling and clips all stayed on without a problem. Great!
The power cable is connected directly to my exterior power box--nothing else was needed. Great product.
Works great and now I'm worry free about snow and ice on my roof
BG✓ Verified Purchase•February 18, 2016
I was a little worried about this heat cable from some of the reviews but it works great. I have a roof with only a slight grade and had a lot of issues last winter (2015) with the heavy snow and lots of icing in northern NH. I had water leaking inside through the eves and a real mess. I bought the 200 ft. set and it was very easy to put down following the simple pattern shown in the instructions. There were more than enough clips and hooks to do the pattern I did covering 3/4's of the entire roof. They work great. I had them on before the snow fell and it kept the snow off. It snowed when it wasn't really forecast and I didn't have it plugged in. I plugged it in and within an hour the snow was all melted around the cable and then the clear area expanded from there. The water runs right off the roof and though it isn't as bad of winter as last year, I've had no water issues this year. It works so well I have no doubt it was handle all weather, which it has handle temps almost 20 below zero. The cable was not fragile at all and very simple to install. The only thing I needed to add was an extension cord to my outside outlet to plug it in.
Not as reliable as I need it to be
FHW3✓ Verified Purchase•February 8, 2016
Sorry to report the product is not as reliable as I need it to be. I have purchased this item 5 times over several years and put them on several homes. My luck/experience is that 2 of the 5 have gone bad for no good reason that I can see after working for some time. One went bad after several months, the other after several weeks.
I do the installations myself - very careful to ensure the cable is not twisted, crimped or damaged in any way.
As for my installation on our new house just this past January, the cable worked for a total of one storm. During the past few days we had another major snow storm. We plugged in the cable, but noticed it only melted the snow for one day, and now the cable is no longer warm. There is power to the outlet, but the cable is cold. Sigh. Trying to install another one now is out of the question.
I am wondering if it is something to do with the coupling between the power cord and the heat-bearing part of the cable. This is a sealed coupling, so obviously not meant to be serviceable (Q: Is there a fuse inside this part that might be replaced? Can the cable be cut on either side and this coupling replaced by splicing in a replacement? Owner information says nothing about servicing it).
I looked online to see if there was a way to diagnose and fix the cable, but came up empty. If you reading this are associated with the manufacturer, please tell me what steps I might take to remedy the issue if it is possible.
Works but . . .
Thomas J. Venditto✓ Verified Purchase•December 27, 2015
I bought and installed this kit a month ago. Guaranteed it won't snow THIS year LOL. I've used them in the past. They work, but must be installed correctly for acceptable results.
The kit: I have bought Frost King in the past. I'd say the Easy Heat kit is comparable.
The quality of the cable and plug etc. is "good". The quality of the shingle clips and wire ties is "ok". They are aluminum which makes them quite malleable. The clips barely hold onto the shingles. The ties barely hold the wires in place(due to the memory of the wire insulation). We'll see how they perform in the weather.'
The Process: Frankly, I think the whole setup is a "Mickey Mouse" afterthought solution. The idea of having wires affixed to roof shingles is ridiculous. I'm sure they're going to trap debris all year long. How does one rake snow off the roof if necessary? How nice would it be to have electric matt under the shingles?
You'd be wise to PRE-PLAN your entire job before buying anything!
1. Know your amperage and location of your electric. You can't daisy chain these things. Each one must be plugged directly into a GFI protected outlet. (no extension cords) If you're installing new electric, FIRST plan the wire coverage which will dictate where to install the electrical outlets. Also, I'd opt for 20 amp circuits.
2. Measure carefully before buying your cables. Don't go cheap.
I was surprised to see how much cable I actually needed. Basically, YOU CAN'T BUY TOO MUCH! Two years ago, I went cheap and just dropped one into the gutter and then 4' down the leader. It was fine for flurries and dustings but quickly overwhelmed by significant precip.
Go on Frost King web site and view the instructions and formulas. Also, take some time to come up with YOUR optimal solution which uses the lease amount of cable. For every situation, there are several solutions.
My Situation:
I have a shallow pitch roof on my 2300 sq ft ranch house. I installed mine 16" in center and a few inches up past the soffit line. I also have a skylight, which I "reached" up to. I used 1(200') and 1(50') to cover one 28' section; about half the back. That's going to max out the 20 amp circuit I allocated for the entire back of the house.
Easy Installation and VERY effective IF you take the time to install it right!
Ted in CT✓ Verified Purchase•September 30, 2015
I put up a 160 foot run of this cabling last fall after dealing with a series of brutal heavy snow winters in New England which had caused me significant problems with ice dams and frozen gutters. Not knowing how effective they would be - I thought a test on my "nightmare" section of roof over my deck (which hardly ever gets sunshine in winter) would be worth trying. The installation was a breeze (and I am not a particularly handy guy) though I was careful to follow the instructions carefully. Key things to note are:
* Measure twice - buy cable length once. They give great instructions on how to measure your roof - it's not just the length, but requires extra cabling for the ups and downs, as well as downspouts and gutters themselves. So take the 10 minutes to measure before buying.
* Plan for where you are going to plug it in - Lay it out mentally ahead of time, because after clipping it all into place, wouldn't you feel dumb if you find yourself with the plug on the far side of the house from where you wanted it?
* Put the clips in first - I did this, and then looping the cables into them was SUPER easy. Trying to put the clips in at the same time as putting the cable into them is a bit clunky and just inviting bundles of tangled cord.
* Avoid an extension cord - They tell you this in the instructions - but if you have to use one, don't use your typical orange extension cord from Home Depot. Get a super heavy 10 gauge one to avoid overheating and minimal resistance.
I installed mine on a nice warm fall day, and it went up in about 1.5 hour (which is about 30 minutes longer than it should have taken - I was being very very slow and careful). Our following winter was a doozy - at one point I had easily 3 feet of snow and ice on my roof - everywhere EXCEPT where the melt cable was. At the beginning of each snow fall, I turned it on, and left it on for 24 hours after the snow. It worked like a charm, with my gutters clear, no ice dams, and a happy me. While my electricity bill went up, it wasn't horrible and WELL worth the problem-free experience.
I just installed another 160' run on another section of my roof that had problems and am looking forward to an even better winter this year.
Page 1 of 2


