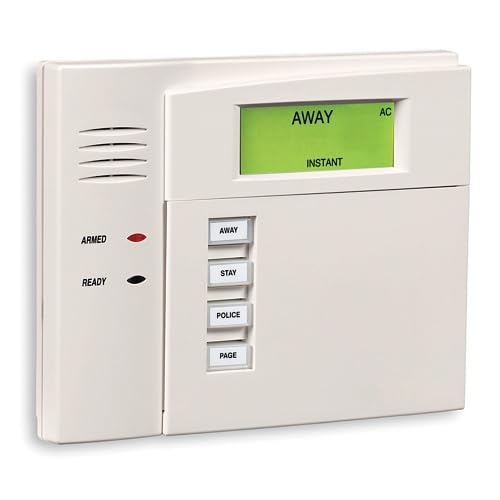
Honeywell Ademco 6150 Fixed Display Keypad


Key features
- •Honeywell Ademco 6150 Fixed English Display Keypad
Honeywell Ademco 6150 Fixed Display Keypad
List Price: $113.47$102.12DEALYou Save: $11.35 (10%)
Free shippingFree Returns – 30 daysFree Order CancellationSecure Payment2–3 Days DeliveryGet It June 23, 2026In Stock (6)No marketing spamNo account requiredFulfilment by FedEx / Amazon / UPS / ShipwirePayPal / Card Buyer Protection
Customer Reviews
Reviews sourced from verified Amazon purchasers4.5
out of 5
Based on 20 reviews
5★
85%
4★
15%
3★
0%
2★
0%
1★
0%
Simple Install - No Programming
NA•December 19, 2017
Like others, I hade to replace an old Ademco 6128 keypad connected to a Vista 10SE Panel. I called the supplier and they verified the Honeywell Ademco 6150 is the recommended keypad. I ordered it and had in in 2 days. I installed in a few minutes by connecting the 4 color coded wires to the appropriate connection points on back of panel. As noted in other comments, the mounting holes even matched up. I was so relieved that there was no programming required as the Vista panel is the brains of the system not the keypad. Good Luck
Easy to switch out as a replacement for the same item
Roy•December 17, 2017
It works as it should. I have to replace this exact Honeywell 6150 keypad because the buttons were sticking. After much online research, here's how I did it and it worked just fine. Hopefully It should work as well for you:
1. With the old one disarmed but plugged in, press the 1 & 3 keys simultaneously until a number appears on the display, the address code. It will be anywhere from 00 to 31. The number is important later
2. Use the notches on the bottom (insert a screwdriver to release the latches).
3. Remove the front panel (the wall bracket can stay, since the new front panel will match it perfectly) and then remove the four thin wires, noting which terminal they were screwed into, making sure they do not touch each other, and removing the black wire LAST.
4. Attach the wires to the same terminals on the new panel in the same places, again with the black lead LAST. It will chime and light up.
5. Press the 1 & 3 buttons simultaneously. If the number on the display matches the number on the panel you had removed, the unit will work. If it is not the same number, use the new keypad buttons to replace the number with the proper number from the old keypad.
6. You are free to press the * key next to exit this mode, and then use the master code for the system to test it. It should work and continue to do so.
Excellent Product!
D-Moe20774•December 15, 2017
I purchased this Keypad to replace an Ademco 4110XM unit that is about 20 years old. This unit took about 20 minutes to install. The original unit has a 4-wire plug type connector, the replacement has 4 screw type connectors for the 4 wires. The connector coming from the wall had to be removed, and the bare wires stripped about 1/4". There are several YouTube videos which will show how to connect the wires. There was no re-programming required after the new keypad was installed. Excellent Product!!
Great to Replace Defective ADT Keypad
William Popoli•June 5, 2017
Had an old ADT keypad that needed to be replaced. This worked great. The address was already set to 31, so it was not necessary to program anything. Very clear programming instructions on the box if you do need to change the address or program other buttons. Wiring matched up exactly, too.
Easy, inexpensive fix for old keypad
John Climacus•July 15, 2016
Replaced a 20-year old Ademco 6128 which had stuck keys. It took all of 15 minutes.
All you have to do is cut off power to your system (find the plug and unplug it, and remove the terminals from the internal battery). Then, it is a matter of hooking up 4 wires. These are extremely thin wires so it takes some care to get them installed into the terminals and the screws tightened down very fully. No need to reprogram anything. There are good videos on the Web showing most of the process. When you turn the system back on, key in your code, and then "off", twice. Also a good idea to call your alarm company beforehand and tell them you are going to have a power interruption for about a half hour.
All you have to do is cut off power to your system (find the plug and unplug it, and remove the terminals from the internal battery). Then, it is a matter of hooking up 4 wires. These are extremely thin wires so it takes some care to get them installed into the terminals and the screws tightened down very fully. No need to reprogram anything. There are good videos on the Web showing most of the process. When you turn the system back on, key in your code, and then "off", twice. Also a good idea to call your alarm company beforehand and tell them you are going to have a power interruption for about a half hour.
Page 1 of 4