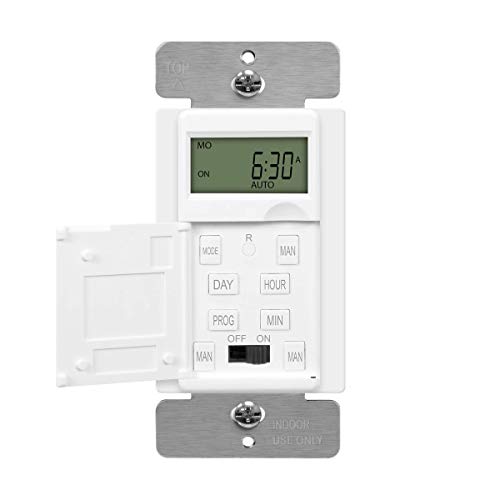
Honeywell RPLS530A 7-Day Programmable Timer Switch, White (Requires 40 W minimum)


Key features
- •Sleek design mounts flush with standard decorative wall plate (not included) (Switch also available in Almond)
- •Two operating modes: Manual (conventional on/off switch) Automatic
- •Programming: Up to 7 programs (7 on/off times) per week. A program can apply to a single day or repeat every day (a program that repeats every day is still considered one program)
- •Connection: Single pole (2 wire) or multiswitch (3 way) (500 W max / 40 W min). not compatible with CFL bulbs.
- •For use with incandescent and halogen lights up to 500 W. Requires 40 W minimum. Dimensions (HxWxD): 2.7 in x 1.8 in x 1.6 in
Honeywell RPLS530A 7-Day Programmable Timer Switch, White (Requires 40 W minimum)
List Price: $49.29$44.36DEALYou Save: $4.93 (10%)
Free shippingFree Returns – 30 daysFree Order CancellationSecure Payment2–3 Days DeliveryGet It June 25, 2026In Stock (7)No marketing spamNo account requiredFulfilment by FedEx / Amazon / UPS / ShipwirePayPal / Card Buyer Protection
Customer Reviews
Reviews sourced from verified Amazon purchasers4.1
out of 5
Based on 10 reviews
5★
60%
4★
0%
3★
0%
2★
30%
1★
10%
Know which switch to buy!
fredbyte✓ Verified Purchase•February 2, 2018
The Honeywell RPLS530A Programmable Wall Switch is just the old Aube T1033A Programmable Wall Switch. My old Aube switch lasted 7 years, better than some of its competitors (which I used to use). Perhaps the only difference now is that the Honeywell version has a battery backup in case of power outages. What was curious was that the instructions for the Aube had the wires labeled as a"1," "2," and "C" in its instructions, but nowhere on the body of the switch were there any such designations. Instead, on the Aube switch, the designations were blue wire (load), black wire (line), and white wire (neutral).
First off, inspect your present switch to determine if it is midrun or endrun (more below). You then need to understand the differences between the RPLS530A and the RPLS730B.
1) The 530A needs at least 40 W as load to operate while the 730B requires no minimum wattage and thus can be used for LED and CFL bulbs.
The following refers to single-pole installation (my situation):
2) The 730B can ONLY be used as a midrun switch, i.e., put into the middle of the circuit between the line (power) and the load (lights). Hence, it connects to 4 wires, 2 black and 2 white. The instructions for the 730B state, "This switch cannot be used if there are not at least 2 white wires joined by a connector inside the electrical box." Also, with the 730B, the wires are not labeled as "1," "2," and "C." Instead, they are blue (load), black (line), and white (neutral), like the original Aube switch.
3) The 530A can be used either as a midrun switch or endrun switch. For an endrun switch (my case), both the line (power) and load (lights) of the circuit are to one side of the switch. Hence, there are only two wires leading to the switch, one black and one white. In this case, the "2" and "C" wires of the 530A connect to the black wire of the circuit and the "1" wire of the 530A connects to the white wire.
Finally, with the 530A, Honeywell corrected the mislabeling found in the Aube instruction sheet. All the wires on the 530A unit are black and are labeled "1", "2," and "C," which correspond to the wiring diagram in the instructions.
Final hint: Use levered push-in wiring connectors, such as those manufactured by WAGO, and forgo the traditional wire nuts. It makes wiring much easier.
Easy Install, Works as Intended
Conscientious Consumer✓ Verified Purchase•December 16, 2016
Installation was easy. Previous reviews were accurate when they describe that this programmable timer does not need to have a neutral wire. The programming itself was easy to understand, and after initial setup I threw away the instructions as it is very intuitive to reprogram it in the future. I have used this timer to control LED lamps on the outside of the house, with a total wattage less than the specification listed on the label, but there have been no problems for the past few weeks after installation.
The housing of the switch is plastic, and it matches with the rocker-type light switches I already have on the same faceplate.
The housing of the switch is plastic, and it matches with the rocker-type light switches I already have on the same faceplate.
Great timer switch (and a warning to RTFM!)
Kevin D.✓ Verified Purchase•July 29, 2016
I installed two of these switches and they have been great so far for the month they have been installed.
** Although it is mentioned in the instructions (and may have been mentioned in other reviews here), the display will NOT WORK AT ALL if the bulb is burned out. I noticed this morning that the display was out on one of the switches and only after re-installing the original (i.e. typical) light switch did I realize that the bulb must be burned out. After replacing the bulb I decided to try the timer switch again and it worked fine. Again, the instructions do mention this as a troubleshooting tip but this simply didn't cross my mind. Don't be a doofus like me! :)
LED Bulbs:
----------------
As mentioned in other reviews, some LED bulbs will *NOT* work with this switch. Instead they just flash slowly when turned off. I've tried a few LED bulbs in it and the bulbs below worked okay. I can add more to the list if anyone has others. Amazon link included if available. Note that single LED bulbs are likely not going to meet the timer's 'minimum' wattage requirement but it doesn't seem to affect anything.
Regular light bulbs:
Cree LED - 60w equivalent - BA19-08027OMF-12DE26-2U100 ("Orange Box" stores only)
Specialty bulbs:
Philips LED colored bulbs - 8w - 60w equivalent - BC8A19/LED/YELLOW/ND
Feit Electric LED Party Bulb - Feit Electric A19/LED/PARTY Novelty LED A19 Party Bulb
Poor instructions and design.
C. Garneau✓ Verified Purchase•May 4, 2016
The instructions for this is very poor in my opinion. I consider myself intelligent when it comes to installations and I have installed a few like to like switches and other things like ceiling fans. When it came to this, I was confused. They should have stated somewhere that no ground wire is required. In addition, they don't tell you how to set the clock to 12 hr time. By default it is set to 24 hr (military time). In the troubleshooting section, they state how to change it with very little direction. I was still unable to change mine. I had to call Honeywell to figure out the wiring and now I may have to call about the clock setting. For now I am using military time. There is no back light in the display which makes it hard to read the display. You will need a good overhead light or a flashlight. Also, the cover for setting the time and programs opens from bottom to top so that you cannot see to program or set the time unless you squat or get on your knees. Poor design. Lastly it only comes with two of the wire connectors. There are three wires, so there should be three connector caps. Shame on Honeywell for not realizing something as simple as that when packaging. The timer is working fine so far, but I gave this two stars for poor instructions and poor design.
Easy to install, seems to work fine with LED lighs at less than the stated 40 watt minimum
TonyK462✓ Verified Purchase•February 20, 2016
I bought 2 for exterior lights using LED Bulbs. One switch replaced a single pole switch and has 2 10 Watt LED bulbs, the other replaced an existing 3-way switch and has 3 10 Watt LED Bulbs. I liked that I could use the same switch for both installations (so only need to learn programing for one kind of switch) and that they were slim in design so fit into 3 gang boxes easily (some others I have looked at are too bulky to fit in with other switches). One thing to note that is if you are replacing an existing 3 way switch you will have to go to the other 3 way switch in the circuit and add a small (supplied) jumper wire between the common wire and the red wire...it just takes a minute but the switch wont work until you do this step. Also, when the switch first powers up it may be in Manual mode (both of mine were) so you have to press and hold the button for 3 seconds until it switches over to Automatic mode. This actually a nice feature that you can disable the program the same way by switching back to Manual mode anytime you don't want to have the lights come on as planned - and then just turn it back to automatic mode when you are ready - no need to mess with the programing. I would definitely buy again.
Page 1 of 2