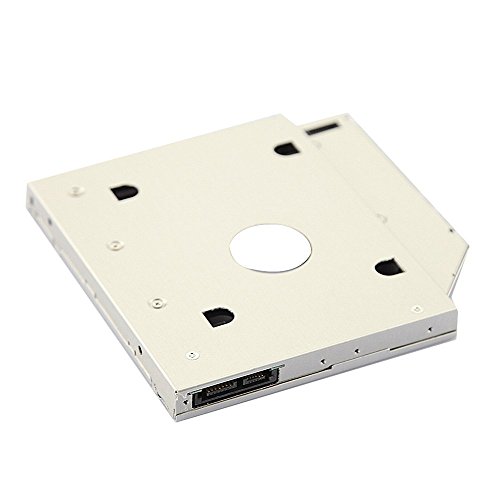
CJESLNA SATA 2nd HDD Caddy for 12.7mm Universal CD/DVD-ROM


Key features
- •Uses 2.5" SATA hard drives 12.7mm-high
- •Improve laptop performance and capacity with extra hard drive
- •Fast & Reliable connection in laptop, just as the primary HDD
- •Fully integrated into laptop, no cables/PSU/software driver needed.
BrandCJESLNA
CategoryEnclosures
CJESLNA SATA 2nd HDD Caddy for 12.7mm Universal CD/DVD-ROM
List Price: $11.62$10.46DEALYou Save: $1.16 (10%)
Free shippingFree Returns – 30 daysFree Order CancellationSecure Payment2–3 Days DeliveryGet It June 22, 2026In Stock (1)No marketing spamNo account requiredFulfilment by FedEx / Amazon / UPS / ShipwirePayPal / Card Buyer Protection
Customer Reviews
Reviews sourced from verified Amazon purchasers4.3
out of 5
Based on 10 reviews
5★
60%
4★
40%
3★
0%
2★
0%
1★
0%
OK on a Toshiba Satellite P755d with a few fixes
Sue Sew✓ Verified Purchase•July 12, 2023
This is a decently made caddy, aluminum not all plastic like one I had purchased for an older Dell (never worked but too cheap to send back).
Two issues for my particular hardware, the Satellite and a OCZ Agility. First there is a small bracket in my laptop that secures the optical housing to the machine with one screw underneath the memory bay. There are two screws from the laptop of adequate length to reach the original equipment optical housing though this bracket. These screws cannot reach down to the thread portion located deeper inside this caddy. Although I have probably hundreds of screws, none were both long enough and thin enough to get through the holes in the Satellite's hold down bracket to the caddy. I ended up using electrical tape to secure the bracket to the caddy. I think it will be fine.
Second, the Agility did not appear in the bios or in windows when laptop was booted. After much messing around with other drives in the caddy I finally realized that the Agility was not shoving up tight enough to the connectors. I had to push it from behind with a thick screwdriver. Success. A Vertex was not a problem nor was the mechanical drive. Just the Agility. I believe it is just a problem with this drive, probably connector board a little off but not noticeable when regular SATA and power cables are applied to it.
Last is I guess a non-issue from function but not from form. The bezel or lack thereof. Yes, it will look a little funny without a bezel. I had quite the time removing the Satellite's bezel from the optical drive but did manage it in the end. And I can still pop the optical in when needed (like when I was troubleshooting) and run it without its bezel in a pinch. YMMV
Overall OK certainly for the price. They might want to look into how deep those threads are where a hold down bracket is applied. My mfr screws certainly were not long enough. Would be nice if they could supply two in addition to the HD screws they already do. And the lack of even some sort of generic-ish bezel were the only reasons for the one star off.
Decent HDD Caddy for the price
K. Domingo✓ Verified Purchase•July 4, 2023
I got my caddy from AMZNeTek for a total of $10.28 (plus shipping). The order was placed on 11/16/2012 and it arrived on 11/19/2012
This caddy was used on an Asus U30SD-XA1 after I installed a Samsung 830 128GB SSD. The caddy fits in tightly inside the CD Drive bay (the only real way I can pull it off is by pulling on the faceplate). It's made with light aluminum in the front and the back (as pictured) and everything else is made of plastic, making it pretty light. It comes with the pictured ziplock bag of HDD screws (5 count in mine), a plain faceplate (which can be removed easily and slapped onto your old CD drive like I did), and the caddy (with the added spacer to lock the HDD in place). My original CD drive came with a bracket to secure the drive into the bottom of the laptop, which I transferred onto the caddy.
My only gripe is that the screws used in my CD drive were too thick for the screw holes present in the caddy. The screws I had were flat-tipped and cylindrical while the ones that worked on the caddy were sharp-tipped. The way I managed to attach my bracket was by removing the four screws bolting the aluminum cover on the caddy and used those to attach my bracket, using my old screws to bolt the cover down. For some reason, the screw holes holding the cover were slightly bigger, so my old screws fit in. Be careful though, all of the screw holes are made of plastic, so don't try and screw in too much unless you want to take out all the plastic that can secure the screw.
Currently, the HDD running in my caddy is a WD Blue 500GB drive. Despite what one of the reviewers said about the caddy running at SATA 1.5, mine runs fine at SATA 2 (the maximum that my WD can support). It depends on what the SATA port the laptop's motherboard supports at the different ports. I also found that you really can't boot off the drive in the caddy (though I found the drive listed when I went through my boot options, just not in the BIOS).
Overall, I'm pretty satisfied with this caddy. Aside from the screw problem, it works pretty great so far. It's a good buy for those who have a 12.7mm CD drive bay that they want to add a HDD to.
Read this first! Easy install once you get these tips.
D. B. Gore✓ Verified Purchase•July 3, 2023
This caddy is terrific. It is strong enough without overbuilding and lightweight enough to give as needed. I read all the tips but they were scattered, and none had the use for the included four drive mount screws, which stymied me for my first try. I have a new SSD 128GB Crucial M4 that I loaded the laptops factory restore on last April, and then once booted I installed the Windows 8 preview and have been playing with it ever since. I left Windows 7 on the old mechanical 500GB hard drive, which until now has only been put in service occasionally to update Windows. And then I replaced the SSD with Windows 8. Now that I know I am upgrading to Windows 8 in a couple of weeks I will have to format it and start from scratch as you cannot have two C: boot drives in the same computer. Rather than hassle with all the niggles that can happen I simply burned an image of the Windows 7 drive and image, in case, for any reason I want to go back, and then formatted the drive as D drive in the computer so I can put data on it as I install my programs on a fresh install of Windows 8. I have several other computers and used the laptop as a test bed so have no data on it that is not on my other computers. You might be installing a blank second drive and if you are and it was an OEM bare drive make sure you Google initializing a new drive so your computer can see it and then you can format it. Others may want to dual boot but I think many will want a fast but smaller SSD to boot and load applications like MS Office on so all runs fast, and then store the data, music, movies, pictures and documents on the mechanical storage drive like I am doing.
Here is how to install it:
1. Remove the battery first and make sure you don't have the power supply plugged in.
2. Open the Optical drive tray using a steel paper clip in the hole in the faceplate (Bezel) to unlock it and it will pop out.
3. Turn the laptop over and find either the screw through the case that holds the drive in place or remove the bottom cover that is about where the back of the drive would be.
4. Once you have located the screw remove it and pull the drawer all the way out and pull the drive out wiggling a bit because the SATA connector will hold it a bit firmly.
5. Check the generic drive caddy and if your original drive bezel was curved and thicker the flat one on the caddy will not work. Remove the one on the caddy if it is different.
6. The bracket that the screw went through to hold it in place that you removed in step 4 will have two screws holding it in place. Remember how it was oriented or take a pic and remove it.
7. There are two holes on the same place on the caddy, using the screws install the bracket on the caddy from your optical drive the same as it was on the optical drive.
8. If the bezel on your optical drive was different, and you removed the one on the caddy, do not try to remove the bezel from your optical drive yet. More later.
9. Install the hard drive mounting screws even though you don't see where they could go. Screw them all the way in but not tight or snugged just touching.
10. Drop the drive in so the SATA connectors are lined up. The 4 mounting screws will be behind the plastic tabs until you slide the drive forward to connect the SATA connectors.
11. The screws are now under the plastic tabs and keep the drive secure.in one direction.
12. Take the plastic spacer and note that when the drive is slid into the connectors there is enough room for that plastic spacer to fit to keep it from sliding back and out. It has a slot cut into it that goes over the tab in the back so align the tab with the tab in the back of the caddy and it will fill that space enough without being tight.
13. Now slide the caddy which already has the bracket to hold it into the laptop, and the hard drive installed, and watching for the bracket from the bottom to secure it to the laptop wiggle it in gently until it seats.
14. Now install the screw into the bracket.
15. Re-install the battery and boot the computer.
16. Using Windows explorer see if the drive can be found and it reads the files. If so you are almost done.
17. If the boot drive is new, like my 128GB SSD running Windows 8, and the drive in the caddy is the old boot drive with Windows 7 or whatever version on it, you have to format it to use it for storage to the main drive.
Now about the bezel or faceplate. On my Toshiba L745 using a Toshiba Samsung TS-L633 optical drive with a thicker and angled bezel, I had to remove the flat faceplate that came with this. Now I broke that getting it off but the caddy was fine. I spent a minute checking my bezel on the old drive but am afraid it will break so I decided to just use it with the bezel missing, as that is fine, until I can find a computer repair place with a used unbroken replacement bezel. The replacement bezel if not broken will snap right in but likely not come back off. I don't need to use the DVD drive again as I have an external DVD burner that was for my Netbook, which I still have. But when I sell this one I will likely want to use the caddy/SSD/8GB of SODIMM RAM on my next one and do not want to damage the optical drive and bezel so it looks and performs as new. At that point I put the 500GB mechanical back in place and restore it with the factory restore disks I created when new a few months ago.
Anyway I am off to find a used OK looking bezel that even if broken I can glue in to make it look factory. If I can't find it that is OK too.
I can't recommend this enough. It is so simple that the screws to go under the tabs and the pilot holes to accommodate the bracket screws can confuse a tech who has been doing this for decades but never engineered a caddy for this.
I hope this helps folks who did not figure out the mounting screws and claim their hard drive is rattling inside as they keep it snug without binding. Also to remind folks that their optical drive bezel has to not be broken for use on the optical drive. Any bezel that is close can be glued to the front of the caddy. The bezel on the caddy is nonfunctional anyway and will slide out with the caddy.
Well done.
Sager NP9150
SomeRandomGuy✓ Verified Purchase•June 6, 2023
yah gotta love this thing, I personally don't use my disk drive at all but I could always use more HDD space so this thing is perfect for me. The cost of one through sager is $40ish. Picked this up here for $11ish. It was pretty simple to install, just pop the cover off the old disk drive and put it on this and bam looks like it was always meant to be there. I put a WD Blue 1TB drive in there and it works great. No speed issues or anything but that depends on your laptop not the cage. My only complaint is it doesnt have anything to hold the HDD down. It has a clip that pops in at the end of the drive which prevents it from moving forward or backword but it could still pop up if you bump your laptop to hard or drop it or something. It holds well enough if you don't throw your laptop bag around but I wish it was held in properly with screws. I am considering drilling some holes in the bottom of this to line up with the screw holes in the bottom of the hdd. Seems like that would solve all my problems and fairly easily at that. Over all I cant complain, it was $11 and it does its job.
Functions perfectly; screw holes could be improved.
Amazon Customer 25557✓ Verified Purchase•May 21, 2023
I used this product to add an SSD to my mother's laptop. My PNY Optima SSD fit nicely inside the HDD caddy, being secured from the bottom by four screws which were included with the caddy. The caddy itself fit nice and snug in the HP G72-250US laptop (replacing the DVD drive). Installing the DVD drive faceplate on the HDD caddy was literally a snap. (Taking it off the DVD drive was another story!) The HDD caddy functions perfectly--no complaints--and my mother has been using it daily for three months.
I did run into two issues, only one of which is the caddy's fault:
(1) The screw holes in the back of the caddy where you're supposed to mount the bracket from the DVD drive (the bracket allows you to secure the caddy to the computer so it won't slide out)--the threads in those screw holes are too deep. In other words, the tiny screws that go into those holes cannot reach the threads. This is because the caddy frame is made primarily from plastic, using metal only where necessary. So the screws are required to go through the plastic holes (which have no threads) and then anchor into the metal behind the plastic, but the screws do not reach that far. In my case, I just superglued the bracket to the caddy since it was going to be a permanent installation. If you find yourself in the same situation and do not want to glue, you could either look for longer screws or try drilling alternate (smaller) holes in both the bracket and the caddy and hope that the screws will thread the plastic as you put them in. Actually, if you're fit is as snug as mine was, you may be able to forego the bracket entirely, as long as you're careful not to accidentally pull it out when you're handling the laptop.
(2) The other issue is that I wanted to boot from the new SSD in the caddy, but the BIOS of the laptop would not let me. I ended up having to install a small boot manager partition on the original hard drive which would direct the computer to continue booting from the SSD. You may be tempted to just put the SSD in the primary hard drive bay and put the original (mechanical) hard drive in caddy, but keep a close eye on your drive's temperatures, if you do this. SSDs can handle higher temps than mechanical hard drives, in general. Also, they don't tend to generate as much heat because they fulfill the read/write requests so quickly. So SSDs are better suited for HDD caddies, in my opinion. If you suspect your drive might get hot in the caddy, you could drill a few well-placed holes to let air pulled in by the CPU fan blow over the hard drive (which is what I did).
Page 1 of 2