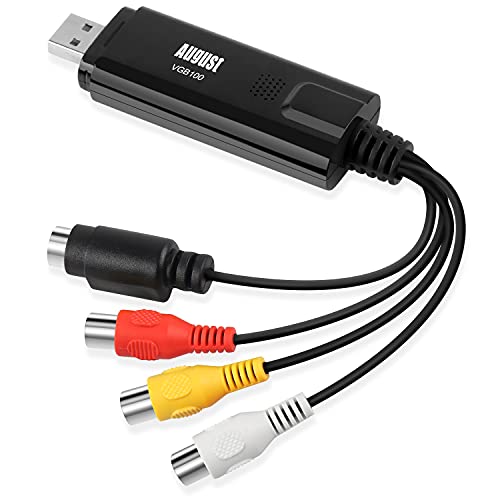
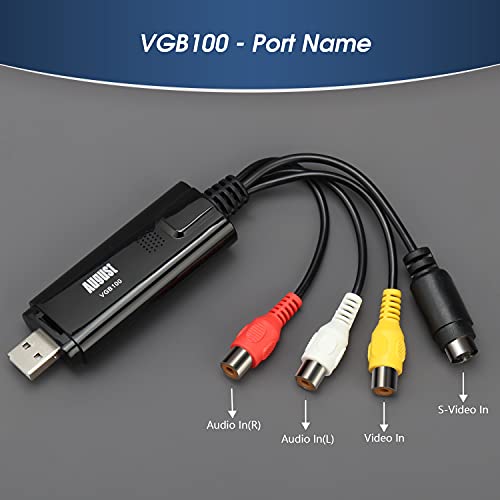
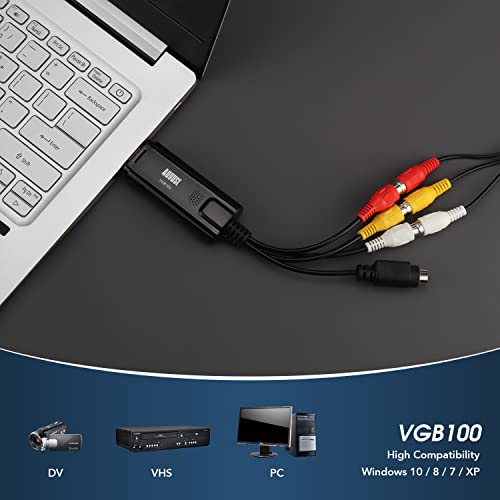
August VGB100 - External USB Video Capture Card - S Video / Composite to USB Transfer Cable - Grabber Lead for Windows 10 / 8 / 7 / Vista / XP


Key features
- •💚SAVE VHS TAPES TO PC - Save your precious memories from VHS tapes onto your PC hard drive. 💚💚💚Daffodil US is the sole authorized seller of authentic August products on the amazon.com. Offers from other sellers are scamming attempts, counterfeit products or unauthorized reselling.
- •💚CREATE DVD COPIES - It's easy to burn your video to a DVD disc and watch back on your TV or send to friends and family using the included software converter and burner.
- •💚RECORD RETRO GAMEPLAY - Connect to Xbox 360 / PS3 / Game Cubes and record any game play footage from consoles with SD video out.
- •💚CONNECT TO CAMCORDERS - SVHS and Composite AV as well as included SCART adapter in allow connection to almost any camcorder for use as a screen for monitoring or to record your footage to hard drive
- •💚Save and Convert Videos on Computers Running WINDOWS 10 / 8 / 7 / XP and from tapes in PAL / SEECAM / NTSC formats
August VGB100 - External USB Video Capture Card - S Video / Composite to USB Transfer Cable - Grabber Lead for Windows 10 / 8 / 7 / Vista / XP
List Price: $52.29$47.06DEALYou Save: $5.23 (10%)
Free shippingFree Returns – 30 daysFree Order CancellationSecure Payment2–3 Days DeliveryGet It June 22, 2026In Stock (2)No marketing spamNo account requiredFulfilment by FedEx / Amazon / UPS / ShipwirePayPal / Card Buyer Protection
Customer Reviews
Reviews sourced from verified Amazon purchasers3.8
out of 5
Based on 10 reviews
5★
40%
4★
60%
3★
0%
2★
0%
1★
0%
Works great with an S-Video cable and OBS Studio
Amazon Customer✓ Verified Purchase•September 21, 2023
Works great with my canon gl2, although i had to order an S-Video cable which i recommend you do the same, they are very cheap. First i installed all the drivers and then i just plug in the cord from the av output on my camcorder and put it in the capture device along with the s-video cable then into my computers usb port. Now the app that it comes with is horrible, i highly recommend obs studio which is what i use and is free. Once the camcorder is set up, add a device on obs and select video capture device, and select the capture card. Then after adding it, right click your mouse while hovering over the video capture device and open device properties and scroll down to audio output mode and click on capture audio only which sounds odd but it works. After that it should show up on the screen. Then go to the top left and select scene selection and click new, then play your video from the camcorder and press "start recording" on the bottom left and let your video play through. When your video is done, press stop recording and go up to scene selection and click "export" and select your video and you can save it to your desktop. I hope this works for you if you are having trouble, it works for me.
Does the job, but software lacks in features
Corey Shuster✓ Verified Purchase•September 7, 2023
First, instead of receiving an "August" branded capture device like in the picture, I received an "EasyCap" device. Probably not much of a difference, but might be important to some.
The device itself installed fine on my Windows 8 desktop using the included disc. However, the capture/editing software (Honestech VHS to DVD) did not seem to have an activation key. Turns out it resides *on the disc* itself, in a file called SN.txt. Be sure to look there if you can't find the key physically included.
The software is decent, allowing you to at least adjust the quality/pixel size of the recording, and letting you crop / add transitions to the result. It is lacking in many features however, such as audio input volume control and the ability to compress to common file formats (like .wmv, .mp4, etc.) By default, it captures in .MPEG, and can stitch together those clips to a raw .AVI file. After capturing/converting to .AVI I use different software (Adobe Premiere) to export in the file formats I need.
Over the past month I've done about 30 or so tape conversions to 720x480 video thus far, with minimal error. Are there better options to choose? Maybe, but as long as this continues to work I'm perfectly satisfied.
Worked exactly like it said it would
Amazon Customer✓ Verified Purchase•August 18, 2023
Wanted to transfer old VHS home movie to DVD. I read several reviews and decided to take a chance.
I hooked up the red, white, and yellow wires to the OUT jacks in the back of my VCR and plugged the USB into my laptop. I did not power up VCR.
I popped the mini setup cd into the laptop and followed along with the picture instructions through the setup ( I have Windows 10, by the way) Everything went smooth. After installation, I clicked on the icon, opened the program and powered up my VCR. I put a blank DVD+R in the laptop. I started the VCR tape clicked on the little gear symbol in the program to start recording. I could actually watch the tape on my laptop screen. I did get an error because I didn't set a timer for the tape. I just guessed and put 1 hour and 27 minutes, started the tape over and viola!
One thing I did get confused about is you can actually see the time used that is going on the DVD+R... after video stopped I hit stop recording and was then asked if I wanted to burn it to DVD right then. I had the box checked that said to burn it but I wasn't sure it did so I did it again? If that makes sense. It went through a preparing playback type of prompts and went into burn mode and I heard the DVD spinning. In any case, when it was through I saved the file, closed the program and powered up only the DVD and sure enough there it was!
Pardon all the rambling, but I hope this helps someone else.
Good hardware device works with Windows 10, but comes with worthless software
Theodore Green✓ Verified Purchase•August 13, 2023
With this device I have now successfully my transferred my Video8 (8mm) video tapes to media files with reasonable quality. Running Window 10. However the included software (Honestech VHS to DVD 4.0) was worthless as it would only create very low resolution video in which any motion was heavily pixelated; it has no resolution options. Instead I used the PotPlayer software which ironically came with the DigitNow converter in which the hardware smeared the video. (I returned the DigitNow converter.) I also tried the OBS Studio software which was recommended by DigitNow, but I found PotPlayer easier to use; it is a free download. I also used MiniTool MovieMaker to split and trim the videos.
Great product. Easy to set up and use (with ...
BFD✓ Verified Purchase•July 17, 2023
Great product. Easy to set up and use (with some trial and error, see below). Manual could be more explanatory. One issue during set-up was that in capture mode you need to set the coding for the vhs tape. It has a PAL default, which is European. U.S. is NTSC. You have to figure that out on your own and then type it in, which can be confusing. It will then have several NTSC options to choose from. I chose the first one, which was NTSC-M to try it out to see if it worked. Dumb luck, as it worked fine. Then you have to do a bit of trial and error to figure out how to work it. This is all doable and it works like a charm. I gave it four stars due to the mediocre documentation, otherwise it would have been 5 stars.
Page 1 of 2