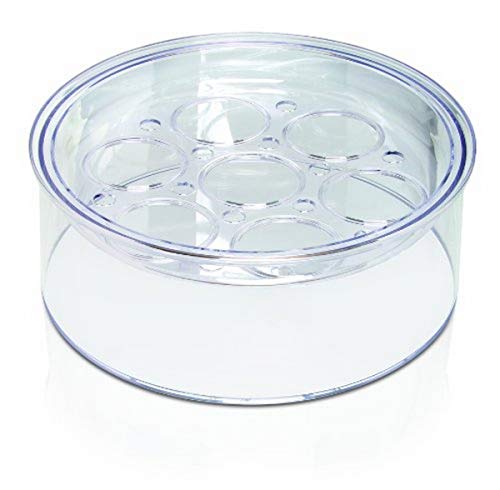
Euro Cuisine GY50 Greek Yogurt Maker with Ultra Fine Mesh Strainer Basket, BPA Free, Patented Greek Yogurt Strainer for Homemade Greek Yogurt (White)


Key features
- •Transform up to 2qt of plain Yogurt into Greek Yogurt
- •For Making Greek Yogurt/Cheese Yogurt
- •BPA Free components
- •Simple instructions and recipes for using yogurt cheese included
- •Can be used with store bought or home made yogurt
Euro Cuisine GY50 Greek Yogurt Maker with Ultra Fine Mesh Strainer Basket, BPA Free, Patented Greek Yogurt Strainer for Homemade Greek Yogurt (White)
List Price: $49.57$44.61DEALYou Save: $4.96 (10%)
Free shippingFree Returns – 30 daysFree Order CancellationSecure Payment2–3 Days DeliveryGet It June 25, 2026In Stock (3)No marketing spamNo account requiredFulfilment by FedEx / Amazon / UPS / ShipwirePayPal / Card Buyer Protection
Customer Reviews
Reviews sourced from verified Amazon purchasers4.6
out of 5
Based on 10 reviews
5★
70%
4★
30%
3★
0%
2★
0%
1★
0%
Difficult to clean.
A. Mann✓ Verified Purchase•August 13, 2023
I had the black style for several years and it finally cracked on me. I bought this one which I liked at first. One day I kept the yogurt in the fridge a little longer than I usually do because I wanted it to be very thick. I couldn't get the yogurt off of the fine mesh screen, even after soaking it in hot water with soap. I used a brush and it still wouldn't come clean. I finally purchased another black one which seems to clean easier.
Perfect size
Mountain Home✓ Verified Purchase•August 7, 2023
I just started making my own yogurt. So easy. Who knew? But the cheese cloth straining was a total mess and I felt like I was throwing away good yogurt that was clinging to the cloth. This strainer is the perfect size for a batch of yogurt using a half gallon of milk. It is a fairly sturdy plastic frame with a fine porous nylon mesh that allows whey through but only minute amounts of solids. I end up with a quart of whey and a quart of really thick Greek style yogurt. I use the whey for bread baking or to cook grains or rice. It is full of all the same good bacteria and proteins as the yogurt, so don't toss it. You can even add it to smoothies. The only reason I gave this 4 instead of 5 was it will just fit the two quarts of unstrained yogurt. I wish it was a wee bit bigger, by just a cup.
Strainer works so well!
Chris✓ Verified Purchase•August 2, 2023
I recently started making homemade Greek yogurt in my instant pot, and one of the websites recommend this strainer. It is amazing! I decided not to spend more for the one with metal mesh, and I have found this older model to work very well and be very easy to clean. It also holds a lot - enough to hold a half gallon batch. I love the lid on it that doubles as a base. I simply grab the basket and lid, flip it over, and the yogurt plops down onto it. I also like the cut outs in the lid that make it very easy to pour the whey into a mason jar to save for making bread.
If you're interested in trying to make your own yogurt, this will pay for itself quickly in what you save on store-bought.
If you're interested in trying to make your own yogurt, this will pay for itself quickly in what you save on store-bought.
Delicate Mesh
Amazon Customer✓ Verified Purchase•July 28, 2023
I love my yogurt strainer. I have to be very careful washing it after each use because the mesh is so delicate I'm so afraid to tear it.
ONE STOP REVIEW - Strainer Review + Yogurt, Yogurt Starter & Whey Tips
SuzanKen✓ Verified Purchase•July 20, 2023
Euro Strainer is the perfect finishing tool for homemade yogurt. I only drain mine for 30 minutes - 2 hours even though it indicates 3-12 hours. This gives me about .5 cups (30 minutes) to 1.5 cups of whey which is perfect for whey bread that I talk about later. The Euro Strainer will hold 2 quarts of yogurt. So, after I make my yogurt either in the pressure cooker (more later) or the microwave/stovetop & oven method, I put the bowl or pressure cooker inner pot into the refrigerator to cool and thicken. Wipe the condensation from the lid.
I put the cooled yogurt in the Euro Strainer and put back in the fridge for about 2 hours. When finished & with the lid on, I give it one big flip then drop it about 2" from the counter. A majority of the yogurt will then be removed from the strainer onto the lip. If you did a full 2 quarts of milk, you need to work quickly especially if you didn't strain 3+ hours. I move it to individual containers or two quart mason / ball jars for storage. You will want to get a flat knife or spatula and gently remove any remaining yogurt from the strainer. Be very careful, as it's a fine mesh and you don't want to detach. I then flip it over and use my faucet sprayer working from the outside with it tilted down to drain flushed yogurt into the sink. Spray around the mesh completely removing the yogurt. DO NOT LET THE YOGURT SET UP OR IT WILL BE HARD TO REMOVE. I put it somewhere safe to dry. I flavor my yogurt with stevia & vanilla about 1/8 tsp per cup. Two quarts of milk will yield about 7 cups of yogurt. I add berries as we eat it. The Euro Strainer is a perfect "END" to a great batch of homemade yogurt.
YOGURT STARTER: If you are making yogurt starter for your next batch which I what I do every 6th batch, fill your ice cube trays with the plain yogurt before straining or flavoring. When yogurt cubes are set, move to a ziplock for freezer storage. I use two cubes that I lay out to thaw when I start my next yogurt batch. Once slightly thawed, use a fork or knife to break into half to thaw a little quicker.
YOGURT TIPS - When I first started making yogurt I brought it to 185 on the stove. I quickly moved to the microwave method and found 16 minutes of 2 quarts of milk in a 2 quart pyrex glass measuring cup (pour pitcher) gives me 185 degree. Stir every 3-4 minutes to get rid of cold spots. You then need to cool to below 120 or you will kill your yogurt bacteria. You can either leave it on the counter for a slow cool or put in a sink of ice cold water. Stirring every so often to cool quicker. By now, your yogurt cubes should be melted and be in your pyrex / bowl or inner pot. As soon as your milk hits 120, pour about a cup of milk back into the pyrex dish or bowl if you are doing the oven method or into the inner pot if doing a pressure cooker method. Stir it around good, then add the remaining milk and stir again.
To incubate the yogurt, I put in my Instant Pot which has a yogurt mode setting it for 10 hours and normal pressure. Note, that pressure isn't used, but there is a low setting (Jiu Niang) and a high to scald (I find it's easier in the MW). You aren't under pressure, so you can use a glass Instant Pot lid or with the regular IP lid you can vent or close. When its finished, I wipe the condensation off the top and move to the fridge.
You can do the oven method too instead of the Instant Pot. I turn my electric oven on the lowest it will go which is 170. I turn the light on. To incubate, move the yogurt in a bowl/pyrex covered with saran wrap to the oven. Turn off the oven. Do not open the door. Leave for 10 hours with the light on to keep it about 100 degrees.
For those without a pressure cooker with yogurt mode or electric oven, I've heard of the hot water method with mason jars in a cooler. People wrap their pressure cookers with a towel. I've not used any of these, but google for more info.
WHEY - This old gal has a great whey bread recipe on her site. I use half white and half whole wheat, plus the 1.5 cups of whey, salt and yeast. It's a no knead bread. DO NOT THROW THE WHEY away. It's very nutritious and can be used different ways if you google it. I've even drank it. Think of it as a shot of healthiness.
I hope this review helps and although I went into additional details, anyone using a Euro Strainer wants to know how you make the yogurt to strain and also what to do with the whey !!! The price of a gallon of milk is so cheap. A half gallon of milk will yield 7 cups of great yogurt. It's worth the time to make healthy yogurt. If you liked this review, please be sure to mark it was helpful. Thanks.
Page 1 of 2