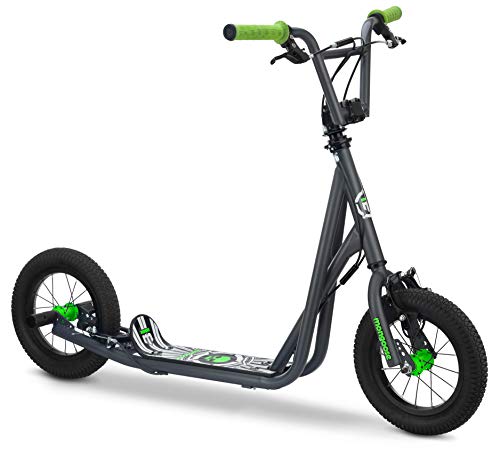
Mongoose Expo Scooter, Ages 6+, 12-Inch Air-Filled Wheels, BMX-Style Handlebars, Steel Frame, Wide Foot Deck, Axle Pegs, Freestyle Gyro Brake Rotor, Kick Scooter for Boys and Girls


Key features
- •12 inches Air tires perform well when riding on paved and unpaved surfaces
- •Wide foot deck for balance and stability while coasting
- •Caliper hand brake offer confident speed control
- •BMX freestyle rotor and axle pegs make for a trick Ready scooter
Mongoose Expo Scooter, Ages 6+, 12-Inch Air-Filled Wheels, BMX-Style Handlebars, Steel Frame, Wide Foot Deck, Axle Pegs, Freestyle Gyro Brake Rotor, Kick Scooter for Boys and Girls
List Price: $224.83$202.35DEALYou Save: $22.48 (10%)
Free shippingFree Returns – 30 daysFree Order CancellationSecure Payment2–3 Days DeliveryGet It June 25, 2026In Stock (30)No marketing spamNo account requiredFulfilment by FedEx / Amazon / UPS / ShipwirePayPal / Card Buyer Protection
Customer Reviews
Reviews sourced from verified Amazon purchasers3.9
out of 5
Based on 10 reviews
5★
60%
4★
40%
3★
0%
2★
0%
1★
0%
Handlebar is a litter loose even after I tightened them up good.
tengps✓ Verified Purchase•May 14, 2017
Birthday present for my daughter and she loves it. Handlebar is a litter loose even after I tightened them up good.
Very good deal and solid scooter.
Pam Jag✓ Verified Purchase•May 5, 2017
This is a fun scooter even for an adult like me! I am 5'4" and I can see it fine for anyone at or under 5'9". It just gets a little short re. bars but still can be reasonably enjoyed. This is meant for trick' riding and front wheels turns complete 360. It is sturdy, plenty fast enough, with back pegs for tricks. I'm having fun popping lil' wheelies with them. Nice fat and smooth riding wheels. I really like it to cruise on. Breaks could be better but I plan to improve on break pads that are softer/better quality. It is the cable set up that affects them and can be adjusted just so far. But very sweet scooter, good for adults, solid, and a great bargain. I really dig it!
Some Assembly Required
Richard L✓ Verified Purchase•April 30, 2017
Before you order this scooter, make sure that you have all necessary tools, or buy it with sufficient lead time needed to take it to a bike shop for assembly. You may consider this a toy but it will very likely be used on Public Street and your child's life may be at risk if not assembled correctly.
Tools Needed:
1. 6mm Allen wrench
2. An adjustable wrench or 9, 10, 14 & 15 mm box end wrenches or sockets
3. Cable cutters or sharp scissors or utility knife
4. Air pump or compressor
5. Optionally pliers, super glue, lock tight, grease, small shrink tube lighter and gloves
I paid for this scooter myself and was not compensated in any way for this review.
First, it is much larger than a standard kick scooter. It will easily handle riders in excess of 150 lbs. It is a heavy scooter and may be too big for a child under age 7. The box clearly states "Age 8+". There is no provision for folding and I have to put the rear seat down to get it in a standard hatchback car (Nissan Versa).
Because it is bigger and has nice 12" wheels, it glides over most bumps, cracks, and irregularities. Large potholes and slotted storm drain covers are still serious hazards.
Packaging was very good. The box indicated that it should not be placed on its side and did not show any signs of having been dropped or damaged. The scooter had all parts zip tied to the frame and was a little challenging to pull up out of the box.
I used wire snips to cut off all zip ties and removed the paper and plastic wrapping to inspect the parts.
The wheels are delivered totally flat. An air pump or compressor will be needed. Be forewarned, the clamp on my hand pump that holds the chuck on the valve stem would not fit between the hub and rim. I had to use my compressor. If your bike pump doesn't fit, take the wheels to a service station for air prior to attaching them to the frame.
Construction quality is on par with any low priced consumer good mass produced in China. In my instance, the rear brake pads were tightened out of alignment with the rim. You will very likely need to adjust the brake pads. As other reviewers noted the brake cable ferrules are not crimped correctly and will fall off. Put a drop of super glue in it and tap it in place or just wrap the wire end in electrical tape, or use a short piece of shrink tube on the end.
The handlebars are not attached. You will need to remove 4 Allen bolts and position the handlebars. I was able to do this single handed, but a second person to hold them in place would ease this task. Once the handlebars are positioned and tightened the brake cables will need to be attached. There are two cables on the right for the rear brake and one coming up out of the stem tube to be attached to the left brake handle.
Adjusting the brakes is not difficult, just take your time and tighten everything when done.
1. Loosen the nut clamping the cable at the rear calipers.
2. Route the two cables attached to the right brake lever through the handlebars and down to the upper cable stop.
3. Screw the alloy barrel adjusters all the way into the upper cable stop and slide the beaded end sideways into the detangler.
4. Hold the rear brake calipers closed against the wheel rim and pull the brake cable taught at the calipers.
5. Tighten the caliper cable clamp nut.
6. Adjust the brakes at the calipers, detangler and at the lever as necessary so that the wheel turn freely and stops easily when the brake lever is engaged.
Now on to the front brakes,
1. Loosen the nut clamping the cable at the front calipers
2. Push the cable up into the head tube until you have enough slack to reach the left brake lever.
3. Screw the barrel adjuster most of the way in and align the slots in the barrel adjuster, nut and break lever.
4. Slip the cable end into the round opening under the break lever and feed the cable into the slot on the barrel adjuster.
5. Turn the barrel adjuster ½ turn.
6. Hold the front brake calipers closed and pull the cable tight.
7. Tighten the caliper cable clamp nut
8. Adjust the barrel adjusters at both ends until the front wheel turns freely and stops easily when the brake lever is engaged.
Assembly took me exactly 40 min from the time the box arrived to first test ride. I provided detailed instructions on what is required to assemble this scooter so that potential purchasers are able to make an informed decision prior to purchasing.
My daughter's first scooter was a $20 scooter. This was to gauge her interest and ability. She didn't use her scooter much until about age seven. In the past 3 months, she has been using it every day and has worn it out. Since this is not a review of that scooter, I will not go into detail. Suffice it to say she couldn't keep up with her friends and small bumps caused tumbles that left her fearful of sidewalks and some streets in our neighborhood.
Now with the Mongoose she has confidence and can keep up with her friends. All of the kids prefer her scooter over any other brand or style. As a parent, I would rate it 4 stars, for size and build quality but my daughter says "it is a solid 5" and since she is the one who rides it every day I gave it a five.
After her first test ride I removed the axel pegs from the rear, as she did hit them occasionally with her ankle when kicking. I later reattached them to the front axle, but I am not sure if I will keep them on or not.
Great ride!
Wonka7364✓ Verified Purchase•April 25, 2017
Very cool scooter- our 6 year old boy loves it! It's a tiny bit big for him, but he will definitely have it now for years to come. We love the big, easy ride wheels, love that there are real brakes and love that it rides as smooth as a bike. BUT...it was a serious assembly. I think I'm pretty handy, but this was a project and I still can't get the breaks to work perfectly. Be prepared to fully assemble this scooter!
Stylish and great for off-road or street (tricks)!
Erin✓ Verified Purchase•April 10, 2017
Brakes were tough to do myself (due to the rotor), but other than that it was easy to build and it's an awesome scooter. My 10 year old prefers it to his bike. He always liked his Razor, but loved that he can "off road" with this. The rotor is Cooke for tricks on front pegs, too!
Page 1 of 2