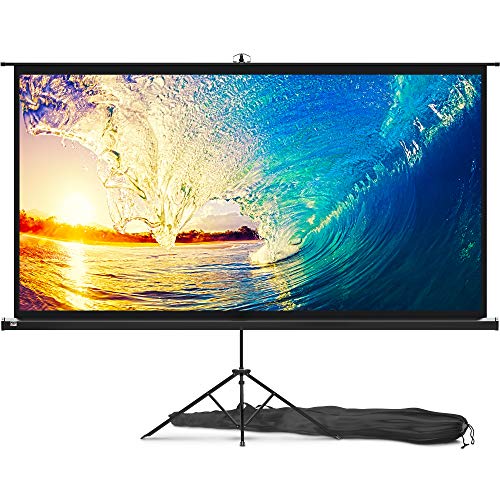
Silver Ticket Products STR Series 6 Piece Home Theater Fixed Frame 4K / 8K Ultra HD, HDTV, HDR & Active 3D Movie Projection Screen, 16:9 Format, 100" Diagonal, White Material STR-169100


Key features
- •(Recommended) Watch the online videos on manufacturers website and video websites
- •The screen surface provides a 1.1 gain and an exceptionally wide viewing angle at 160 degrees with no resolution loss at any viewing angle
- •2 3/8" heavy duty beveled aluminum frame wrapped in light-absorbing black velvet material for a beautifully crisp viewing image; Enjoy beautiful movies, pictures, and games in FULL HD and Active 3D
- •Quick and easy assembly with tensioning rod system ensures that you can bring cinema-quality entertainment to your home in just a few minutes
- •Secure top and bottom mounting brackets that allow horizontal adjustment
Silver Ticket Products STR Series 6 Piece Home Theater Fixed Frame 4K / 8K Ultra HD, HDTV, HDR & Active 3D Movie Projection Screen, 16:9 Format, 100" Diagonal, White Material STR-169100
List Price: $334.62$301.16DEALYou Save: $33.46 (10%)
Free shippingFree Returns – 30 daysFree Order CancellationSecure Payment2–3 Days DeliveryGet It June 24, 2026In Stock (1)No marketing spamNo account requiredFulfilment by FedEx / Amazon / UPS / ShipwirePayPal / Card Buyer Protection
Customer Reviews
Reviews sourced from verified Amazon purchasers4.8
out of 5
Based on 10 reviews
5★
100%
4★
0%
3★
0%
2★
0%
1★
0%
Video professional theater screen
Paul✓ Verified Purchase•July 29, 2023
I am a video professional. I shoot and edit videos for corporations as well as make documentaries, some of which are nationally televised. I know video and I know what makes a great image. I'm using an Epson 5040 projector and this screen is stunning! I had a much older and much more expensive screen and this is way brighter, very even from edge to edge and sharp as a tack with the right images on it. Can't recommend this high enough, for the money it's impossible to beat!
Do not be tempted with stretchable, wrinkle resistant, or DIY blackout material…wow
Ryan✓ Verified Purchase•June 30, 2023
First off, I have been using projectors in my home theater for years. I have used the free ones, that are part of the package, I have built DIY ones, and even used Carls blackout material. They were excellent.. or so I thought.
A month ago, I upgraded the projector, to one capable of Wi-Fi, Bluetooth, 4K etc. I had my previous projector, 12 ft from screen, ceiling mounted. Dead center. No matter what, the screen made the image terrible.
I spent a lot on the projector. I spent a ton of time wiring speakers in the ceiling and even more in the furniture. No way I accepted that a projector that was triple the cost, of the old, would look that bad.
I researched a ton and landed here. I have a 2 car garage, that is split dead down the middle, studded, insulated, dry walled, and I tan two separate ac systems.
The build was a little tight, I laid a white b d sheet down, prior to laying anything else down. I wanted to prevent smudges or and other issues.
On the back off all rails for the frame, is a number indicating the quantity of white tabs needed, that hold the screen. You can assemble the frame, once the corner and center supports, are in, you have to slide the white tabs onto the back side of the rail. Keep them close to the corners.
The rods are fed too and bottom, with the side going in, that has no rubber. Feed it through the screens loops. Every place you see where the pole is visible, that is where you will pull the screen, up over them, and the rod will hold it between the canvas.
Pull it tight like a spare tire, in a star formation, pulling the immediate opposite side every time.
A Phillips screw driver is all that is needed. I did not anchor the corners, with the screws, until the very end. Build took about 45 minutes to build, in a tight area, and I did it alone.
A.) I woke up to tackle this, and was blown away by the simplicity. The order came right on time. It came well protected.
B.) I am no millionaire, but if I enjoy something, I want to enjoy it the way it was designed to be enjoyed. So, I bought the new Xbox series x and the 4K Roku.
I went from 98", to 110". I built my previous to spec, but had to reduce image to 80%, and it would never touch the boarders. Turned out the wood started to bow, causing the screen to look bad. My wife was standing in the theater, as I turned it in the first time and said wow!! She is never impressed by my Tim the Tool Man Taylor approach.
Here are three photos to show gain,my maximum viewing angle is clear at 170 degrees, the second photo is displaying clarity from the worse angle, the last photo is the screen with every light on in the room.
As you can see, Call of Duty MW2, on Xbox Series X, is still very clear even with a lot of light.
I would never buy anything but another screen from them. If I grow richer, I'd buy better models, but it would be from this seller. When I ordered it, the messages me to confirm the order and answer a few questions. That's great service too. Best purchase experience in months.
Excellent value for projector screen
BETTE B.✓ Verified Purchase•June 20, 2023
I have been using a beige wall with slight texture for watching my Optoma HD-20 and now my Optoma HD25-LV projector. The bare wall was able to provide a very good picture for Blu-ray and 3D. But I kept reading how a good projection screen would give a much better picture because of the smooth surface and neutral color. I decided to go with a fixed screen because it gave me a better chance of no wrinkles and no motor to break. I decided on the Silver Ticket brand because of the reviews and ease of construction shown in the videos. The cost seemed very reasonable compared to other screens.
The screen arrived very soon after ordering. I think it was only three days. The packaging arrived in excellent shape, but it probably would not have mattered if there were dents in the outer box because it was double boxed. Everything was very well packaged.
I started assembly by vacuuming the carpet in the assembly areas as recommended, but I also laid down some extra sheets on the carpet. (I have two shedding dog!). I never did have an issue with the screen attracting hair or fuzz during the assembly or installation.
I laid out all the frame pieces and started assembling the top and bottom sections as instructed. I placed the listed number of plastic snap lugs and wall mounting brackets in the slots. Check the orientation of the wall mounting brackets. Two for the top and two for the bottom. They are different. Some videos recommend a portable drill for quick attachment of the parts but I found a regular Philips screw driver just as fast. Portable drills have a tendency to strip out screws. I then attached the sides after installing the listed amount of plastic snap lugs. I noticed a little jogging of the frame parts was required to fit the screws to the holes. Once all the frame pieces were in place I tightened everything down. I now had a very secure, stable frame.
Next, I rolled out the screen completely between the frame, front side (white) down, black side up. I then installed the six rods. The two longer rods go on the the vertical sides. They have a "bubble" on each end. The rods for the horizontal sides, two for the top and two for the bottom, have a "bubble" on one end only. The end without the 'bubble" go in the screen first. The rods took a little twisting and pushing the rod along to complete their installation. When completed there will be two rod 'bubbles" at each corner, none in the middle.
I then started pulling the rods over the plastic snap lugs. As instructed I started at the corners first. The first two corners went easy. The third corner took a little more strength as the screen started stretching. The last corner took the most strength but was not difficult. Now that all the corners were done, I just finished up by pulling the rods over the plastic snap lugs until all were completed. I did not require any additional tools to do this, but some hard but not impossible pulling was needed. I new this meant a nice smooth screen.
I lifted the screen up to check for alignment and everything looked smooth and solid. No further adjustment was required. To install the middle support I laid the screen back down and put one end of the middle support in the center of the bottom frame slot. The other end of the support I put down about a foot from the center of the top frame in the slot. This is because the screen stretching causes a slight bow in the center of the top and bottom frames. I undid two of the plastic snap lugs between the support bar and the center of the frame to put less tension on the frame. I then pulled slowly on the center support to get to the top frame center. I pulled a few times, took a break, and then pulled again. Slowly but surely I got the center support to the middle of both top and bottom frames. This was the most difficult part of the assembly. But patience results in a perfectly squared up screen. I then pulled the rod over the two plastic snap lugs I had unattached earlier.
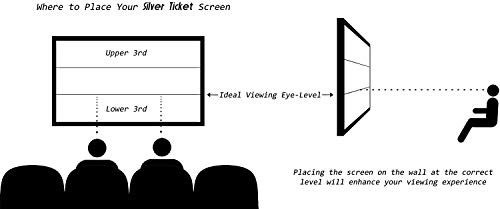
To attach the screen to my wall I located studs that gave me the more than 48" but less then 80" requirement for the wall mounting brackets. I needed 14.5" distance between my ceiling and actual viewing part of the screen for my ceiling mounted projector. The screen frame is 2.5 ". The supplied wall mounting bracket holes are down .75". So 14.5" - 2.5 + .75" = 12.75". The important part was considering the dimensions of the screen frame and knowing the wall hanger holes are down .75" from the top of the screen. So I drilled four holes. The top two holes were both down 12.75" from the ceiling and 63.875" apart because of stud location. The bottom two holes were 61.375" perpendicular from the top two holes. This measurement was found by measuring the distance between the top and bottom wall mounting bracket holes on the screen. I installed the four supplied wall screws. After sliding the wall hangers to match the wall screw measurements, two of us were able to set the screen on the wall screws and set it in place.
The Silver Ticket Screen is a vast improvement over the bare wall. Colors appear more vivid, more detail is visible, the the overall picture is brighter. Having a frame gives the picture a more movie-like appearance. The screen itself is totally uniform with no wrinkles or annoying inconsistencies that a bare wall might have. The price makes this screen quite a bargain.
The screen arrived very soon after ordering. I think it was only three days. The packaging arrived in excellent shape, but it probably would not have mattered if there were dents in the outer box because it was double boxed. Everything was very well packaged.
I started assembly by vacuuming the carpet in the assembly areas as recommended, but I also laid down some extra sheets on the carpet. (I have two shedding dog!). I never did have an issue with the screen attracting hair or fuzz during the assembly or installation.
I laid out all the frame pieces and started assembling the top and bottom sections as instructed. I placed the listed number of plastic snap lugs and wall mounting brackets in the slots. Check the orientation of the wall mounting brackets. Two for the top and two for the bottom. They are different. Some videos recommend a portable drill for quick attachment of the parts but I found a regular Philips screw driver just as fast. Portable drills have a tendency to strip out screws. I then attached the sides after installing the listed amount of plastic snap lugs. I noticed a little jogging of the frame parts was required to fit the screws to the holes. Once all the frame pieces were in place I tightened everything down. I now had a very secure, stable frame.
Next, I rolled out the screen completely between the frame, front side (white) down, black side up. I then installed the six rods. The two longer rods go on the the vertical sides. They have a "bubble" on each end. The rods for the horizontal sides, two for the top and two for the bottom, have a "bubble" on one end only. The end without the 'bubble" go in the screen first. The rods took a little twisting and pushing the rod along to complete their installation. When completed there will be two rod 'bubbles" at each corner, none in the middle.
I then started pulling the rods over the plastic snap lugs. As instructed I started at the corners first. The first two corners went easy. The third corner took a little more strength as the screen started stretching. The last corner took the most strength but was not difficult. Now that all the corners were done, I just finished up by pulling the rods over the plastic snap lugs until all were completed. I did not require any additional tools to do this, but some hard but not impossible pulling was needed. I new this meant a nice smooth screen.
I lifted the screen up to check for alignment and everything looked smooth and solid. No further adjustment was required. To install the middle support I laid the screen back down and put one end of the middle support in the center of the bottom frame slot. The other end of the support I put down about a foot from the center of the top frame in the slot. This is because the screen stretching causes a slight bow in the center of the top and bottom frames. I undid two of the plastic snap lugs between the support bar and the center of the frame to put less tension on the frame. I then pulled slowly on the center support to get to the top frame center. I pulled a few times, took a break, and then pulled again. Slowly but surely I got the center support to the middle of both top and bottom frames. This was the most difficult part of the assembly. But patience results in a perfectly squared up screen. I then pulled the rod over the two plastic snap lugs I had unattached earlier.
To attach the screen to my wall I located studs that gave me the more than 48" but less then 80" requirement for the wall mounting brackets. I needed 14.5" distance between my ceiling and actual viewing part of the screen for my ceiling mounted projector. The screen frame is 2.5 ". The supplied wall mounting bracket holes are down .75". So 14.5" - 2.5 + .75" = 12.75". The important part was considering the dimensions of the screen frame and knowing the wall hanger holes are down .75" from the top of the screen. So I drilled four holes. The top two holes were both down 12.75" from the ceiling and 63.875" apart because of stud location. The bottom two holes were 61.375" perpendicular from the top two holes. This measurement was found by measuring the distance between the top and bottom wall mounting bracket holes on the screen. I installed the four supplied wall screws. After sliding the wall hangers to match the wall screw measurements, two of us were able to set the screen on the wall screws and set it in place.
The Silver Ticket Screen is a vast improvement over the bare wall. Colors appear more vivid, more detail is visible, the the overall picture is brighter. Having a frame gives the picture a more movie-like appearance. The screen itself is totally uniform with no wrinkles or annoying inconsistencies that a bare wall might have. The price makes this screen quite a bargain.
Absolutely Perfect!
Amazon Customer✓ Verified Purchase•May 1, 2023
We bought this based on several reviews online and on Amazon. This has to be one of my best purchases ever! We upgraded our theater room and bought this screen. It is gorgeous! It looks fantastic on the wall. The video on the directions made it sound so easy to set up. We were skeptical but when we put it together it was easy. Very easy! It went together so easily. We then thought it would be difficult to hang. Nope. It went up easily. If we could give it ten stars we would. We love it!
AMAZING! 142†Grey 16:9 AMAZING!
James U✓ Verified Purchase•April 30, 2023
The media could not be loaded. Paired with Optoma EH412st, We decided to do a theater room and watched a million videos on YouTube comparing screens and found Silverticket and Elite to be the most popular.
So we watch a million more videos and read a million reviews from multiple screens by both these manufacturers and finally went with Silverticket. We were scared at first because it's not listed as a ALR screen however if you watch our review video and look at the pics you will see our room with the blinds closed is pretty lit up still. Can I just say OMG! We are sooo very happy we went with Silverticket!
The price is great, delivery time kinda sucked but that was all Amazon not the seller. Originally it stated free 2 day delivery but then got pushed back 8 days ( order sun morning and it was delivered the next week on mon) We are in CA and apparently the screen was coming from New Jersey warehouse. Amazon gave us the run around so bad we wanted to cancel our order. But as it was being prepared for shipment 5hrs after we ordered Amazon would not cancel the order and we are so happy we didn't. Like I said not the Silvertickets fault just poor Customer Service from Amazon.
We have it paired with Optoma EH412st, we wanted the gt1080hdr but Amazon delivered it 4days early when I was out of town at work, by the time we raced home in the middle of the night it was gone, Amazon refunded us for that but now we needed a projector so we just went to the local A/V store and picked this up as it is basically the same specs.
Setup was easy, we watched 4-5 YouTube videos with people setting it up and that made it 100% easy after frame was assembled we followed a video that started with the vertical middle on each side then horizontal middle on each side and took our time working out 1 on each side of frame crisscrossing the frame. top then bottom then side to side. We repeated this until all was done as for the middle bar it wasn't as bad as everyone stated just put it in the center on 1 side then diagonally on the other and slowly push into place.
We that's my LONG review sorry!
But this screen is AWSOME! Thanks Silverticket!!!
Page 1 of 2