PYvideo Rear Backup Camera Kit for Toyota Camry, Corolla, Prius and More (2012-2014) - (Color: Black)


Key features
- •Full kit for plug and play without any wire cut, new design with upgraded hardware.
- •600 TV lines HD camera to deliver ultra clarity for both day and night.6V camera voltage to match Toyota radio output, no need of additional work for relay, no need to sacrifice image quality to use 12V camera .
- •Installation video for reference, easy DIY. 2 year warranty and easy return or exchange. Replacement camera available when the warranty expired. https://www.amazon.com/dp/B0784DQYVD
- •Enough caution is needed for installation, pinched or stretched cable will reduce the camera life.
- •For Camry SE/XLE models, please check another kit for easy installation http://amzn.to/2i6Z4vl
PYvideo Rear Backup Camera Kit for Toyota Camry, Corolla, Prius and More (2012-2014) - (Color: Black)
List Price: $145.43$130.89DEALYou Save: $14.54 (10%)
Free shippingFree Returns – 30 daysFree Order CancellationSecure Payment2–3 Days DeliveryGet It June 23, 2026In Stock (1)No marketing spamNo account requiredFulfilment by FedEx / Amazon / UPS / ShipwirePayPal / Card Buyer Protection
Customer Reviews
Reviews sourced from verified Amazon purchasers4.1
out of 5
Based on 10 reviews
5★
90%
4★
10%
3★
0%
2★
0%
1★
0%
EXCELLENT and easy install.
Seth R.✓ Verified Purchase•August 19, 2023
This is on a 2012 Camry LE. The XLE/SE are slightly different--easier. Let's face it! Toyota COULD HAVE put this in free. They wouldn't need the supplied wiring and adapters, so it would have cost them what?? $25-35??
I bought this March 31st, but only got good weather recently to install it. I made a couple of mods from the way people install, but nothing to change your outcome if you do it the standard way.
First, if you don't have the set of orange body panel removers, buy them now. Less than $15-20, but a god-send!
Beware!! I am a ham radio operator and I do overkill on installs.
Removal of the trunk trim panel is the scariest. I cleaned everything and replaced any worn rubber washers at the hardware store. I mounted the camera dead center under the emblem. I don't know what all the left and right mounting hoopla is about. This is an 8mm hole, not that huge 3/4" others use. Don't over tighten! If you go too much the camera will left from the edge of the trim panel. Not much and it's no big deal, but that will put it ever so slightly tilted up. Just for insurance I used a tootpick to add some black silicone sealant in a fine line around the base.
I did not want to go shoving wires (though thin) in through one of the license plate lamp assemblies. The top center of the trim (behind the logo) has a plastic trim clip off center. I drilled a hole in the trunk about an inch left and slighter lower than that. I cleaned off any burrs, then coated the edge and inside and out with black silicone. Then I put a 1/4" rubber washer over the silcone. Twenty minutes later I inserted the small connector from the camera (covered with tape!) through the hole, replaced the trim and tightened it down. The inside of the hole was then fully coated withe more silicone. I also added the security of some tape around the cable before inserting. It is very safe!!
Overkill: I added split PET braid loom over the cable and secured the ends with loom tape. The rest of the routing/tie down was normal.
Instead of going through the rubber grommet on the upper passenger side, I put the cable down that wall behind the carpet and ran it under th back seat. Just personal. I didn't want to get near that airbag. I had the bottom of the seat out for seat covers anyway, but it is NOT difficult to remove. I tied off to the wiring that goes back to left door sill plate. There is a large metal bracket there that I put the black camera ground wire to. I only popped off the two left door sill plates and tied down. I fished the cable from back to front under the B pillar.
The front kick panel is a little uppity, but once it is off things get tougher. Routing behind it can be crazy, but doable. Right above the pedals is the hardest to reach and stay well away from pedal assemblies or anything that moves.
Once the radio is out, you will see an opening you can bring the cable up through. I have all of this in PET braid but still stay away from sharp edges.
My test turned out perfect, so I started final attachment. First I soldered and shrink-tubed the red wires together. Then covered with SILICONE tape as a buffer. Also, I put silicone tape around the yellow video connectors. This stuff has no adhesive and only sticks to itself; but, it will seal a pipe! SO nothing will come apart later. This stuff: http://www.amazon.com/gp/product/B00HWROKAK/ref=oh_aui_search_detailpage?ie=UTF8&psc=1
The only glitch I had was dropping one of the lower bolts into the console. Pulling it apart was nothing I wanted to mess with. I took one of the bolts to the hardware store and had the same flange bolt and washer for $ .60. Some things aren't worth a hassle.
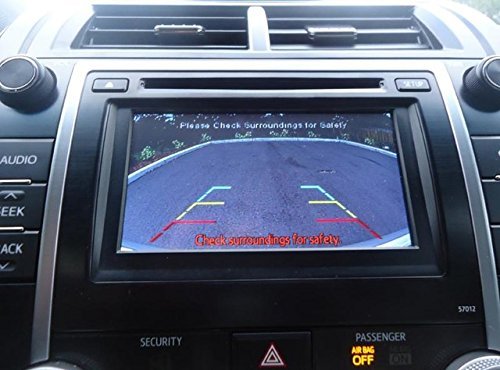
I left the lines ON, though you can disable them by cutting a little green wire loop (I think it is).
I measured, measured, and remeasured the setback for the camera. I wanted it about 2-3mm back from the edge and that's where it wound up. Those lines bear some paying attention to. The first time I turned this on for a test (key on, not started) my dog was about 10 ft back. If there were another line behind the green one, it might have touched him. Sooooo, yellow MEANS caution, and red is flirting with damage.
Impressions:
I would like to see a slightly darker screen in the daytime, but it is truly viewable.
The camera is 170-deg and it sees sidewalk to sidewalk on a two lane + parking street.
I put projector white LED backup bulbs in months ago. I cannot wait until tonight to see how this does.
Tech support from the seller is EXCELLENT (I had a pre-purchase question) and fast.
I bought this March 31st, but only got good weather recently to install it. I made a couple of mods from the way people install, but nothing to change your outcome if you do it the standard way.
First, if you don't have the set of orange body panel removers, buy them now. Less than $15-20, but a god-send!
Beware!! I am a ham radio operator and I do overkill on installs.
Removal of the trunk trim panel is the scariest. I cleaned everything and replaced any worn rubber washers at the hardware store. I mounted the camera dead center under the emblem. I don't know what all the left and right mounting hoopla is about. This is an 8mm hole, not that huge 3/4" others use. Don't over tighten! If you go too much the camera will left from the edge of the trim panel. Not much and it's no big deal, but that will put it ever so slightly tilted up. Just for insurance I used a tootpick to add some black silicone sealant in a fine line around the base.
I did not want to go shoving wires (though thin) in through one of the license plate lamp assemblies. The top center of the trim (behind the logo) has a plastic trim clip off center. I drilled a hole in the trunk about an inch left and slighter lower than that. I cleaned off any burrs, then coated the edge and inside and out with black silicone. Then I put a 1/4" rubber washer over the silcone. Twenty minutes later I inserted the small connector from the camera (covered with tape!) through the hole, replaced the trim and tightened it down. The inside of the hole was then fully coated withe more silicone. I also added the security of some tape around the cable before inserting. It is very safe!!
Overkill: I added split PET braid loom over the cable and secured the ends with loom tape. The rest of the routing/tie down was normal.
Instead of going through the rubber grommet on the upper passenger side, I put the cable down that wall behind the carpet and ran it under th back seat. Just personal. I didn't want to get near that airbag. I had the bottom of the seat out for seat covers anyway, but it is NOT difficult to remove. I tied off to the wiring that goes back to left door sill plate. There is a large metal bracket there that I put the black camera ground wire to. I only popped off the two left door sill plates and tied down. I fished the cable from back to front under the B pillar.
The front kick panel is a little uppity, but once it is off things get tougher. Routing behind it can be crazy, but doable. Right above the pedals is the hardest to reach and stay well away from pedal assemblies or anything that moves.
Once the radio is out, you will see an opening you can bring the cable up through. I have all of this in PET braid but still stay away from sharp edges.
My test turned out perfect, so I started final attachment. First I soldered and shrink-tubed the red wires together. Then covered with SILICONE tape as a buffer. Also, I put silicone tape around the yellow video connectors. This stuff has no adhesive and only sticks to itself; but, it will seal a pipe! SO nothing will come apart later. This stuff: http://www.amazon.com/gp/product/B00HWROKAK/ref=oh_aui_search_detailpage?ie=UTF8&psc=1
The only glitch I had was dropping one of the lower bolts into the console. Pulling it apart was nothing I wanted to mess with. I took one of the bolts to the hardware store and had the same flange bolt and washer for $ .60. Some things aren't worth a hassle.
I left the lines ON, though you can disable them by cutting a little green wire loop (I think it is).
I measured, measured, and remeasured the setback for the camera. I wanted it about 2-3mm back from the edge and that's where it wound up. Those lines bear some paying attention to. The first time I turned this on for a test (key on, not started) my dog was about 10 ft back. If there were another line behind the green one, it might have touched him. Sooooo, yellow MEANS caution, and red is flirting with damage.
Impressions:
I would like to see a slightly darker screen in the daytime, but it is truly viewable.
The camera is 170-deg and it sees sidewalk to sidewalk on a two lane + parking street.
I put projector white LED backup bulbs in months ago. I cannot wait until tonight to see how this does.
Tech support from the seller is EXCELLENT (I had a pre-purchase question) and fast.
camera
mo ✓ Verified Purchase•August 18, 2023
very easy to install.
Great backup camera and great instructions
Kindle Customer✓ Verified Purchase•August 16, 2023
This backup camera kit worked perfectly for my 2012 Camry!
The instructions are great and the videos on the seller's website are really helpful.
The links on the amazon product page do not work because the videos no longer exist.
I bought a premium auto trim removal kit which I probably didn't need one with that many pieces. Although I did use a bunch of different ones that I wasn't expecting to use. One that was really handy was the one that is like the end of a hammer on one side to help with pulling the buttons out on the trunk liner.
It took me longer than most people because I've never done anything like this and I kept coming back to look at the videos any time something didn't go completely smoothly to be sure I wasn't messing it up.
For example - the videos are all on brand new cars - if your car isn't new there is dirt and stuff built up under the shroud that is on the trunk over the license plate where the license plate lights are. It doesn't just come right off, even with the hex nuts off and the plastic shroud clip loosened. It still has two other clips on the sides and for me I had to use my trim removal tools to pry them out. Nothing like the video where the guy just gently lifted up and it came right off.
Another example - my radio stuck, even though everything was removed and it was "ready" to be lifted out. It didn't lift right out either.
For both of these I had to come back and re-watch the video a few times just to be sure I wasn't missing something because I didn't want to force anything.
Then when feeding the wires from the trunk into the back of the car ... I don't have a plastic wire fisher, and I don't know anyone who does. Dang one would have been nice to have ahead of time. However a wire hanger straightened out with electrical tape wound around one end to make it not sharp worked pretty well. The only challenge was it wanted to bend down along the inside of the back seat. I had to pull the side of the seat out a little and use the flashlight to find it and then grab it with needle nose pliers to pull it out. Once I got it, I taped the wires to the end still in the car and pulled them through to the trunk.
I connected the radio first and then worked my way back to the back of the car because I wanted to ensure the camera worked before I completed the entire thing.
In the end with all of the stopping and reviewing it took me a full three hours to complete. This included putting everything back together again and fighting with the kick panel trim which didn't want to go back on until I figured out that you have to get the middle trim slide connector on first and then attach the others when putting it back on. I think that one took a good 20 minutes. The shroud issue took a good 40 minutes. So there was a lot of wasted time. If I ever do it again I will be a lot faster.
One thing I would change about it is I would put the drill hole farther back / closer to the trunk. I put it in the middle like in the video and it's a little more forward than I would have preferred. Still it works perfectly and I'm happy with it. And for 2 mm difference I'm not going to take the trunk apart, take the shroud off, and re-drill that again!.
I went back into the trunk and added the optional ground to the chassis. I didn't notice any difference in the video quality, but it was not difficult to do. I just bought a spade terminal or a fork terminal to put on the end of the wire and then loosened a nut inside the trunk near the tail light (required taking off the trunk liner in that area) and inserted the fork terminal under the nut and tightened it back up so it's against the chassis, replaced the extra wires where I had hidden them in the trunk liner, and replaced the trunk liner.
High quality image
Diane✓ Verified Purchase•August 4, 2023
High quality image both day and night. Also the necessary harness are included. Works perfectly with Camry 2013. Seller is very responsive. Happy with the product.
Easy install on 2012 Prius A, works great. Happy wife, happy life!!!!
James W. Allison✓ Verified Purchase•August 3, 2023
Installed in my wife's 2012 Prius A, and she loves it.
Before you start:
- My kit arrived without the plastic strip(s) mentioned in the video, and without those strips or something similar, you won't be able to pull the camera wire through the rubber boot on the rear hatch, or between the roof and roof liner. I used a 36" piece of #16 jacketed solid copper wire to fish the wiring.
- The kit had about 1/4 the number of cable ties that I thought should be used to hold the wiring in a neatly-routed (and protected/non-pinching/non-abrading) position. Have 15-20 additional 3" cable ties handy before you start the installation.
The printed instructions say to test the camera by plugging it into the wiring harness (center plug) and the radio, but the video skips this step. If you follow the written instructions for the steps required to remove the radio and center console, it doesn't require any additional work (you won't have to backtrack later or do any extra work, other than unplugging the camera after it has been tested). Better safe than sorry - test the camera before installation!
When I pulled the bottom-most interior panel off the hatch, two of the fasteners released from the panel, rather than the hatch. If this happens to you, do NOT try to remove the fastener from the hatch with a pair of pliers - it will ruin the fastener!! The yellow plastic pry tool that came with the camera wasn't any help in removing the fasteners from the hatch, so I used a metal nail bar similar to Amazon's "Stanley 55-045 7-1/2-Inch Wonder Bar II Pry Bar" to extract the fasteners so they could be reinstalled on the panel prior to reinstallation. Treat the fastener like a nail - slide the notch on the right-angle portion of the nail bar around the body of the fastener, between the part of the fastener that holds the panel to the hatch, and the hatch, and gently pry the fastener free from the hatch.
When preparing to route the wire between the roof and the liner, remove the middle, middle-left, and left-most (as facing the interior from the hatch) fasteners. They're easy to remove and replace, and removing all three fasteners lessens the tendency of the liner to kink when you pull it down to feed the fire through.
To feed the camera wire through the wiring clips in the bottom of the door frames, put one (or both) thumbs on the top portion of the wiring clip (see that arrow on the clip?) and push the top of the clip towards the cabin interior to pop it loose from the innermost (toward the center of the cabin) top corner of the clip.
The video skipped over routing the wire from the rear door opening to the front door opening. It's fairly easy to use your wire-fishing appliance (plastic strips, piece of wire, ...) to fish the camera wire between the door pillar and the plastic panel that covers the pillar.
All told, it took bout 3 hours for me to install the camera, but I was totally paranoid about those interior panel fasteners, so I was being VERY careful (and slow) removing the panels. The other two steps that seemed to require a fair amount of time were fishing the camera wire through the rubber boot at the hatch (TIGHT fit, even with a lubricant! BTW use silicone spray if you have it - WD-40 attracts moisture, and its solvent properties can have a negative impact on any adhesives etc. on the OEM wiring), and fishing the wire between the roof liner and the roof (kept hanging-up), but overall, it was a fairly simple install, and went pretty smoothly.
Page 1 of 2