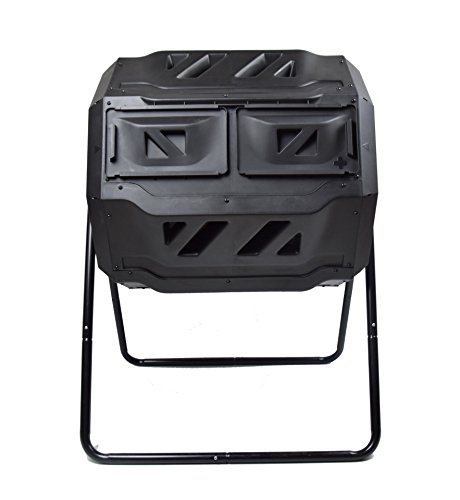
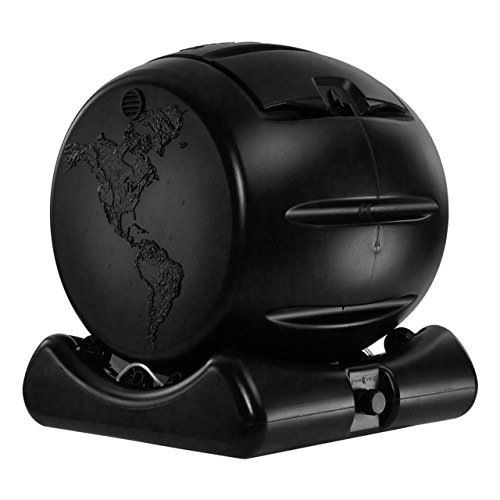
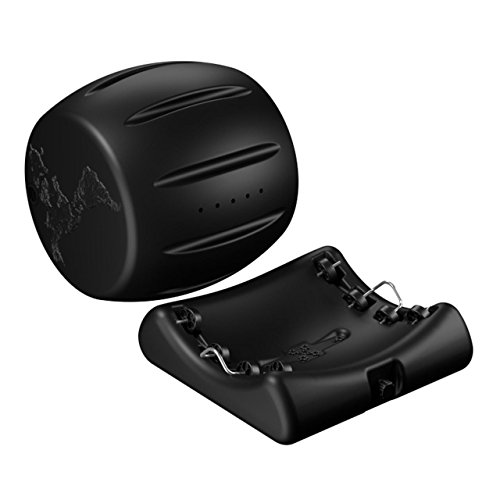
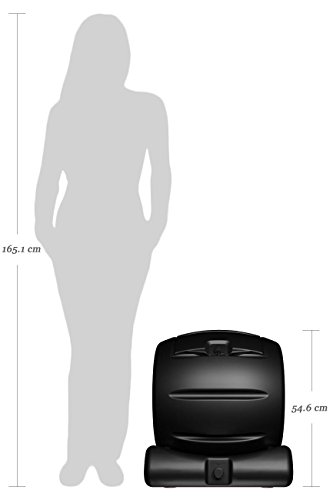
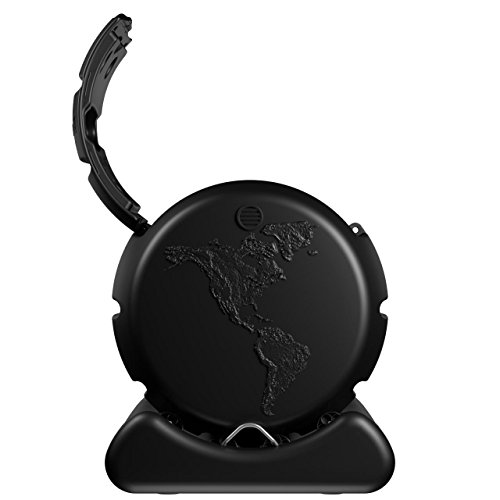
The Cutest Composter in the World, Made in the USA, Food Safe, BPA and Rust Free, No Assembly Required, Envirocycle Mini Composting Tumbler Bin and Compost Tea Maker

Key features
- •The cutest composter in the world. Produces solid and liquid compost.
- •Solid like a tank. Made of food safe, BPA and rust free, UV and antioxidant protected materials.
- •Made in the USA. Let's bring jobs back to America.
- •No assembly required. And our customer service? Not bad at all...
- •We invented it. They try to copy it. We keep improving it.
BrandEnvirocycle
CategoryComposting Tumblers
Size17 US Gallons
ColorBlack
Warranty5 year limited warranty.
The Cutest Composter in the World, Made in the USA, Food Safe, BPA and Rust Free, No Assembly Required, Envirocycle Mini Composting Tumbler Bin and Compost Tea Maker
List Price: $276.44$248.80DEALYou Save: $27.64 (10%)
Free shippingFree Returns – 30 daysFree Order CancellationSecure Payment2–3 Days DeliveryGet It June 24, 2026In Stock (1)No marketing spamNo account requiredFulfilment by FedEx / Amazon / UPS / ShipwirePayPal / Card Buyer Protection
Customer Reviews
Reviews sourced from verified Amazon purchasers4.6
out of 5
Based on 20 reviews
5★
90%
4★
10%
3★
0%
2★
0%
1★
0%
Magically turn your waste into Black Gold!
G. Johnson✓ Verified Purchase•June 6, 2017
How easy, one carton which contained two pieces. Open box, put the base on the ground and place the drum on the base, done. Gotta love that.
Looks awesome and built to last. I should get many years out of this composter. The drum sits on the base which supports the weight and has
eight solid rollers with heavy duty pins. I'm not a fan of units that sit on stands which can break over time or nuts and bolts to deal with. The other reason I chose Envirocycle is because of the reviews, they speak volumes here. I also checked to see if they responded well to customers questions
and they actually do and give some great tips too. I didn't want to start off composting with something that was going to be difficult to put together
and no chance of customer support or a composter that would last one or two seasons. I plan on getting another one so I can add to it while one
is quietly making some compost tea and some really good compost. Kudos to Envirocycle for promptly answering many of the questions I had about getting started with composting.
Composting
K. Siu✓ Verified Purchase•May 4, 2017
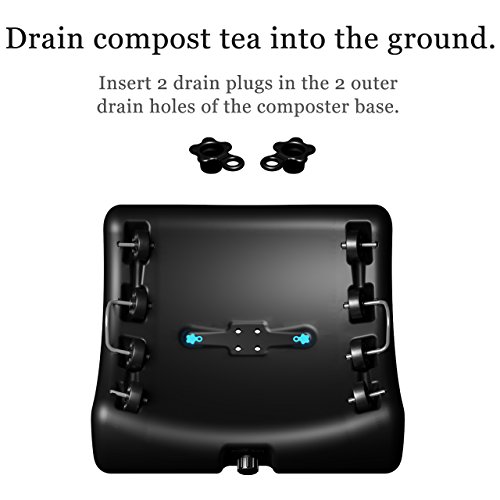
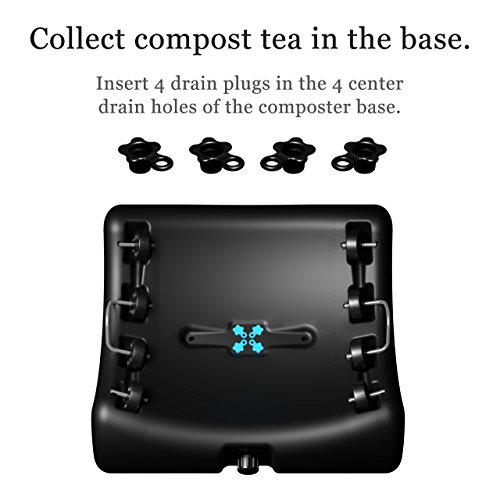
The product itself is really well made. I saw with older models they used a metal latch and since improve upon that with a plastic latch. I believe that improvement made a big impact. I don't have much to say about the compost tea since i haven't used it yet really. But you really need to have your compost complete or removed from the base to access compost tea. I only wished they added more weight to base. Because when the base is empty and you have heavy barrow, the base can really move around when you turn it. I wished they added some friction to the base.
In 2016, I bought my first Envirocycle mostly because I wanted to create my lawn and garden soil without relying on fertilizer. I didn't know anything about composting or about the C:N ratios when I started. My first batch was way off because it was too moist and it had too much greens. Although my waste did compost, I found myself constantly adding more material to the compost, which prolonged the composting time. I got these big balls of black mush. I was quite disappointed with my first batch, but I was nevertheless determined.
In 2017, I bought myself a compost thermometer here on amazon REOTEMP FG20P Backyard Compost Thermometer - 20" Stem, Fahrenheit with Composting Instructions. Instead of adding the materials bits in bits, I just put materials into 5-gallon containers before. With these 35 gallons, i usually have like 1-2 containers of greens and 3-4 containers of browns. I also bought myself a second tumbler so that I don't have to wait for the first one to complete because kitchen scrapes do fill up fast! This time around i made sure all my materials are well distributed because of 1) aeration and 2) to avoid clumps. I also made sure it was 4/5 filled because you really do need that critical mass to keep the pile toasty or it'll just die out fast. From my experience, rolling it 3x every 3 days does produce sufficient results.
If it's 70 degrees outside and doesn't heat above 90 oC within the first day, then you got the problem. It's either you have too much/little Carbon, too much/little Nitrogen, too much/little Moisture, or too much/little oxygen. It should really reach 100 oC to 120 oC before your second turn. After 2-3 weeks, most items are barely recognizable. And within 4-8 weeks you should have your finish material.
i'm on my 3 & 4 batches with images provided. Hopefully, my 3rd try is will produce even better results. I'm really hoping to get that nice black soil consistency. I always gotten those black ball clumps, which might mena that i have too little carbon and/or that it's too moist. I'll probably add a bit of peat moss a week before i use the compost for soiling my lawn. and the other barrow i'll mix perlite and peat moss for my garden.
if i have time, i'll post some additional photos of the envirocycle composting my piles. happy composting!
Composting
K. Siu✓ Verified Purchase•May 4, 2017
The product itself is really well made. I saw with older models they used a metal latch and since improve upon that with a plastic latch. I believe that improvement made a big impact. I don't have much to say about the compost tea since i haven't used it yet really. But you really need to have your compost complete or removed from the base to access compost tea. I only wished they added more weight to base. Because when the base is empty and you have heavy barrow, the base can really move around when you turn it. I wished they added some friction to the base.
In 2016, I bought my first Envirocycle mostly because I wanted to create my lawn and garden soil without relying on fertilizer. I didn't know anything about composting or about the C:N ratios when I started. My first batch was way off because it was too moist and it had too much greens. Although my waste did compost, I found myself constantly adding more material to the compost, which prolonged the composting time. I got these big balls of black mush. I was quite disappointed with my first batch, but I was nevertheless determined.
In 2017, I bought myself a compost thermometer here on amazon REOTEMP FG20P Backyard Compost Thermometer - 20" Stem, Fahrenheit with Composting Instructions. Instead of adding the materials bits in bits, I just put materials into 5-gallon containers before. With these 35 gallons, i usually have like 1-2 containers of greens and 3-4 containers of browns. I also bought myself a second tumbler so that I don't have to wait for the first one to complete because kitchen scrapes do fill up fast! This time around i made sure all my materials are well distributed because of 1) aeration and 2) to avoid clumps. I also made sure it was 4/5 filled because you really do need that critical mass to keep the pile toasty or it'll just die out fast. From my experience, rolling it 3x every 3 days does produce sufficient results.
If it's 70 degrees outside and doesn't heat above 90 oC within the first day, then you got the problem. It's either you have too much/little Carbon, too much/little Nitrogen, too much/little Moisture, or too much/little oxygen. It should really reach 100 oC to 120 oC before your second turn. After 2-3 weeks, most items are barely recognizable. And within 4-8 weeks you should have your finish material.
i'm on my 3 & 4 batches with images provided. Hopefully, my 3rd try is will produce even better results. I'm really hoping to get that nice black soil consistency. I always gotten those black ball clumps, which might mena that i have too little carbon and/or that it's too moist. I'll probably add a bit of peat moss a week before i use the compost for soiling my lawn. and the other barrow i'll mix perlite and peat moss for my garden.
if i have time, i'll post some additional photos of the envirocycle composting my piles. happy composting!
In 2016, I bought my first Envirocycle mostly because I wanted to create my lawn and garden soil without relying on fertilizer. I didn't know anything about composting or about the C:N ratios when I started. My first batch was way off because it was too moist and it had too much greens. Although my waste did compost, I found myself constantly adding more material to the compost, which prolonged the composting time. I got these big balls of black mush. I was quite disappointed with my first batch, but I was nevertheless determined.
In 2017, I bought myself a compost thermometer here on amazon REOTEMP FG20P Backyard Compost Thermometer - 20" Stem, Fahrenheit with Composting Instructions. Instead of adding the materials bits in bits, I just put materials into 5-gallon containers before. With these 35 gallons, i usually have like 1-2 containers of greens and 3-4 containers of browns. I also bought myself a second tumbler so that I don't have to wait for the first one to complete because kitchen scrapes do fill up fast! This time around i made sure all my materials are well distributed because of 1) aeration and 2) to avoid clumps. I also made sure it was 4/5 filled because you really do need that critical mass to keep the pile toasty or it'll just die out fast. From my experience, rolling it 3x every 3 days does produce sufficient results.
If it's 70 degrees outside and doesn't heat above 90 oC within the first day, then you got the problem. It's either you have too much/little Carbon, too much/little Nitrogen, too much/little Moisture, or too much/little oxygen. It should really reach 100 oC to 120 oC before your second turn. After 2-3 weeks, most items are barely recognizable. And within 4-8 weeks you should have your finish material.
i'm on my 3 & 4 batches with images provided. Hopefully, my 3rd try is will produce even better results. I'm really hoping to get that nice black soil consistency. I always gotten those black ball clumps, which might mena that i have too little carbon and/or that it's too moist. I'll probably add a bit of peat moss a week before i use the compost for soiling my lawn. and the other barrow i'll mix perlite and peat moss for my garden.
if i have time, i'll post some additional photos of the envirocycle composting my piles. happy composting!
I've NEVER been so excited to make DIRT!
tc✓ Verified Purchase•June 15, 2016
I could not BE more happy!
This compost looks svelte, compact (for the 35 Gallon I got), fits great anywhere (visually), and is easy to roll, move (by rolling), fill, maintain, etc.
I'm only about 2 weeks in to using it, but it's not only changed my normal operation of "composting" - using the city compost bin provided with my recycle and garbage, but I've NEVER been so excited to make DIRT! ;) OR, for that matter, the compost tea. (non-consumable). ;)
I'm by no means shy to show it off... it doesn't stink (externally) and it doesn't literally look like a pile of poo. ;)
Tip, use a better shredder than the one I used for cardboard... you'll likely overheat it shredding large items, but I think it's best for the 1in size the instructions suggest and it's easier to get it all in the container (smaller).
I also put all my clippings in my wheelbarrow and shredded it with my clippers to make, essentially, a salad from the dead flower stems, grasses, plants, leaves, bush trimmings, etc. SMALL (in my limited gardening experience breaks down easier and quicker), it only makes sense.
Page 1 of 4