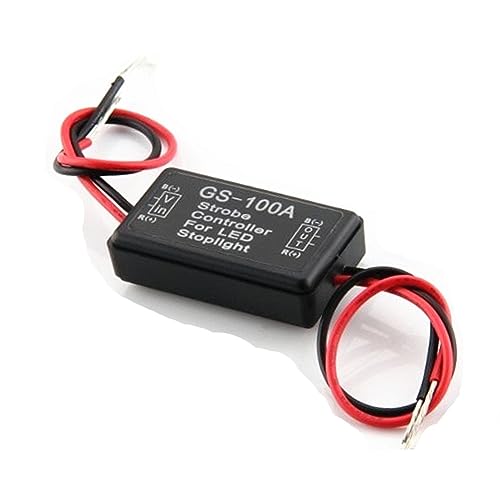
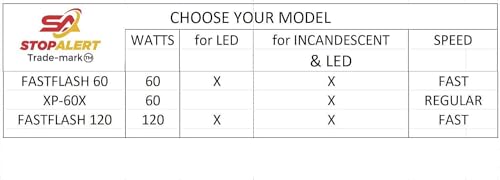
Stop-Alert NEW XP 60X +60 Brake Flasher Universal Stop bulbs & Tail Light Relay Pre-programmed pattern (rapid flash, low flash & steady) LEDs & OTHERS for Cars, Trucks, Motorcycles - 5A 60W


Key features
- •PROVEN HISTORY: Durable Heavy Duty,140% Powerful than any other brake flashers
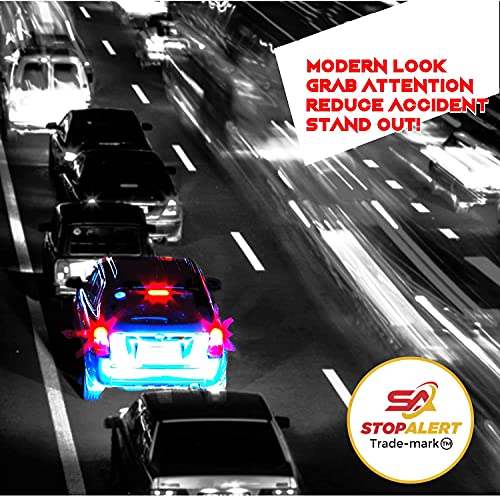
- •ADD STYLE TO YOUR RIDES: Elevate your vehicles LED Lighting Setup, Modern look & make It stand out!
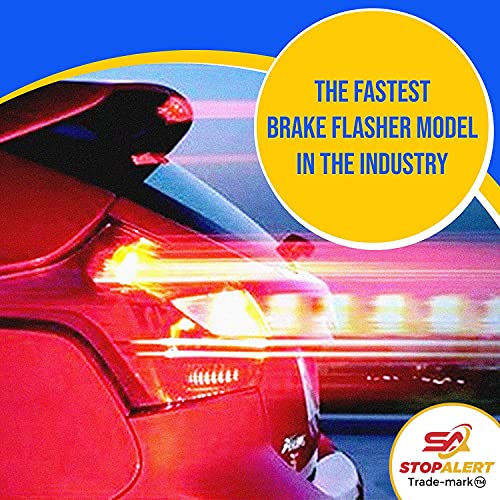
- •SECURITY IS OUR PRIORITY: Alert the back drivers of a sudden stop, Grab attention, Reduce accident.
- •TOP-NOTCH ACCESSORY: Enhance brake lights to 3 pattern sequence RAPID SLOW & SOLID FLASH, Waterproof
- •«EASY TO INSTALL» Instruction kit + 3M adhesive tape **PROFESSIONAL INSTALLATION REQUIRED**
Stop-Alert NEW XP 60X +60 Brake Flasher Universal Stop bulbs & Tail Light Relay Pre-programmed pattern (rapid flash, low flash & steady) LEDs & OTHERS for Cars, Trucks, Motorcycles - 5A 60W
List Price: $34.28$30.85DEALYou Save: $3.43 (10%)
Free shippingFree Returns – 30 daysFree Order CancellationSecure Payment2–3 Days DeliveryGet It June 23, 2026In Stock (1)No marketing spamNo account requiredFulfilment by FedEx / Amazon / UPS / ShipwirePayPal / Card Buyer Protection
Customer Reviews
Reviews sourced from verified Amazon purchasers4.2
out of 5
Based on 10 reviews
5★
90%
4★
0%
3★
0%
2★
0%
1★
10%
Grabs drivers attention
W. T. Langley✓ Verified Purchase•October 29, 2017
This works just like it says. 3-5 rapid flashes followed by 3 slow flashes and then solid light. It's designed to attract the drivers attention behind you and I noticed very quickly that drivers behind me are keeping a greater distance when I brake in traffic. So it's doing it's job and it was well worth the price I paid for it. In traffic, anything that grabs drivers attentions and potentially avoids collisions is a good thing.
Installation was very easy, I recommend getting Posi-Lock connectors and Posi-tap connectors for installation.
I installed this on a Tiger 800xc
Installation was very easy, I recommend getting Posi-Lock connectors and Posi-tap connectors for installation.
I installed this on a Tiger 800xc
The Difference between the XP-60 and the FastFlash 60
ShawnS✓ Verified Purchase•August 19, 2017
I have a few Bikes so I ordered both the Fast Flash and XP-60 simply because they do not explain the difference in the two, so I will do it here.
The XP-60 will allow your break light or any light to flash when activated. The Flash sequence is slightly different or seems to be slightly different than the Fast Flash. The XP-60 has 1 quick flash followed by 3 quick Blinks, followed by 3 slightly longer blinks then a nice steady on. The XP-60 is in no way a frantic flasher, it is noticeable and will get the attention of the people behind you, just not startle them. The Fast Flash, is just That a FAST very Fast Flash. Activate and it is very Rapid (2-3 times faster then the XP-60) 3 burst, then 3 flashes much like the XP-60 first the flashes, then it Stays a strong steady break light. The Fast Flash is a Frantic attention getting flasher!!!! It will wake people up behind you!!! It will annoy them for sure if they are following you in steady traffic.
Installing them was very easy, Follow the fire harness from your tail light to where it connects into the main wire harness, you will be able to unplug your tail light there. You should have 3 wires, power, ground and break light. Power is for the constant on part of the tail light, the break wire is the one your looking for as well as the ground. The Flasher unit is clearly marked In and out on both sides and has 2 wires on both sides. Hook the (+) to the power wire and the (-) to the ground. Turn on the key to the bike and your light should look normal. Squeeze the break and you should get the flashing sequence before it stays a steady on bright break light. I add two small LED marker lights below my plate, so they will flash in and stay steady on while my break light will operate normally. So you can add up to 60 Watts of lights with these little boxes, or a bunch led lights (because they use almost no power) The whole wiring process is super simple and will take just a few minutes if you are just using your break light. If you are adding lights like me, then of course it will take a bit more time. They do supply you with some really strong double back tape to mount this tiny box where ever you have room. The box size is very small, maybe 1/2 to 1/3 credit card and 1/3 inch thick. it is smaller than it looks, so you will have plenty of places to locate it, even on race bikes. They work well, I will post a couple of videos when I get them both hooked up on the bikes. Again I added two marker LED's to my bikes, which I purchased from Superbright LED.com. They also sell here on Amazon.
Great value for added safety. Easy install.
Lucas Kolacki✓ Verified Purchase•August 7, 2017
So far a great product. Got to my door quickly and well packaged. Even came in an anti static bag which was cool, if not a bit overkill. The instructions were very easy to follow, and from the time I opened the garage to having put the last clip back in the liner for the trunk it took me all of 20 minutes to install. For the price and the time it took, I say its well worth it to add even a little bit of safety when you drive on the freeway as much as I do. Did not dim the light at all from the install. The only con I can think of is that it did not come with any connectors of any kind. I have my own weatherproof connectors lying around, so that wasn't an issue for me. Hopefully it lasts a good long while.
Very eye-catching. It's hard to not notice.
The consumer's voice✓ Verified Purchase•July 31, 2017
I've ordered two of these so far, and love them. Installed the first one on one of my vehicles and the next one on my mom's car.
One thing to note, when I put the one in on my car, I accidentally wired it in reverse. I don't mean positive/negative polarity, but there is one side that clearly states "IN" and the other says "OUT." It was dark when I put the one in on my car, and I put it in backwards. It still worked, but a little bit differently than when I put the one in my mom's car "correctly."
Let me explain in a little more detail. When wired in reverse, the light still strobes with the same frequency, but between flashes, the lights go completely out. When wired as it is labeled, when the lights aren't strobing at full intensity, they switch to a half-power luminosity and remain dim (but still on) between full-light strobes. Personally, I prefer the effect when wiring it backwards, as it is more eye-catching. The effect just seems a bit more subtle when wired as instructed.
For reference, the I installed these on nearly identical cars that have a strip of LED lights for the third brake light. Results might vary if you're wiring one up to a traditional incandescent brake light. I can't tell you all how it works on that type of light because all my third brake lights are LEDs, and the one I put on my neighbor's truck is one that I already replaced with LEDs.
All-in-all, this is a really smart, inexpensive, and easy modification to your vehicle that I believe will greatly reduce your chances of being rear-ended. It's a no-brainer, and I spoke with local law enforcement to make sure it was a legal modification. If the school buses are using this sort of device to protect the children, why not add it to your vehicle as well?
*** Quick note - when I do electrical work, with few exceptions, I prefer to solder wires directly to each other rather than use crimp-on connectors. It's just a pet peeve of mine. Sure, the connectors are easier and preferable for some applications, but I'm pretty set in my ways. After soldering, I coat the exposed area with "liquid electrical tape." It's some of the greatest stuff on Earth. Do it once and do it right, I always say. :-)
Easy to install on a Chevy K3500 third brake light ...
weatherbear✓ Verified Purchase•July 7, 2017
Easy to install on a Chevy K3500 third brake light application, and provides better visibility and awareness of your intention to stop or slow down, for those distracted knuckleheads behind you, who inevitably follow to close.
This is a follow up review, 7 months later.
A few days ago, my third brake light failed. Was hoping it was the two bulbs, but obviously for both to fail at the same time would be an odd occurrence. Unfortunately, the control box had an issue and had apparently overheated and burned out an internal connection causing total third brake light failure. Not sure how hot it became before it's failure, just glad it was in an all metal compartment. Will replace with another brand.
Page 1 of 2