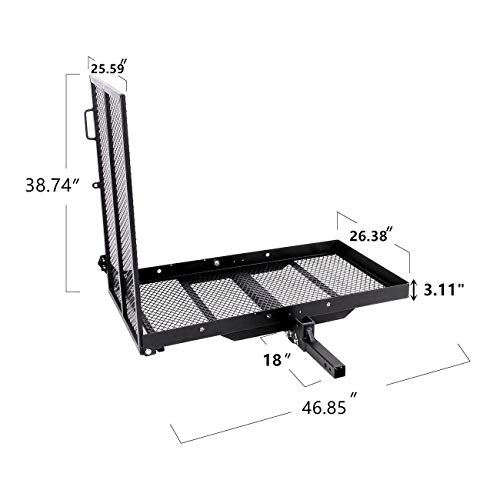
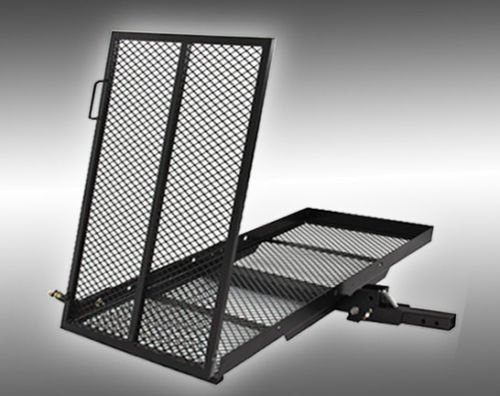
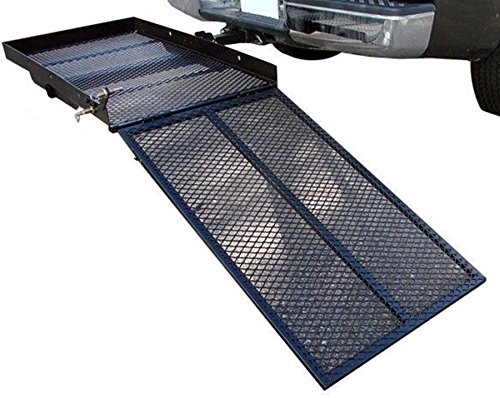
EGO BIKE Carrier for Wheelchair Power Electric Medical Mobility Scooter Rack with Ramp


Key features
- •Platform dimension : 28 X 48 inch; Total length of ramp when expended is 42 1/4 inch
- •Total weight of carrier 75 Lbs; Weight of ramp (gate) 16 lbs. .easy to lift; Weight Capacity of Ramp: Up to 400 lbs.
- •Has a 3 inch safety rail; Fits all 2" Receiver, hitch class III or IV; Folding ramp can also be locked flat when not in use
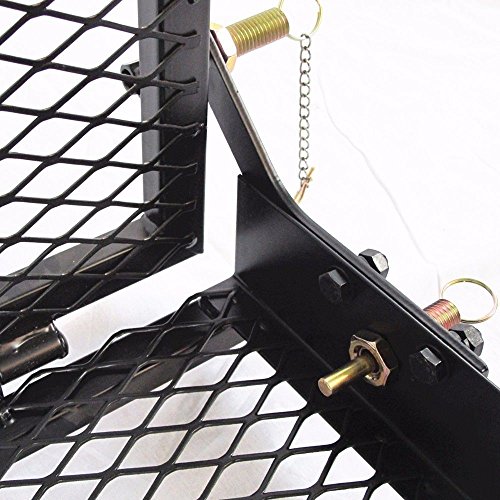
- •Heavy duty folding hitch makes our carrier more rigid and stronger; Folding ramp is easily locked upright with double
- •Heavy duty internal spring loaded pull locks,Anti-wobble is not included
EGO BIKE Carrier for Wheelchair Power Electric Medical Mobility Scooter Rack with Ramp
List Price: $194.97$175.47DEALYou Save: $19.50 (10%)
Free shippingFree Returns – 30 daysFree Order CancellationSecure Payment2–3 Days DeliveryGet It June 23, 2026In Stock (3)No marketing spamNo account requiredFulfilment by FedEx / Amazon / UPS / ShipwirePayPal / Card Buyer Protection
Customer Reviews
Reviews sourced from verified Amazon purchasers3.6
out of 5
Based on 10 reviews
5★
30%
4★
30%
3★
20%
2★
10%
1★
10%
Your paying a low price for a low grade carrier. It could be made better but it would then cost more. Very little assembly.
wleamon4✓ Verified Purchase•June 16, 2018
The best thing about this carrier was the price. It is not very sturdy. It rattles and moves around a lot. I still place my scooter on it but only because I have no other alternative. As I travel down the highways I worry that my scooter is going to be jarred loose and fall off this carrier. The side rails are not high enough to keep my scooter from jumping them when loading. I strap my scooter down real good and then pray for the best. Just a little more work and this carrier could be one of the best on the market. I also like the fact that the lift gate doesn't weigh so much. The lift gate is easy to lift and locks in place really well. I guess you pay for what you get. The changes I am suggesting I know would make this carrier cost $200. I just didn't have $200 or I would have purchased a different carrier.
Better packin necessary
San Diego Highwayman✓ Verified Purchase•May 11, 2018
Right handy rack
GOOD that it kin be set up with the ramp either right or left -- [ for me, left works best.
Arrived damaged [ corners bent ] due to insufficient packing padding --
I'd suggest some foam ends to protect from shifting inside the cardboard box -- ALmost sent it back --took me about 15 min to straightin
Beware those snoozing on assembly line in Hong Kong
Pixiegirl19 and PCfixinman✓ Verified Purchase•July 25, 2017
At first look, this is a (seemingly) well built trailer. Our issue, was the bolt holes for the hitch attachment/ hinge were drilled wrong, and we weren't able to get it together. It was frustrating, to get that far, yet be so far away.
20 MINUTE ASSEMBLY INSTRUCTION FOR THISS UNIT
Robert Miller✓ Verified Purchase•March 20, 2017
Confusing directions, contacted seller: response look at pictures sent. Follow my instructions and you can assemble this in 20 minutes.
Using a ratchet set, wrench set or adjustable wrench.
1. Open package and set unit up side down on 2 milk crates or pieces of wood or rolled up rug.
2. Place the long black tube in slot with the welded metal support patch facing up at you and extending out the front of platform.
3. Using the 3 heavy bolts with washers attach this tube to the frame. Tighten now.
4. Flip the unit up right now so you are looking at the deck with the gate on it.
5. Attach the extension piece provided by on extended tube with the round part facing up.
6. Insert the heavy metal bolt with washer,lock washer and nut in the back bottom left hole and tighten
7. Insert the lock pin bolt into forward hole. (This pin locks the unit in the down position or in the up right position behind your vehicle.
8. Go to the back left corner of unit and attach the semi-horse shaped bracket in holes provided. (make sure nut HEADS are inside the unit.
Lightly snug these bolts up from the rear outside.
9. Insert the brass pull pin units as indicated. ( Make sure the bottom one just screws in even with the inside nut)
10.Lift the gate and now attach the second brass pull pin in the top of the horse shoe and make sure it pops into the hole slot on gate.
Now tighten all the nuts and bolts in this rear section once all is lined up.
11. With the large bolt and nut left over, place nut on bolt about half ways up,then screw the bolt in the hole under the folding add on piece.
This is to be adjusted when the carrier is in the flat down position to put more pressure on keeping it level.( Tighten nut or you will loose it)
12. Place reflector tape as indicated.
13. Insert in 2 inch draw bar on vehicle , lock in with pinned cross bolt. (NOT INCLUDED,purchase from TSC, Canadian Tire or auto store)
14. By removing the cross bolt on the newly assembled unit, lift it up in a vertical position and re-insert the cross bolt and pin for when not in use.
15. DOUBLE CHECK THAT ALL NUTS AND BOLTS ARE TIGHT, ESPECIALLY BEFORE AND AFTER YOUR FIRST TRIP. (bolts loosen from
vibration)
Normal to hear noise and vibration from carrier unless you shim the unit with cedar shake or buy a locking unit to stop movement in the hitch.
HOPE THIS HELPS EVERY ONE! rbm from Canada
Great item, Terrible Assembly Instructons
Dean A Ralston✓ Verified Purchase•January 2, 2017
I like this item. It does what I need to do. I use it for moving boxes, furniture, and lawn equipment. However the assembly instructions are terrible. It took me about 90 minutes to put this together. The biggest issue is that the illustrations in the instructions are from the computer drawings when this was being designed, not from actual photos. And with that, they are from when the computer drawings were being edited. I ran into a few places where the illustrations looked ok on paper, but they actually defied the laws of physics. They showed the carrier being installed in a way that it could not pivot up and down, and the gate would have to pass through the carrier in order to install the hardware in the ways that the illustrations showed it. But once it was put together, this has been a work horse whenever I need just a little bit more cargo room.
Page 1 of 2