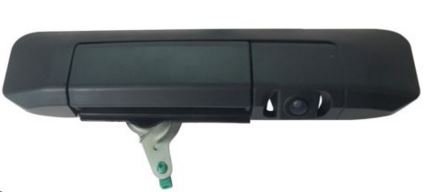
PYvideo Backup Camera with Tailgate Handle for Tacoma (2005-2014) for Universal Monitors (RCA) (Color: Black)


Key features
- •6-15V 520-TVL HD camera to deliver ultra clarity for both day and night
- •High quality fully shielded video cable to isolate noise, ensuring HD image delivered to display monitor
- •Total 32.5 feet cable length (26 feet extension cable and 6.5 feet camera cable) to cover long bed
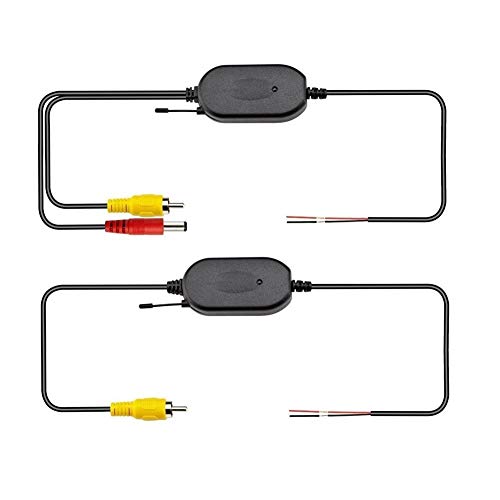
- •Route the cable from tailgate to front dash, connect to display with universal RCA connector. If you would like to connect to factory display, please contact us for additional harness
- •This kit comes with all the wiring and connectors to install into your truck with aftermarket display.* MONITOR OR NAVIGATION UNIT NOT INCLUDED
BrandPYvideo
CategoryVehicle Backup Cameras
PYvideo Backup Camera with Tailgate Handle for Tacoma (2005-2014) for Universal Monitors (RCA) (Color: Black)
List Price: $114.93$103.44DEALYou Save: $11.49 (10%)
Free shippingFree Returns – 30 daysFree Order CancellationSecure Payment2–3 Days DeliveryGet It June 23, 2026In Stock (1)No marketing spamNo account requiredFulfilment by FedEx / Amazon / UPS / ShipwirePayPal / Card Buyer Protection
Customer Reviews
Reviews sourced from verified Amazon purchasers4.4
out of 5
Based on 10 reviews
5★
50%
4★
40%
3★
10%
2★
0%
1★
0%
Handle quality is very good and camera clarity is very good as well
Nick•April 22, 2018
Handle quality is very good and camera clarity is very good as well. Paired it with a Pioneer 4200NEX. Everything fits perfectly and looks OEM once completed. The molded quick disconnect is very convenient to have since it still allow's the tailgate to be removed from the truck with the camera installed. Wire length was more than enough on a 2006 Toyota Tacoma. Also there are power leads on both ends of the cable, which is very nice since it allow's you to pull power from either end of your vehicle, depending on how you want to do your install.
Had a question during installation and the PYVideo customer service was very easy to get a hold of and very helpful on the phone. Their website also has a lot of helpful information and links to installation videos. Very satisfied with this purchase.
Had a question during installation and the PYVideo customer service was very easy to get a hold of and very helpful on the phone. Their website also has a lot of helpful information and links to installation videos. Very satisfied with this purchase.
Great product. Good quality and easy to install.
Jerry•January 2, 2018
I installed this on my 2007 Toyota Tacoma and everything fits perfectly which makes it a breeze to install. This should work the same for all 2005 -
2011 Tacoma models. The camera delivers a very clear image.
Instructions that came with the camera are easy to follow. If you follow these instructions you won't have a problem.
I paired this with a Pioneer AVH-X490BS. The end result is a very clean look. Much nicer than a camera on a license plate mount.
Works great
B.H.•June 30, 2017
Running the wires on 07 double cab wasn't fun but well worth it after all. It's been about 3 month since I hooked it up to pioneer avic 8200nex, still works great. Also, seller's support is top-notch as well.
Decent product that makes backing up safer!
urbantaco•June 11, 2017
Handle/camera installed in my tacoma without issue. Plenty of wire for a double cab long bed. Picture on camera is good and hooked up to a new radio. It makes for a nice tech upgrade on an older vehicle.
My only complaint is the tolerances on the lift handle are too tight and small scratches have started to appear on the handle after only a few months of use.
My only complaint is the tolerances on the lift handle are too tight and small scratches have started to appear on the handle after only a few months of use.
Good product. Relatively Easy to Install.
Amazon_Shopper619•April 17, 2017
I installed this on my 2005 Access Cab; better late than never. It wasn't too difficult to install. The quality of the video coming from the camera is nice, but the viewing angle is narrower than I had imagined (but it's not bad). And simply as a tailgate handle, its obviously not as wide as the stock handle, but it seems robust enough and the fit is good. The torsion spring assembled to it was not as strong as the one on the factory handle, so after engaging the handle, the handle would not retract back on its own because its torsion spring is weak; lubricating the latches of the tailgate seems to have helped the torsion spring do its job, however. I'll swap the torsion spring from the factory handle onto this one if it becomes a problem again. Once installed, this tailgate handles looks factory.
The package came with almost everything needed to install. However, it only comes with about 5 feet of 1/4" Split Loom, which would only cover the first portion of the routing from the camera to just outside of the tailgate; I bought about 15 feet of 3/8" Split Loom to cover the rest of the routing. They could have included more tie wraps, as I had to use like 10 more of my own.
The installation instructions are okay and cover most of everything if you read it carefully. But they could make the instructions much better as this is a model specific backup camera. They could add more model specific information and add pictures/figures in the instructions for routing and such.
The installation is easy. First, I installed the Split Loom over all the wiring, which was a pain in the ass. Then I just removed the tailgate plastic protector using a torx T30 bit. Then I simply unbolted the factory handle and bolted this one on. I used a Dremel tool to widen one of the drain holes at the bottom of the tailgate to allow the Camera Cable to be routed out of the tailgate; I spray painted the exposed metal to prevent rust.
This kit gives you options for powering the camera: there is about a few feet of power and ground wire branching out from the rear connector of the Extension Cable; this is intended for getting power and ground by splicing into the backup light's wiring harness located behind the Driver's Side Tail Lamp Housing; the RCA connector end of the Extension Cable also has a power wire branching out of it; this is intended for the option of powering the camera from the Head Unit wiring harness instead. In either option for getting power to the camera, you still have to attach the ground wire to a vehicle body ground (I attached it to a grounded screw behind the Driver's Side tail lamp housing). If you choose to power the camera from the backup light's harness, the camera will obviously only get power when the vehicle is in reverse gear. I chose to get power from the Head Unit harness so that I'll have access to the camera while not in reverse gear; however, this means that the camera will always be powered whenever the vehicle is on, so it might affect the life of the camera.
I connected the Extension Cable to the Camera Cable right where the factory wiring splits to the LH and RH Tail Lamp Housings. Then I just routed the Extension Cable following the factory wiring, all the way into the cabin; there is a grommet in the cabin floor, under the Driver's Seat, under the carpet, which the factory wiring enters the cabin through; I made cuts in the grommet to allow the Extension Cable into the cabin and sealed the opening with RTV silicone; I removed the Driver's seat to make this portion of the installation easier. I connected the RCA plug into my Head Unit, and verified the camera was working. I allowed slack where the Camera Cable exited the tailgate to allow the tailgate to open and close freely. I also added slack where the Extension Cable and the Camera Cable connect to allow quick disconnection in case I have to remove the tailgate in the future. Then I tie-wrapped all the wire routing to the factory wiring to finish the installation.
Page 1 of 2