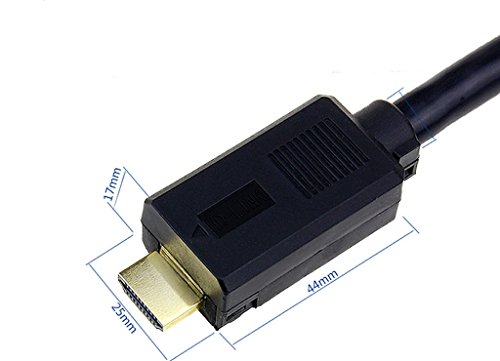
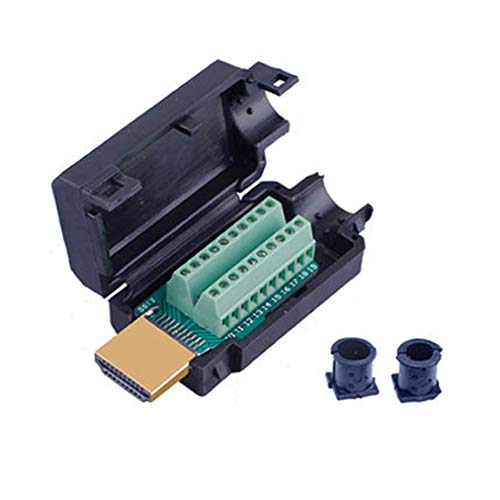
HDMI Adapter signals Terminal Breakout Plastic Cover Terminal Breakout Board Connector


Key features
- •Size:50mm*23mm*17mm
- •No need weld
HDMI Adapter signals Terminal Breakout Plastic Cover Terminal Breakout Board Connector
List Price: $15.11$13.60DEALYou Save: $1.51 (10%)
Free shippingFree Returns – 30 daysFree Order CancellationSecure Payment2–3 Days DeliveryGet It June 23, 2026In Stock (1)No marketing spamNo account requiredFulfilment by FedEx / Amazon / UPS / ShipwirePayPal / Card Buyer Protection
Customer Reviews
Reviews sourced from verified Amazon purchasers3.9
out of 5
Based on 10 reviews
5★
60%
4★
40%
3★
0%
2★
0%
1★
0%
It works - Detailed Guide Below
Peter The Great✓ Verified Purchase•July 31, 2023
If you are reading this, you probably have broken the end of a cable buried in some inaccessible manner like behind some wall. This device can save the day but you must have patience and a few extra accessories.
The pain with HDMI cables is there is no wiring standard so any diagram is borderline useless.
You will need:
- magnifying glass if you have close up problems (optional)
- 2x HDMI female-female couplers
- extra HDMI cable long enough to loop back to the good side of the cable
- electrical tape
- heat shrink tube (optional)
- wire strippers
- multimeter and some wire clips
- alternate flat head micro screw driver as the one they give is a bit on the marginal side
HOW TO DO THE JOB:
First step is have patience. This will take some time.
Second step is creating the loop. Connect a female coupler to the good end of the cable. Insert your extra HDMI cable that reaches back to your location. Put another female coupler on that end and then attach your repair kit. Create a setup where both ends of the cable can be secured down to prevent them from moving. I taped them down to plastic lid.
Third step is to prep your connections on the broken side of the HDMI cable. You will have 19 or 20 connections to make, depending on the cable. Expose roughly 1.5" of the wires from the HDMI cable jacket. If you are going to use heat shrink tube, add it now and push it a few feet up the cable for later. Then, strip back roughly 1/4" of wire on each line. There are likely 4 ground shield lines which are bare already. Don't cut those back but instead put electrical tape on them for the distance they stick out of the wire jacket and leave the last 1/4" exposed.
Fourth is identify which wire goes with to which terminal. Set your multimeter for continuity which is usually a tone test. Use a wire clip and connect to one side of the multimeter pos/neg post and clip to a signal wire. With the other multimeter post, start touching the screw posts one at time. Most of the signals will tone out and when you find that that tone, you know that signal wire connects to that screw post. Insert that signal wire to that screw post and screw it down tight. Do a pull test on the wire. If there is still exposed wire showing, you have too large of an exposed wire tip. Trim it back and note that exposure length for the rest of the connections. Note that I had three signals that did not tone but did have a small ~75ohm resistance measured. Those 75ohm reading are still the right screw post for that wire. Retrim signal wires as necessary to keep the the connector area tidy - it will help later. Dont forget to attach your ground shield wires with electrical tape. They have dedicated screw posts too.
Fifth is a test run. Gently reconnect your cable into some sort of working device. I recommend keeping the repair area with couplers intact and take the other end of the loop back to where you want to test. Remember to reconnect your good side of the cable back to its original location. Try to test a variety of sources, preferably high bandwidth (ie 4K HDR) to look for signal drop outs.
Sixth step is after you are happy with step 5, screw on the metal housing to the repair. Use the plastic/rubber grommet pieces that fits snuggly. Apply your heat shrink tube. Then use electrical tape, starting the base of the metal jacket and coil down several inches.
Hope this review helps!
My only complaint with unit is the quality of the screw post breakout header board was fairly cheap. I would gladly have paid 2x for a unit with a robust header piece.
Works!
Jared✓ Verified Purchase•July 27, 2023
Sometimes you have a Hdmi cable burried in the wall, and then you damage the cable end... When that happens, this is the fix.
No instructions, just fitfo! You should know how to use a multimeter otherwise You won't fare well. Keep the wires short and tight as there is very little room in the case once it goes together. That's my only complaint, a touch more room would have been nice
No instructions, just fitfo! You should know how to use a multimeter otherwise You won't fare well. Keep the wires short and tight as there is very little room in the case once it goes together. That's my only complaint, a touch more room would have been nice
Use female to female hdmi adapter. Helps tremendously
Amazon Customer✓ Verified Purchase•July 25, 2023
Had to run hdmi through the wall along with cat5 in the same plastic conduit. Had to cut off the end of the hdmi to fit through the conduit. Using a female to female adapter helped tremendously. Plug this end into one end of the female adapter and plug the other (good) end into the other side of the female adapter and one by one find each wire to make sure all are in correct spots. However case may not fit in all conditions and its been running fine without the black case for weeks
Perfect, but without the screws!
Jeypam✓ Verified Purchase•July 10, 2023
This product was a lifesaver for me, I had a 50' in wall cable with a damaged connector. This item did the trick. Works perfectly, but I removed 1 star since the product was shipped without the screws and I had to wrap the connector with electrical tape to keep it closed. No matter since this is an in wall connection. In any case, I would purchase this item again for an in wall connection, or repair.
Saved Me In A Big Way
John A. Clark✓ Verified Purchase•June 20, 2023
Moved to a new home that had a 25' long HDMI cable that snaked behind walls and was not easily removed/replaced. The end of the cable had been broken by the previous owners. This repair kit saved me from having to rip out 25' of drywall. Make sure you follow the wiring guide. I followed another wiring diagram online first that proved to be incorrect. You'll need a jewelers screwdriver and wire strippers capable of stripping 26 AWG wire.
Page 1 of 2