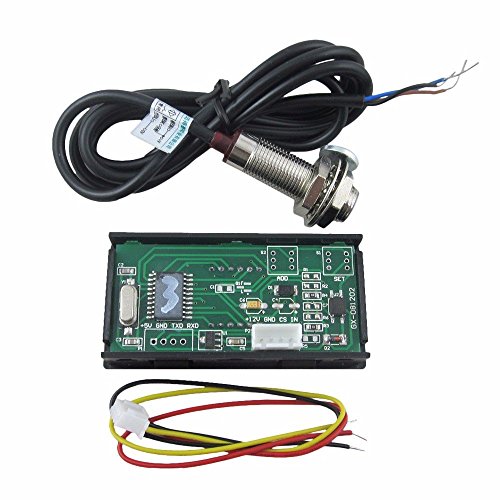
DIGITEN 4 Digital Green LED Tachometer RPM Speed Meter + Hall Proximity Switch Magnet Sensor NPN for Lathe Conveyor Belt


Key features
- •Measure range: 5-9999RPM.
- •Power requirement:DC 8-15V
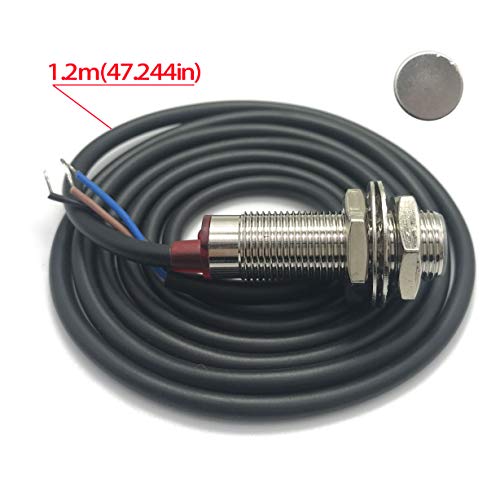
- •Come with hall sensor and magnet
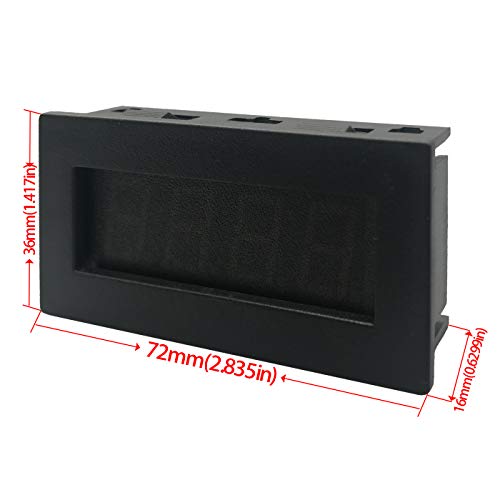
- •Display:red 0.56" LED
- •Application: Lathe, CNC, Mower, Spring, etc.Measure varied motor RPM.
DIGITEN 4 Digital Green LED Tachometer RPM Speed Meter + Hall Proximity Switch Magnet Sensor NPN for Lathe Conveyor Belt
List Price: $36.84$33.16DEALYou Save: $3.68 (10%)
Free shippingFree Returns – 30 daysFree Order CancellationSecure Payment2–3 Days DeliveryGet It June 23, 2026In Stock (2)No marketing spamNo account requiredFulfilment by FedEx / Amazon / UPS / ShipwirePayPal / Card Buyer Protection
Customer Reviews
Reviews sourced from verified Amazon purchasers4.1
out of 5
Based on 10 reviews
5★
70%
4★
30%
3★
0%
2★
0%
1★
0%
Power supply needed
Hoyt Criss✓ Verified Purchase•May 17, 2024
Very good, works as expected. Easy installation
Great Little Tachometer!!
AB✓ Verified Purchase•May 4, 2024
Hello All! I purchased this tachometer to provide RPM information on my drill press. After reading several reviews, I thought I would do some additional measurements of the sensor for others to use in their decision making and engineering efforts. As the sensor is a hall effect device, the magnetic polarity of the supplied magnet in relationship to the sensor DOES matter. It is essential that the SOUTH pole of the magnet face the sensor. In order to determine which side of the magnet is the south pole, I used a smart phone app provided by K&J Magnetics called KJ Pole ID (iPhone version). Simply open the app and point the top of the phone towards one face of the magnet. The app will display the magnetic polarity that is currently facing the phone. Arrange the magnet such that the app displays "The SOUTH pole of the magnet is facing the phone", then mark the face of the magnet for easy identification prior to mounting.
When power to the sensor is ON and no magnet is present, the sensor will output 0VDC as shown in the picture. The red LED on the bottom of the sensor will also be illuminated. When the magnetic SOUTH pole of the magnet approaches the sensor (in my test, about a quarter inch), the red LED will turn off and the output of the sensor will switch to a positive DC voltage. In my test, this voltage is proportional to the supplied DC input voltage to the sensor minus approximately 560mV (Vout_sensor = Vdc_sensor - .560).
The rise time of the sensor, or the time it takes for the output of the sensor to rise from 10 percent to 90 percent of its steady value (Vout_sensor), is 114uS. This is with a 9VDC regulated DC power supply into the sensor. Please see the attached photo for additional details. The fall time (no photo attached), is much faster with a time of 160nS.
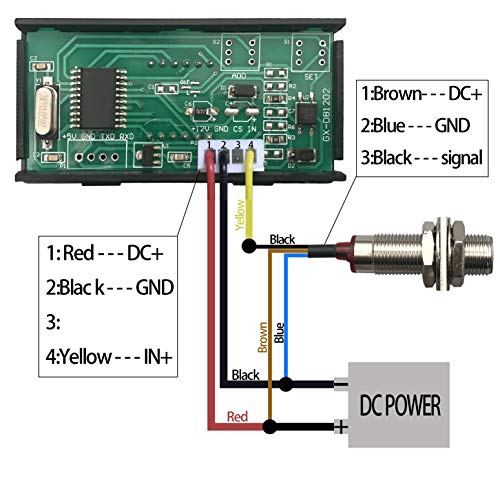
During the wiring portion of the assembly, it's important to note the colorings of the wires at the display and at the sensor.
The sensor color codes are as follows:
Brown: +DC supply voltage
Blue: GND
Black: Sensor Output Voltage (I called this Vout_sensor in my discussion above)
The tachometer display color codes are as follows:
Red: +DC supply voltage
Black: GND
Yellow: Sensor Input Voltage (Connect this lead to the Black lead of the sensor wiring)
As mentioned by Digiten, the DC supply voltage must fall into the range of 8VDC to 15VDC (Do NOT use an AC-output power supply). As an engineer, this implies that any supply voltage below or above this range can cause unexpected operation or failure of the product. My recommendation is to use a walwart-style (plug in) regulated DC power supply with an output voltage of either 9VDC or 12VDC. When connecting the power supply to the tachometer, make certain that the output polarity of the power supply correlates to the input polarity of the tachometer.
When mounting your display, I would recommend measuring the actual dimensions of your display first as mine were slightly different from the recommended cutout dimensions shown on the product page. The cutout portion of my display (the area behind the front mounting flange) measured 33.33mm by 68.26mm. The panel cutout dimension on the page has this listed at: 68x33mm. Those extra thousandths of an inch could make mounting the display a challenge depending on the supporting material.
In my next review, I will compare the RPM values from this tachometer to the RPM values calculated from a high-end encoder and RPM measuring device :) In summary, this is a well made and nicely constructed tachometer for the price!
When power to the sensor is ON and no magnet is present, the sensor will output 0VDC as shown in the picture. The red LED on the bottom of the sensor will also be illuminated. When the magnetic SOUTH pole of the magnet approaches the sensor (in my test, about a quarter inch), the red LED will turn off and the output of the sensor will switch to a positive DC voltage. In my test, this voltage is proportional to the supplied DC input voltage to the sensor minus approximately 560mV (Vout_sensor = Vdc_sensor - .560).
The rise time of the sensor, or the time it takes for the output of the sensor to rise from 10 percent to 90 percent of its steady value (Vout_sensor), is 114uS. This is with a 9VDC regulated DC power supply into the sensor. Please see the attached photo for additional details. The fall time (no photo attached), is much faster with a time of 160nS.
During the wiring portion of the assembly, it's important to note the colorings of the wires at the display and at the sensor.
The sensor color codes are as follows:
Brown: +DC supply voltage
Blue: GND
Black: Sensor Output Voltage (I called this Vout_sensor in my discussion above)
The tachometer display color codes are as follows:
Red: +DC supply voltage
Black: GND
Yellow: Sensor Input Voltage (Connect this lead to the Black lead of the sensor wiring)
As mentioned by Digiten, the DC supply voltage must fall into the range of 8VDC to 15VDC (Do NOT use an AC-output power supply). As an engineer, this implies that any supply voltage below or above this range can cause unexpected operation or failure of the product. My recommendation is to use a walwart-style (plug in) regulated DC power supply with an output voltage of either 9VDC or 12VDC. When connecting the power supply to the tachometer, make certain that the output polarity of the power supply correlates to the input polarity of the tachometer.
When mounting your display, I would recommend measuring the actual dimensions of your display first as mine were slightly different from the recommended cutout dimensions shown on the product page. The cutout portion of my display (the area behind the front mounting flange) measured 33.33mm by 68.26mm. The panel cutout dimension on the page has this listed at: 68x33mm. Those extra thousandths of an inch could make mounting the display a challenge depending on the supporting material.
In my next review, I will compare the RPM values from this tachometer to the RPM values calculated from a high-end encoder and RPM measuring device :) In summary, this is a well made and nicely constructed tachometer for the price!
Works better than expected, only time will tell if it continues that way.
Jason✓ Verified Purchase•May 4, 2024
Works better than expected. I installed on a 6-speed gear driven milling machine spindle and the RPM shown is within 3 rpm of what the machine manufacturer says it would run at any particular speed. The included magnet is holding fine at 1500 rpm, but I will likely epoxy it on just in case. This is polarity specific so if you get no reading try flipping the magnet over.
Hopefully it keeps working long term, only time will tell.
Hopefully it keeps working long term, only time will tell.
Exactly as described, buy with confidence.
Scott P.✓ Verified Purchase•April 17, 2024
Short no BS review. I bought 2 of them and when needed will buy more.
Set it up and use it as in the instructions to deliver a easily usable Tachometer. I used a 9 volt battery without any problems but will use a wall wart for a permanent mount. Do Freaking fasten with tape or glue the magnet down.... or you will deserve the high velocity object smacked into your forehead (yeah, I failed this IQ test myself)
Mark the polarity of the magnet with a colored marker, and mount with the right side up.
PS. You can use any small neodymium magnet with them, a stronger one will give you a larger usable gap. Mark the expected side up...... Have fun playing with them, its addictive. Oh, forgot to say I tested the accuracy and as far as I can tell is accurate and uniform over speed range. Do, I say say again, do fasten the magnet securely when running at speed. I got hit only once but had two vanish into the depths of my garage and without a doubt stuck to the most unexpected hunk of metal in there.
You can thank me later. As said before I drink light beer.....
Peace!
Scott P.
Great item for the price.
Amazon Customer✓ Verified Purchase•April 13, 2024
The tachometer is well made and easy to install in the machine that I am building. Great value for the price.
Page 1 of 2