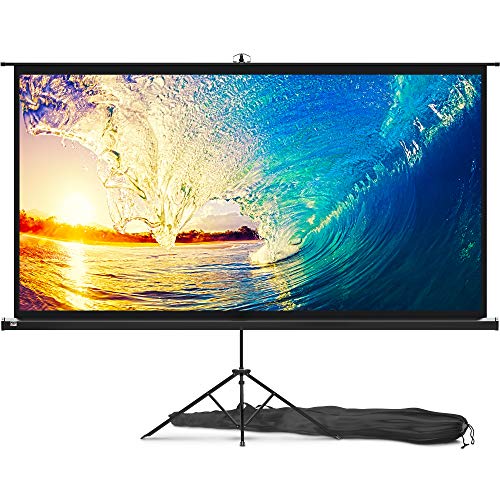
Silver Ticket Products STR Series 6 Piece Home Theater Fixed Frame 4K / 8K Ultra HD, HDTV, HDR & Active 3D Movie Projection Screen, 2.35:1 Format, 138" Diagonal, High Contrast Material STR-235138-HC


Key features
- •Wall Mounted Fixed Frame Projection Screen (Overall Size 60.375" Tall x 135.5" Wide) (Viewing Area 142" Diagonal x 55.625" Tall x 130.75" Wide) No option for Legs or Stands with this product. Recommended for projectors with Auto Zoom and Zoom Memory Features, or an Anamorphic Lens.
- •0.95 Gain Dark Grey screen surface with an exceptionally wide viewing angle at 160 degrees with no resolution loss at any viewing angle. Works great with Long Throw projectors, Not Recommended Short and Ultra Short Throw projectors.
- •2 3/8" heavy duty beveled aluminum frame wrapped in light-absorbing black velvet material for a beautifully crisp viewing image; Enjoy beautiful movies, pictures, and games in FULL HD, 4K / 8K and Active 3D
- •Quick and easy assembly with tensioning rod system ensures that you can bring cinema-quality entertainment to your home in just a few minutes. Secure top and bottom mounting brackets that allow horizontal adjustment
- •Before purchasing, project an image on wall to determine the size works for the projector and watch the step by step instructional video listed.
Silver Ticket Products STR Series 6 Piece Home Theater Fixed Frame 4K / 8K Ultra HD, HDTV, HDR & Active 3D Movie Projection Screen, 2.35:1 Format, 138" Diagonal, High Contrast Material STR-235138-HC
List Price: $945.72$851.15DEALYou Save: $94.57 (10%)
Free shippingFree Returns – 30 daysFree Order CancellationSecure Payment2–3 Days DeliveryGet It June 22, 2026In Stock (1)No marketing spamNo account requiredFulfilment by FedEx / Amazon / UPS / ShipwirePayPal / Card Buyer Protection
Customer Reviews
Reviews sourced from verified Amazon purchasers4.8
out of 5
Based on 10 reviews
5★
90%
4★
10%
3★
0%
2★
0%
1★
0%
Blockbuster Hit
Fadi Shamaan✓ Verified Purchase•January 1, 2024
Lights dimmed, popcorn in hand, and anticipation in the air. There's nothing quite like the excitement of watching a movie in the comfort of your own home theater. As a cinephile and proud owner of the Silver Ticket Products STR Series 6 Piece Home Theater Fixed Frame Projection Screen, I can confidently say that this product is the real star of the show. With its stunning 4K/8K Ultra HD, HDTV, HDR, and Active 3D capabilities, 16:9 format, 100" diagonal size, and grey material, this projection screen delivers an unparalleled cinematic experience. Strap in and prepare for a detailed and thorough review that will leave you eager to hit the play button!
1. Picture-Perfect Quality: When it comes to home theater projection screens, the Silver Ticket Products STR Series takes the spotlight. The 4K/8K Ultra HD support ensures razor-sharp resolution and lifelike details, making every scene come alive. The HDR compatibility adds depth and richness to colors, enhancing the overall visual experience. Whether you're watching the latest Hollywood blockbuster or immersing yourself in a gripping documentary, the picture quality on this screen is nothing short of breathtaking. I found myself constantly in awe of the vivid colors, exceptional contrast, and impressive clarity, which transported me into the heart of the movie.
2. Impeccable Design: The Silver Ticket STR Series boasts a fixed frame design that adds a touch of elegance to any home theater setup. The sturdy aluminum frame not only provides stability but also enhances the overall durability of the screen. The installation process was a breeze, thanks to the included instructions and user-friendly design. The 16:9 aspect ratio perfectly accommodates widescreen content, and the 100" diagonal size ensures a truly immersive viewing experience for both small gatherings and larger parties. Plus, the grey material of the screen eliminates any potential hotspotting, providing consistent brightness and uniformity across the entire surface.
3. Versatile Compatibility: Lights, camera, action! The Silver Ticket Products STR Series projection screen is a true multi-talented star, compatible with a wide range of devices. Whether you're using a 4K Blu-ray player, gaming console, streaming device, or even a projector, this screen effortlessly handles them all. The active 3D support takes movie nights to a whole new dimension, literally! I was thrilled to explore the realms of 3D movies with exceptional clarity and depth, further enhancing my viewing pleasure. This versatility ensures that you can enjoy various forms of entertainment without compromising on quality.
4. Enhanced Viewing Experience: As someone who values comfort during extended movie marathons, I can confidently say that the Silver Ticket STR Series projection screen delivers on all fronts. The grey material not only provides excellent color reproduction but also improves contrast in ambient light conditions. This means you can enjoy your favorite films even during the day without worrying about washed-out colors or distracting reflections. Additionally, the screen's wide viewing angle ensures that everyone in the room gets an optimal visual experience, regardless of their seating position. No more fighting over the best seat in the house!
5. Customer Service that Deserves an Oscar: In my journey as a consumer, exceptional customer service has always been the cherry on top of a great product. Silver Ticket Products truly exceeded my expectations in this aspect. From the moment I reached out with questions about the product to the smooth delivery process and post-purchase support, their team proved to be professional, responsive, and dedicated to ensuring customer satisfaction. Their commitment to going the extra mile for their customers deserves a standing ovation!
Conclusion: In the world of home theater projection screens, the Silver Ticket Products STR Series 6 Piece Projection Screen is a true blockbuster. With its outstanding picture quality, impeccable design, versatile compatibility, enhanced viewing experience, and top-notch customer service, this screen has raised the bar for home theater enthusiasts. Whether you're a movie buff, a gaming enthusiast, or simply love the immersive experience of watching content on the big screen, the Silver Ticket STR Series is the ultimate star of your home theater setup. Lights, camera, and action have never been more captivating!
Fantastic screen. Exceeded expectations.
Pat✓ Verified Purchase•December 28, 2023
I purchased the STR-169120 120" 16:9 white material screen. I reserve the 5-star review for the best of the best, but this purchase meets the criteria -- exactly as described, high quality product, straightforward setup, and good customer support.
Before I even received the screen, the Silver Ticket reached out via email and linked the setup video. Even though it was an automated message, they made it clear that I had product support should I need it.
Putting the thing together took a bit of time (>1 hour), but it was simple enough with the video instruction. Minimal tools required -- just a Phillips-head screwdriver. The physical instruction manual wasn't the best I've seen, but the video instruction goes step-by-step with great detail so I only glanced at the instruction manual briefly to confirm I had all the parts. All parts and hardware were clearly labeled and in good condition. Came with a few extra screws and plastic screen lugs, so that made me a bit nervous, but the setup was straightforward enough that I realized quickly that I wasn't missing any steps. My biggest concern was whether the screen frame would fit together perfectly enough to make sure everything remained in square and that the screen material would stay wrinkle-free and taut, but the attachment bracers pull the sides in nice and tight. I checked it with my framing square once I was done putting the frame together and it was pretty much perfect. The connections are tight enough where you can't even see the seams where the bars attach to one another. The tension rod system also allows you to stretch the screen over the frame really easily, and the end product was a nice uniform, wrinkle-free appearance. It sits against the wall more flush than my 65" LED TV and only sticks out maybe 3 inches. Looks fantastic and satisfies the perfectionist side of me.
Mounting was really simple too. The 4 mounting brackets (2 top, 2 bottom) can be slid into desired position so you can effectively position the screen on the wall however you want without worrying about where your wall studs are. The only thing I would suggest here is sliding one mounting bracket in from each side (one from top left, one from top right, one from bottom left, one from bottom right) rather than sliding them in from the same side like they suggest in the setup video. The reason is because to slide one of the brackets to the opposite side, I had to remove the support bar, then it took some jiggering to get the piece to slide over the center joint. Minimal issue but worth noting.
The quality of the picture at 120" far exceeds the picture when I was just projecting onto my white wall or the cheap white projector sheet that I purchased as a placeholder until I could get a real screen. The black frame actually absorbs light spill so even though there is a bit extra due to my angling of my projector and using keystone correction to fit the screen, you can't tell at all. Seriously looks like a professional quality movie screen.
Overall, I'm beyond pleased with this purchase. Setup was simple and straightforward, it looks sleek and stylish, and it reflects a beautiful picture. Highly recommend if you are in the market for a fixed-position projector screen. 5/5 across the board.
Excellent value for projector screen
BETTE B.✓ Verified Purchase•November 24, 2023
I have been using a beige wall with slight texture for watching my Optoma HD-20 and now my Optoma HD25-LV projector. The bare wall was able to provide a very good picture for Blu-ray and 3D. But I kept reading how a good projection screen would give a much better picture because of the smooth surface and neutral color. I decided to go with a fixed screen because it gave me a better chance of no wrinkles and no motor to break. I decided on the Silver Ticket brand because of the reviews and ease of construction shown in the videos. The cost seemed very reasonable compared to other screens.
The screen arrived very soon after ordering. I think it was only three days. The packaging arrived in excellent shape, but it probably would not have mattered if there were dents in the outer box because it was double boxed. Everything was very well packaged.
I started assembly by vacuuming the carpet in the assembly areas as recommended, but I also laid down some extra sheets on the carpet. (I have two shedding dog!). I never did have an issue with the screen attracting hair or fuzz during the assembly or installation.
I laid out all the frame pieces and started assembling the top and bottom sections as instructed. I placed the listed number of plastic snap lugs and wall mounting brackets in the slots. Check the orientation of the wall mounting brackets. Two for the top and two for the bottom. They are different. Some videos recommend a portable drill for quick attachment of the parts but I found a regular Philips screw driver just as fast. Portable drills have a tendency to strip out screws. I then attached the sides after installing the listed amount of plastic snap lugs. I noticed a little jogging of the frame parts was required to fit the screws to the holes. Once all the frame pieces were in place I tightened everything down. I now had a very secure, stable frame.
Next, I rolled out the screen completely between the frame, front side (white) down, black side up. I then installed the six rods. The two longer rods go on the the vertical sides. They have a "bubble" on each end. The rods for the horizontal sides, two for the top and two for the bottom, have a "bubble" on one end only. The end without the 'bubble" go in the screen first. The rods took a little twisting and pushing the rod along to complete their installation. When completed there will be two rod 'bubbles" at each corner, none in the middle.
I then started pulling the rods over the plastic snap lugs. As instructed I started at the corners first. The first two corners went easy. The third corner took a little more strength as the screen started stretching. The last corner took the most strength but was not difficult. Now that all the corners were done, I just finished up by pulling the rods over the plastic snap lugs until all were completed. I did not require any additional tools to do this, but some hard but not impossible pulling was needed. I new this meant a nice smooth screen.
I lifted the screen up to check for alignment and everything looked smooth and solid. No further adjustment was required. To install the middle support I laid the screen back down and put one end of the middle support in the center of the bottom frame slot. The other end of the support I put down about a foot from the center of the top frame in the slot. This is because the screen stretching causes a slight bow in the center of the top and bottom frames. I undid two of the plastic snap lugs between the support bar and the center of the frame to put less tension on the frame. I then pulled slowly on the center support to get to the top frame center. I pulled a few times, took a break, and then pulled again. Slowly but surely I got the center support to the middle of both top and bottom frames. This was the most difficult part of the assembly. But patience results in a perfectly squared up screen. I then pulled the rod over the two plastic snap lugs I had unattached earlier.
To attach the screen to my wall I located studs that gave me the more than 48" but less then 80" requirement for the wall mounting brackets. I needed 14.5" distance between my ceiling and actual viewing part of the screen for my ceiling mounted projector. The screen frame is 2.5 ". The supplied wall mounting bracket holes are down .75". So 14.5" - 2.5 + .75" = 12.75". The important part was considering the dimensions of the screen frame and knowing the wall hanger holes are down .75" from the top of the screen. So I drilled four holes. The top two holes were both down 12.75" from the ceiling and 63.875" apart because of stud location. The bottom two holes were 61.375" perpendicular from the top two holes. This measurement was found by measuring the distance between the top and bottom wall mounting bracket holes on the screen. I installed the four supplied wall screws. After sliding the wall hangers to match the wall screw measurements, two of us were able to set the screen on the wall screws and set it in place.
The Silver Ticket Screen is a vast improvement over the bare wall. Colors appear more vivid, more detail is visible, the the overall picture is brighter. Having a frame gives the picture a more movie-like appearance. The screen itself is totally uniform with no wrinkles or annoying inconsistencies that a bare wall might have. The price makes this screen quite a bargain.
Do not be tempted with stretchable, wrinkle resistant, or DIY blackout material…wow
Ryan✓ Verified Purchase•November 13, 2023
First off, I have been using projectors in my home theater for years. I have used the free ones, that are part of the package, I have built DIY ones, and even used Carls blackout material. They were excellent.. or so I thought.
A month ago, I upgraded the projector, to one capable of Wi-Fi, Bluetooth, 4K etc. I had my previous projector, 12 ft from screen, ceiling mounted. Dead center. No matter what, the screen made the image terrible.
I spent a lot on the projector. I spent a ton of time wiring speakers in the ceiling and even more in the furniture. No way I accepted that a projector that was triple the cost, of the old, would look that bad.
I researched a ton and landed here. I have a 2 car garage, that is split dead down the middle, studded, insulated, dry walled, and I tan two separate ac systems.
The build was a little tight, I laid a white b d sheet down, prior to laying anything else down. I wanted to prevent smudges or and other issues.
On the back off all rails for the frame, is a number indicating the quantity of white tabs needed, that hold the screen. You can assemble the frame, once the corner and center supports, are in, you have to slide the white tabs onto the back side of the rail. Keep them close to the corners.
The rods are fed too and bottom, with the side going in, that has no rubber. Feed it through the screens loops. Every place you see where the pole is visible, that is where you will pull the screen, up over them, and the rod will hold it between the canvas.
Pull it tight like a spare tire, in a star formation, pulling the immediate opposite side every time.
A Phillips screw driver is all that is needed. I did not anchor the corners, with the screws, until the very end. Build took about 45 minutes to build, in a tight area, and I did it alone.
A.) I woke up to tackle this, and was blown away by the simplicity. The order came right on time. It came well protected.
B.) I am no millionaire, but if I enjoy something, I want to enjoy it the way it was designed to be enjoyed. So, I bought the new Xbox series x and the 4K Roku.
I went from 98", to 110". I built my previous to spec, but had to reduce image to 80%, and it would never touch the boarders. Turned out the wood started to bow, causing the screen to look bad. My wife was standing in the theater, as I turned it in the first time and said wow!! She is never impressed by my Tim the Tool Man Taylor approach.
Here are three photos to show gain,my maximum viewing angle is clear at 170 degrees, the second photo is displaying clarity from the worse angle, the last photo is the screen with every light on in the room.
As you can see, Call of Duty MW2, on Xbox Series X, is still very clear even with a lot of light.
I would never buy anything but another screen from them. If I grow richer, I'd buy better models, but it would be from this seller. When I ordered it, the messages me to confirm the order and answer a few questions. That's great service too. Best purchase experience in months.
Great movie theater at home experience!!
eric✓ Verified Purchase•October 26, 2023
For under $600 dollars I now have a great movie theater at home experience that I can share with friends and family.
Did some research of different screens and decided on the 120 inch white screen Silver Ticket Productions. I chose this one because it sounds like the ideal size of screen picture for these lower cost HD 1080 projector is 80-120 inches. Now the projector seemed to look great even up to 200 inches that it says it goes to. I picked a Nexigo projector for like 250 dollars.
So I picked this size screen for the projector I boughts ideal size and to start, the information available for these screens is great. I enjoyed looking at the differences of these Silver Tickets prices and why they are. I expect I'll upgrade to a bigger silver colored screen of theirs in the future. I wanted to try them out so I'm starting near the bottom of their products to start.
Shipping was fast, I got the screen, a projector, and a projector stand. All arrived within 4 days with free normal shipping.
Focusing here on the screen itself, the packaging was thorough, lots of packing tape to cut and we'll placed Styrofoam support protecting the metal and other parts. The directions could use more detail, because setup is super easy when you see it done. I went to and recommend watching a Silver Ticket Productions setup on YouTube. They cover and show how easy it is to setup in 6 minutes.
The quality of the parts are excellent. You will need space on the floor to set this all up!
I used the projector on a large white wall and then the screen to see the differences. I'll be honest, if you want to use a projector against a big wall you can and it works pretty darn well. I would say the screen adds greater detail, color, and depth of contrast to lights and darks. You really feel like you're in a movie theater!
Overall it has been an excellent experience thus far. I will update if anything goes wrong. Otherwise I highly recommend. Definitely satisfied!
Page 1 of 2