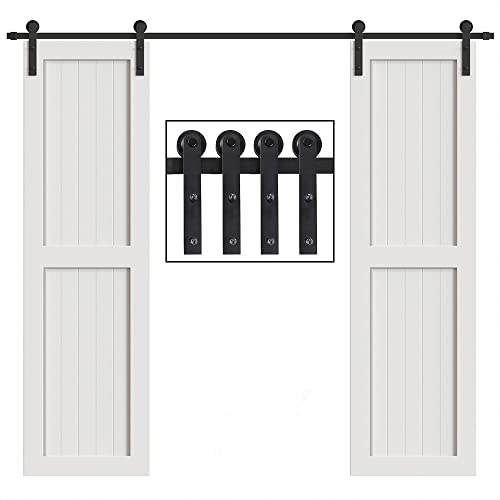
ZEKOO 6FT Double Track Bypass Sliding Barn Door Hardware Kit for 2 Doors, Bypass Barn Door Track Kit, Low Ceiling, Easy Install, J Shape Hanger, Fit 36" Wide Door Panel


Key features
- •【Shopping Tips】Sold hardware only, doors not included. Needs at least 9" ceiling clearance to install. Doors cannot be thicker than 2" or the kit won't work. Do not install it on sheetrock walls or drywall without studs. Please contact us on Amazon if you need different-length spacers or roller bolts.
- •【Service Assurance】ZEKOO stands by you all the time. Please do not hesitate to contact our customer service team if you have any questions. If parts missing or broken, we will send you a replacement ASAP.
- •【About ZEKOO Double Track Bypass】If you want the opening to show as much as possible, this kit offers a better solution than the single track bypass. 2 separate tracks allow the barn door to slide on the track you desire, so the doors won't affect each other when sliding. Then no need to worry about the door overlap compared to the single track bypass kit.
- •【Why Choose ZEKOO】Black electrostatic sprayed carbon steel track, say goodbye to corrosion, rust, and scratch. Wheels are covered by nylon, bringing them great durability, vibration, and wear resistance. Bearings are made of high-purity Gcr15 steel, rigorously tested over 160,000 times, and secure the buttery smooth and quiet of the rollers when sliding.
- •【Heavy-duty Materials】Track is made from 1/4" solid high standard Q235 carbon steel. Both self-tapping and roller bolts are grade 8.8. These make our hardware kit can hold 230 lbs doors easily. Rubber covered Door Stoppers own a good buffer effect and also reduce the noise.
- •【Part List】 2 x 6FT Rail, 5 x Spacer, 4 x Roller, 5 x Bracket Kit, 4 x Door Stopper, 4 x Anti-jump Pad, 2 x Floor Guide, 1 x Step-By-Step Installation Manual, and some small accessories.
ZEKOO 6FT Double Track Bypass Sliding Barn Door Hardware Kit for 2 Doors, Bypass Barn Door Track Kit, Low Ceiling, Easy Install, J Shape Hanger, Fit 36" Wide Door Panel
List Price: $241.52$217.37DEALYou Save: $24.15 (10%)
Free shippingFree Returns – 30 daysFree Order CancellationSecure Payment2–3 Days DeliveryGet It June 23, 2026In Stock (1)No marketing spamNo account requiredFulfilment by FedEx / Amazon / UPS / ShipwirePayPal / Card Buyer Protection
Customer Reviews
Reviews sourced from verified Amazon purchasers4.6
out of 5
Based on 10 reviews
5★
60%
4★
40%
3★
0%
2★
0%
1★
0%
Notes from two successful Zekoo New Style Bypass hardware installations
Wired for Life✓ Verified Purchase•February 28, 2024
The media could not be loaded. I love the end result from the two Zekoo 6.6 ft Bypass door hardware kits that we've now installed in front of 2 closets, in a home with low ceilings. My husband and brother-in-law helped me with the time- and muscle-consuming installation of this sturdy, heavy-duty Zekoo hardware. It took us three full days, not including door staining or trips to the hardware store. None of us had previously installed any sliding doors. I've read other reviews complaining about the instructions, and here are some things that we learned that might make helpful updates to the Zekoo instruction manual:
1) The first step in the instructions should talk you through plans for the wall that will support this hardware. This Zekoo hardware is probably strongest when used on walls with a wall stud at the center of what will become the space above the doors, and additional studs on either side of the center at standard 16" intervals. My house is not so well built, with studs only at the ends of the closets. To compensate and insure our wall would support this heavy hardware, we added a 2" x 8" board to the inside surface behind the drywall above the closet. This board was supported by the top of the closet frame, and made the rest of the hole-drilling instructions work out easily. The Zekoo kit does come with drywall molly anchors. Considering the weight of the kit and my solid doors, my team decided not to trust mollies to hold it all up. We also used a 1" x 6" X 80" board, which I finished to match my doors, across the front of the top of the closet. Using this board gives more clearance for wall baseboards, and it also enabled us to make installation measurements and pilot holes on the board, before the board was installed on the wall.
2) Where the instructions tell you to draw lines, I would have said "Mark points." Once the hardware is installed, you will be able to see part of any lines you have drawn on your wall, and you may need to paint or stain over your lines. Unnecessary extra work, easily avoided.
3) The purpose of the bottom line is explained in the instructions, but the reasons for the top two lines are not. We learned that the other two lines are guides for the two screw holes in each of the brackets that will support the outside rail. These top two lines are also better replaced by marks versus lines, using a square to line them up at the proper vertical distance from the first, or bottom line of holes (see photo). The two rails ideally will run parallel to each other (otherwise, you will need doors of different lengths). Keeping everything square and using the measurements written in the instructions allows the inside and outside rails to line up properly.
4) The instructions suggest screwing together the two pieces that make up the bracket, before mounting the bracket on the wall. If you have very little clearance over the open space your doors will cover, you may have to put the brackets together first to be able to tighten the screws. I only had 8 1/2" between the top of my closets and the ceiling, though, and we found it to be much easier to mount the part of the bracket that goes against the wall first, by itself, because it is harder to screw in the wall mount screws than it is to tighten the bracket connection screws. You can then level these bracket pieces and tighten them down. Separately, in a comfortable work space, you can loosely pre-assemble the other halves of the brackets onto what will be the outside rail, lift this whole construction into place, and screw and tighten all connections. The outside half of the bracket needs to fit over the top of the wall half of the bracket, for the rails to be aligned.
5) For cutting the slot needed in the bottom of the door, the easiest approach we found was to ignore the instructions to cut out a notch 5/16" wide by 3/4" deep, and to use a circular saw set to approximately half the width of the door. My doors are 1 3/8" thick and our saw was set to cut 11/16" to cut at a depth of about 1/2". After making one cut in the door bottom, flip the same door over and, without changing the saw settings, saw again (see video). This process neatly created a straight track, which was wide enough to work with the small plastic door guides that came with my Zekoo kits. Zekoo measurements aim to have your doors 3/8" off the ground, so the guide does not have to fit completely into the track on the door. My doors slide very smoothly. We also found that the track was needed. The doors slide smoothly, but they also swing easily, without a guide.
6) You will probably need to use many washers to make sure that no parts rub together and to make the kit fit your application. We made a number of final adjustments, including using two washers on each bolt through the outside track, to keep the outside track bolt ends from rubbing the inside door bracket when it slides. Also this kit works with a range of door thicknesses. My 1 3/8" doors were on the thinner end, and the door wheel hardware includes bolts with acorn nuts, which can only be tightened so far. I needed 6 washers per bolt to make this hardware work with my doors, or 48 washers per two door closet. I bought a box of washers.
7) Finally, there are no extra nuts or bolts with this kit and there is a pile of hardware to manage. We lost much time at one point. trying to find an acorn nut that vanished. Be careful with the hardware!
Other than some instruction clarification and maybe some extra washers and nuts, I think this kit is about as good as it can be, without coming completely pre-assembled. Nice job, Zekoo!
Quality hardware set
J. lewis✓ Verified Purchase•February 17, 2024
The only thing I didn't like about it was holes only set for 16 inch studs but that seems standard on these. You have to find a way to improvise if your studs don't match (like use a board). Otherwise all the hardware works good. Wheels slide smoothly on the rails, etc.
Good quality But!
weasel✓ Verified Purchase•February 9, 2024
Well overall I like the kit but!
It calls to put you bottom row or holes 1-11/16" higher than the doors hight. This will put an 1/8 between the door bottom and the guide it comes with. The door guide is 3/4
Next the lag bolts for the rails could be longer i wanted to put it directly through my drywall onto to header behind it and I'm pretty sure there only 3/4" holding it up there whitch is not enough in my opinion. So im going to have to add an exposed headboard to attach the rails.
If you have tow kick around the bottom of your wall you will also need the exposed header to shim the doors away from the wall so they don't hit
But!!! It is a nice set and I'll be making it work
Great track system
Joe✓ Verified Purchase•February 5, 2024
The bolts to hang the rails could have been bigger they broke off while screwing into the studs. I replaced them and everything else works great for closet doors.
Prompt service
T Scott✓ Verified Purchase•January 19, 2024
I asked customer service if this kit would work on a door that is 1" thick. They said yes it would but with a slightly larger gap between the doors. They added that if I wanted they would send bolts that would fit better. I didn't have a problem with the gap, so I purchased the hardware , notified them when I got it and they promptly sent me the replacement hardware UPS.
I have not installed it yet, but the finish was very nice as well as the build quality.
I have not installed it yet, but the finish was very nice as well as the build quality.
Page 1 of 2


![LTIYITL 52" Bi-Folding Sliding Barn Door Hardware,Smoothly and Quietly-Heavy Duty -Simple and Easy to Install for 4 Doors Hardware Kit,Basic"J"[No Door ]](https://m.media-amazon.com/images/I/41+BgwtBEBL._SL500_.jpg)

![LTIYITL 4.3FT Bi-Folding Sliding Barn Door Hardware,Smoothly and Quietly-Heavy Duty -Simple and Easy to Install for 2 Doors Hardware Kit,Basic"J"[No Door ]](https://m.media-amazon.com/images/I/41cviWdOggL._SL500_.jpg)

