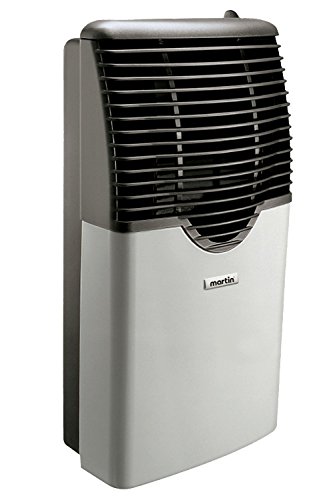
Direct Vent Propane Wall Heater Furnace Built-in Thermostat 8,000 Btu


Key features
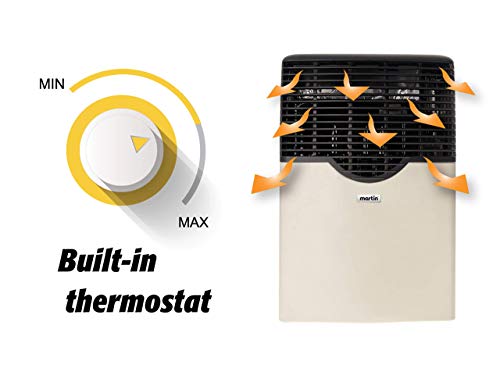
- •WARM, ADJUSTABLE HEAT - Keep living or work spaces heated with a direct vent wall heater with room thermostat that lets you monitor your heat dispersion.
- •BUILT-IN THERMOSTAT (Low - High Dial) - 8,000 BTU
- •STYLISH & CLEAN ENERGY - A sleek fireplace design, our direct vent gas heater produces safe, clean energy that's economical and aesthetically pleasing.
- •QUICK & EASY INSTALLATION - Connect our heater to a gas fitter and it will heat your living space effectively with low maintenance required. (The wallʼs thickness cannot be less than 4-1/2" (11.5 cm) nor can it exceed 12-5/8" (32 cm).)
- •CERTIFIED QUALITY - Heavy-duty grill made with die-cast aluminum and glass ceramic window for more safety, Product is certified for use in the USA and Canada.
- •Propane Gas Heater
- •Die-Cast Aluminum Grill
- •Adjustable Thermostat
- •Glass Ceramic Window
- •Clean, Natural Energy
- •Quick and Easy Installation
- •Certified for USA and Canada
Direct Vent Propane Wall Heater Furnace Built-in Thermostat 8,000 Btu
List Price: $945.74$851.17DEALYou Save: $94.57 (10%)
Free shippingFree Returns – 30 daysFree Order CancellationSecure Payment2–3 Days DeliveryGet It June 24, 2026In Stock (2)No marketing spamNo account requiredFulfilment by FedEx / Amazon / UPS / ShipwirePayPal / Card Buyer Protection
Customer Reviews
Reviews sourced from verified Amazon purchasers4.7
out of 5
Based on 4 reviews
5★
75%
4★
25%
3★
0%
2★
0%
1★
0%
easy to install
Robert Officer✓ Verified Purchase•November 13, 2017
high quality, easy to install, super efficient!
Glad I purchased this heater
Todd Lundy✓ Verified Purchase•November 11, 2017
Easy to install, love the glass window, works well at keeping our 14 x 20 camp nice and warm!
Like it a lot.
creeky✓ Verified Purchase•November 6, 2017
The Martin with window is a great direct vent heater. I really like the modulating flame. The unit is also fairly quiet. I had another direct vent propane model installed that died after 4 years. It was an earlier generation of heater without the modulating flame. So it would bang on and pop and clunk as it cooled with some frequency. It was also much larger in size.
The install was straightforward for me as I already had the hole cut for the old heater. Martin included a "liner" which went inside the old hole. Then I put the new vent in. Its about the size of an older 8k btu vent. Nice. And I filled around the new venting with roxul. A stone based insulation capable of handling very hot temperatures (will not burn or melt). So I got a nice insulated bug/critter proof install.
The unit was very easy to hook up. I had a 3/8" mip to mip fitting on hand. Note: you will need this for any of these direct vent installs. The fitting on the heater and the hose will be female. Save some time. Pick one up at the hardware store before installing! You'll also need a flare fitting from the mip to the hose. I think that was included with my hose package as I already had it on there. But if you're doing this for the first time you'll want to check your fittings before installing.
I fitted with sealant goop on the Mip threads (but not on the flare fitting!) and away I went. No leaks. Took me 2 hours and 18 minutes. Complete from opening the box to cleaning up the box.
The heater has been running for two days. I ran the heater on max for a bit after giving it a day to break in. Just to burn off any manufacturing grease left over. It smelled a bit. But not as bad as the previous 3 I installed from another company.
I give this five stars. Easy to install. Safe to use. Neat window. 80% efficient. Modulating flame. This new generation of direct vent heaters has gotten pretty good.
Generally good, but a few issues
Daniel P Maloney✓ Verified Purchase•October 27, 2017
Ordered after having had a few pre-purchase questions promptly answered. Received in good condition, unit is of sturdy construction and seems generally well-made. Installed it myself, instructions were very clear and easy to follow. I wouldn't say it's an average DIY job, though -- cutting a 9" hole in the wall isn't always easy, and the penalty for getting the hole in the wrong spot is substantial. Also, running your own gas lines is probably best left to a pro - not that I followed my own advice, mind you.
My only problem with installation was an inability to successfully pressure test the system before hooking up to my propane tanks. I tightened all my connections and did a soap test, but everything was gas-tight. The leak turned out to be internal to the heater - the compression fitting on the tube heading up to the control valve leaked like crazy. With little room to swing a wrench, it was hard to tighten, but eventually I got the bubbles to stop and fired the stove up. Worked great for a couple of days, but then I started smelling gas. Checked the same connection and it was leaking again. Tightened it again, applied a little green Loctite (the thread penetrating kind), and let it cure overnight. No problems since.
The only other issue I have is trying to light the pilot. Following the instructions, I keep the knob pressed down for 10 or more seconds after the pilot lights. But when I release the knob, the pilot slowly dies. I found that pressing the button on the top of the control valve fully with a screwdriver for a few seconds does the trick, but that's a nuisance since it requires either removing the front grille or poking a screwdriver through the grille. It's like pushing down the knob doesn't quite open the pilot valve enough.
Oh, and the heater was a little stinky when I first started it up. But that's to be expected, since you need to burn off manufacturing oils and heat up the paint to cure it. Been great since then -- keeps my 10'x12' outdoor office nice and toasty.