DROK Voltage Amp Meter DC, Battery Monitor DC 0-300V 200A, Ammeter Voltmeter for Solar System Setup Power Energy Capacity Volt Current Detector Panel with Hall Sensor


Key features
- •Multifunctional Meter: DROK multimeter panel is available to measure percentage and AH of remaining capacity, DC positive and negative bidirectional current, DC voltage, DC positive and negative power, DC positive and negative bidirectional accumulated electric energy. Voltage measurement range is DC 0-300V, current measurement range is 0-200A.
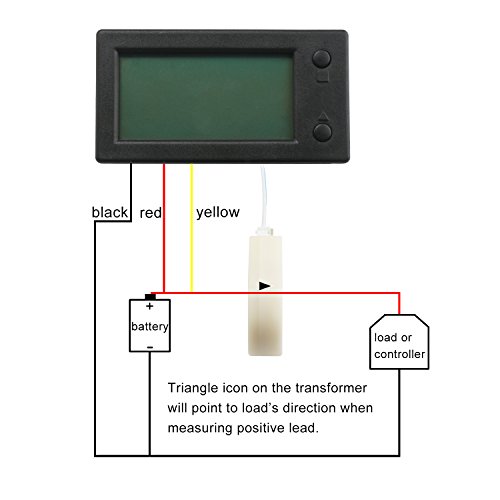
- •Hall Sensor & Easy Mount: the voltage amperage meter is coming with a Hall transformer to for isolated measurement, reliable and safe; accepting two-wire system connection and three-wire system connection, could be powered DC5~90V, easy and simple to wire this meter up.
- •Display: backlight can be controlled to be ON or OFF as user's need; Equipped with full angle of view LCD screen, users could see the display clearly whenever at night and day, indoor or outside, even under the sunshine.
- •Alarming Function: it will alarm and flash to draw your attention when the real voltage is higher or lower than preset alarming voltage and real current is higher than preset current; It will also alarm and flash to remind you to charge for your device when the remaining capacity of battery is low.
- •Wide Applications: Can be used as dc amp meter, digital volt meter, power meter, battery capacity monitor. Suitable for all kinds of batteries, such as Lead-acid batteries, Lithium Polymer batteries, lithium iron phosphate batteries and etc. With function of storing date when power down, using this meter, no need to worry that your electric data will be lost.
DROK Voltage Amp Meter DC, Battery Monitor DC 0-300V 200A, Ammeter Voltmeter for Solar System Setup Power Energy Capacity Volt Current Detector Panel with Hall Sensor
List Price: $69.82$62.84DEALYou Save: $6.98 (10%)
Free shippingFree Returns – 30 daysFree Order CancellationSecure Payment2–3 Days DeliveryGet It June 23, 2026In Stock (1)No marketing spamNo account requiredFulfilment by FedEx / Amazon / UPS / ShipwirePayPal / Card Buyer Protection
Customer Reviews
Reviews sourced from verified Amazon purchasers4.1
out of 5
Based on 10 reviews
5★
20%
4★
80%
3★
0%
2★
0%
1★
0%
Great inexpensive gauge, pos and neg current readings, does everything I want
Ed W✓ Verified Purchase•August 10, 2023
I did a rewiring project for my camper's battery & solar charging system and wanted to install some ammeters while I was at it. I went with Hall sensors vs shunt sensors for convenience. This sensor is great because it offers bi-directional measurement, I didn't realize that this was actually kind of hard to track down with many other meters not indicating positive or negative direction. This meter does show either positive or negative current flow. I installed it on the main feed from my battery so I can tell what the load is on the batteries. I installed a second sensor (green number gauge in pic, also a Hall sensor) on the solar output from the CC. I do not have a way of confirming the absolute accuracy of the ammeter, but it does show numbers consistent with what I'm expecting (0 when there would not be a load, consistent with the solar output current vs other simultaneous camper loads, reads about what I expect when applying a load with a rough estimate of the current required). I concur with other reviews that the manual is hard to decipher. It does tell you the right things to do, but it is not intuitive and even though I felt I was following directions I had a hard time getting my initial setup how I wanted. And the manual does not go through what all the menu options are, some of which are calibrations so you need to be careful about what you are changing. After making a change, press and hold the menu button to save the change.
Works well.. no shunt required.
Erik✓ Verified Purchase•August 7, 2023
Was a little skeptical whether it would work or not with no shunt, bit it's been fantastic. Tracks the Ah left in the battery very well. Easy to install. I suggest getting the longer cable. Using for a 200Ah LifePo on my sailboat.
IMPORTANT things to know to save you time
Ima Lotliku✓ Verified Purchase•August 2, 2023
I got this for my travel trailer so I could monitor the battery use and charge. One installation tip I got that you might consider is to use CAT5 or CAT6 cable between the monitor, the Hall sensor, power, and ground connections. Yes, you can send 12v over these thin wires without worry. I used about 15ft of cable along with these connectors that made it even easier: https://www.amazon.com/gp/product/B07PR1LFVG/ref=ppx_yo_dt_b_search_asin_title?ie=UTF8&psc=1.
After installing this meter, I could not find the directions as to how to program it. But, I thought, how hard can it be. Well, as it turns out, programming the device is not the least bit intuitive.
Searching the internet, including the DROK site proved fruitless. I resorted to reading all the Q&A and reviews to piece it together. And then, out of the corner of my eye, I saw a pdf link on the Amazon product page to the User Manual under Technical Specification just below the Technical Details section under Product Information. Here is the link to make it even easier for you: https://m.media-amazon.com/images/I/B1ubSSVdpyS.pdf.
Read it VERY CAREFULLY. It really does answer most questions.
Now, here is what I wanted most to know about programming, and perhaps you, too:
1. AH stands for Amp Hours. FYI, for an inexpensive Interstate hybrid, deep cycle,12v, lead acid battery, group 24, that's about 60. If you have two for your trailer as I do, set this number at 120 as in AH1 20.0. Be sure to hold the square top button for a few seconds to make it stick. This whole thing should flash at you when it does.
2. FU here stands for something other than what you may think. In this case, it is what your voltage reading should be when FULLY CHARGED . For a 12v system, like my trailer, that should be at least 12.6 for a healthy, fully charged battery. So I set this number to FU0 12.6.
3. As for the other settings, I haven't bothered with them other than to make sure they were all set to '0' since I didn't want alarms going off.
Hope this helps. Thanks for all the other reviews with tips, especially the one about holding down the square, top, right-side button to get the setting to stick.
Not a precision instrument, but good enough. Shows the info I need for my camper.
L. Blake✓ Verified Purchase•July 21, 2023
Compact multi-meter, easy to install. Display is easy to read even with the backlight off. Hall effect sensor makes it easy to measure a circuit with a single +12VDC feed, but multiple grounds (wired and chassis). 20mm hole is plenty big enough for my 4 Ga cable.
Readings are close enough to my Fluke that I can use it to keep track of what I need at a glance. Just installed it, so can't yet comment on stability over time. The attached photos are of the meter after calibrating the Hall sensor to zero; then with fans, gas sensor, dash cam and GPS connected (800ma) but no WH yet. (dash cam and GPS on stand-by, so minimum current - solar charging system has battery bank on 13.7V float)
This unit came with a printed instruction sheet that is the same one available for download on the Amazon page. Wiring is straight forward for a 12V system, just +12VDC and ground. Button usage and parameter setting is a learning experience, but got it after a few tries.
The instruction sheet could be better; phrasing and vocabulary required some translation, and the parameter setting seems incomplete. The instructions describe setting five (5) parameters (see attached photos):
AHX XX.X - AmpHour capacity of battery bank, 430.0 in the photo
FUX XX.X - Full Voltage for the batteries (U is seven-segment for V), 12.8 in the photo
HUX XX.X - High Voltage (over-voltage) for alarm, 15.4 in the photo
LUX XX.X - Low Voltage for alarm, 10.8 in the photo
HAX XX.X - High Amp (over-current) for alarm, 125.0 in the photo
All good.....but.....there are three more parameters that are not mentioned in the instructions:
CUX XX.X - not described, but the reading matches the cumulative energy (WH) as of this photo
AAX XX.X - not described, but the reading matches the current as of this photo
AUX XX.X - not described, but the reading matches the voltage as of this photo
Not sure if these can be set, or if setting them changes anything. Didn't try. Maybe a way to calibrate without disconnecting things, maybe just lazy programmers? Something for the DROK product expert to explain. True fans would like to know.....
So, overall, not perfect but worth the money for my installation (if it holds up).
Recent Version of WLS-PVA200 Drok Battery Monitor - Info to hopefully help others
F150TruckNut✓ Verified Purchase•July 10, 2023
I am writing this to hopefully help others who might have the same setup problems I had. The recent version of this WLS-PVA200 came with additional setup mode options that weren't described in the supplied user guide. Here is a response from droking.com support:
"”"”"”"”"”"”"”"”"”"”"”"”"”-
Hello,
Please ignore CU,AA, AU menus, they are available for the other version with Bluetooth.
The available menus are as shown in instruction. AH and FU are necessary setups. FU is the fully charged voltage.
Droking support:
"”"”"”"”"”"”"”"”"”"”"”"”"”-
My review comments:
Set only "AH"=Amp Hours of battery, and "FU", which is "FV", or Full Voltage minimum number when battery fully charged. Leave all other CU, AA, and AU setup parameters as 000.0.
If CU, AA, and AU have some number other than set of 000.0, you can ignore. I noticed after resetting CU, AU, and AU to 000.0, one or more showed dynamic live amps and dynamic live voltage, and that's okay. Long pressing of top right button (4 seconds), and then letting go of button, with then display flashing to confirm save of setup, completes setup mode.
Note, you must set accurate AH (Amp Hours), and FU (=FV, Full voltage) numbers values of your battery. Once set and saved, they are retained even without device being powered. After setting those parameters and saving them to memory, charge battery fully to minimum and/or above FU (FV) number previously set. With meter then in standard display mode (not in setup mode) showing, and with no electrical load being drawn, calibrate amps to 0 with a short 2 second press of top right button. This will calibrate amps drawn from fully charged battery to 0, and battery indicator will stop flashing empty, and show a full battery indication. Now activate or connect an electrical load, with positive (only) electrical load battery cable passing through hall effect sensor donut, and the arrow indicator on the hall effect donut sensor pointed in direction to electrical load, and amps drawn will be shown as a positive number. Wiring this meter with it's own separate switch on the unit's red power cable is advised during electrical load non-use to power off this unit and prevent parasitic drain of battery powering this unit. This is especially important if wiring where both the yellow wire and red wire are tied together for the "two wire device powering method" described in user guide. This two wire device powering method is using the same battery to power it, as the battery the device is also monitoring, and will slowly drain battery by itself even during times when no other electrical load is being taken from battery.
Optionally, you can pass the positive (only) cable from your battery charger through Hall effect sensor donut in combination with the already existing positive (only) cable from electrical load to battery described above. Then you will see -XXX.X amperage on meter standard display, where negative amps means that amps are being put back into battery from battery charger. If display is not a negative number when charging battery when wiring this way, remove battery charger positive cable from Hall effect sensor donut and put it through donut in the reverse direction of from before.
So, when electrical loads are drawing power from battery, the amps displayed should be a positive number. Conversely, when charging battery, amps displayed should be a negative number. This only happens when both the charger positive (only) wire, and battery electrical load positive (only) wire, are properly (direction of current flow) directionally wired through Hall effect sensor donut.
Once wired and configured correctly, device should only need occasional amps re-calibration to 0 when battery fully charged and no electrical loads connected. This is due to battery aging and reduction of battery capability and performance over the batteries usage lifetime.
Device will detect battery full when accurate FV (FU) (Full Voltage minimum number to indicate when battery fully charged) setting is configured, and automatically reset displayed battery symbol to full indication status. This works even if you don't pass battery charger positive (only) cable through Hall effect sensor donut. That FV (FU) parameter is needed by the device to know when battery is fully charged.
AH parameter setting is needed by device to know the "energy capacity" of the battery, or how much total energy the battery contains. Batteries can be purchased in various physical sizes, and varying energy capacities, (Amp Hours), with physically smaller batteries generally associated with having smaller Amp Hour capacities.
Once I spent an hour or two figuring it out, (as user guide is difficult to understand and out of date with info on newer added unnecessary additional parameters), this Electrical Engineer found it to work reasonably well, and with reasonable accuracy for a $40.00 device.
Hope this helps someone.
"”"”"”"”"”"”"”"”"”"”"”"”"”-
Hello,
Please ignore CU,AA, AU menus, they are available for the other version with Bluetooth.
The available menus are as shown in instruction. AH and FU are necessary setups. FU is the fully charged voltage.
Droking support:
"”"”"”"”"”"”"”"”"”"”"”"”"”-
My review comments:
Set only "AH"=Amp Hours of battery, and "FU", which is "FV", or Full Voltage minimum number when battery fully charged. Leave all other CU, AA, and AU setup parameters as 000.0.
If CU, AA, and AU have some number other than set of 000.0, you can ignore. I noticed after resetting CU, AU, and AU to 000.0, one or more showed dynamic live amps and dynamic live voltage, and that's okay. Long pressing of top right button (4 seconds), and then letting go of button, with then display flashing to confirm save of setup, completes setup mode.
Note, you must set accurate AH (Amp Hours), and FU (=FV, Full voltage) numbers values of your battery. Once set and saved, they are retained even without device being powered. After setting those parameters and saving them to memory, charge battery fully to minimum and/or above FU (FV) number previously set. With meter then in standard display mode (not in setup mode) showing, and with no electrical load being drawn, calibrate amps to 0 with a short 2 second press of top right button. This will calibrate amps drawn from fully charged battery to 0, and battery indicator will stop flashing empty, and show a full battery indication. Now activate or connect an electrical load, with positive (only) electrical load battery cable passing through hall effect sensor donut, and the arrow indicator on the hall effect donut sensor pointed in direction to electrical load, and amps drawn will be shown as a positive number. Wiring this meter with it's own separate switch on the unit's red power cable is advised during electrical load non-use to power off this unit and prevent parasitic drain of battery powering this unit. This is especially important if wiring where both the yellow wire and red wire are tied together for the "two wire device powering method" described in user guide. This two wire device powering method is using the same battery to power it, as the battery the device is also monitoring, and will slowly drain battery by itself even during times when no other electrical load is being taken from battery.
Optionally, you can pass the positive (only) cable from your battery charger through Hall effect sensor donut in combination with the already existing positive (only) cable from electrical load to battery described above. Then you will see -XXX.X amperage on meter standard display, where negative amps means that amps are being put back into battery from battery charger. If display is not a negative number when charging battery when wiring this way, remove battery charger positive cable from Hall effect sensor donut and put it through donut in the reverse direction of from before.
So, when electrical loads are drawing power from battery, the amps displayed should be a positive number. Conversely, when charging battery, amps displayed should be a negative number. This only happens when both the charger positive (only) wire, and battery electrical load positive (only) wire, are properly (direction of current flow) directionally wired through Hall effect sensor donut.
Once wired and configured correctly, device should only need occasional amps re-calibration to 0 when battery fully charged and no electrical loads connected. This is due to battery aging and reduction of battery capability and performance over the batteries usage lifetime.
Device will detect battery full when accurate FV (FU) (Full Voltage minimum number to indicate when battery fully charged) setting is configured, and automatically reset displayed battery symbol to full indication status. This works even if you don't pass battery charger positive (only) cable through Hall effect sensor donut. That FV (FU) parameter is needed by the device to know when battery is fully charged.
AH parameter setting is needed by device to know the "energy capacity" of the battery, or how much total energy the battery contains. Batteries can be purchased in various physical sizes, and varying energy capacities, (Amp Hours), with physically smaller batteries generally associated with having smaller Amp Hour capacities.
Once I spent an hour or two figuring it out, (as user guide is difficult to understand and out of date with info on newer added unnecessary additional parameters), this Electrical Engineer found it to work reasonably well, and with reasonable accuracy for a $40.00 device.
Hope this helps someone.
Page 1 of 2


