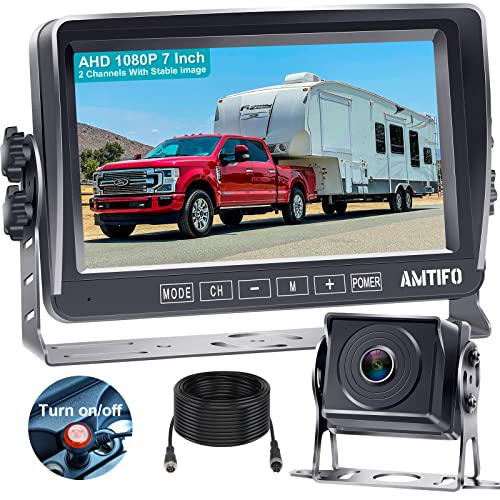
RV Backup Camera Wireless Portable: Magnetic Scratch-Proof Install-Free 7-Inch Rear View Camera with DVR Recording Monitor - Rechargeable Solar Reverse Camera for Trailer Truck Camper AMTIFO A8


Key features
- •►Upgraded FHD 1080P Digital Wireless Backup Camera. 984 ft range with no interference for reliable performance on up to 60 ft vehicles. Warm Hint : Bracket Adapter and Pigtail wire Plug compatible Furrion pre-wired Bracket and Power outlet can be provided according your need
- •►Camera with a very high IP rating of 69 it's very waterproof and weather resistant. It has a wide viewing angle of 150 degrees,the image quality is HD with 18 infrared lights. The Screen made by IPS pannel, It allows you to see a clear picture at any angle without any reflection or blurring.
- •►Super large 7" monitor:The image is super clear and any distortion is reduced to a minimum. Thus, you will get to enjoy a flawless parking and driving experience.FHD 1080P high quality resolutions chips. The image could be fliped between mirror(rear view) and facing(front view),Backup lines optional to turns on/off.
- •►The monitor has split screen ability with four way video Input CH1/CH2/CH3/CH4--, you can add a 2nd/third/ fourth digital wireless camera for the monitor. Also it allows you to monitor two or four cameras with at same time or just monitor one camera. If you would like add 2nd or more cameras for the system just contact us get the camera link.
- •►The system is compatible with RV/Pickup/Truck/Bus/Van/Trailer/Camper/5th wheel/Motorhome. A professional instruction sheet comes in the package. Also: With the 2 year Warranty, free tech support and replacement service; we know you will be pleased with this camera. (All support and services via email at: [email protected] )
BrandAMTIFO
CategoryVehicle Backup Cameras
Size7 Inch Monitor With RV Backup Camera
ColorBlack
Warranty2 Years Warranty
RV Backup Camera Wireless Portable: Magnetic Scratch-Proof Install-Free 7-Inch Rear View Camera with DVR Recording Monitor - Rechargeable Solar Reverse Camera for Trailer Truck Camper AMTIFO A8
List Price: $203.67$183.30DEALYou Save: $20.37 (10%)
Free shippingFree Returns – 30 daysFree Order CancellationSecure Payment2–3 Days DeliveryGet It June 25, 2026In Stock (4)No marketing spamNo account requiredFulfilment by FedEx / Amazon / UPS / ShipwirePayPal / Card Buyer Protection
Customer Reviews
Reviews sourced from verified Amazon purchasers4.5
out of 5
Based on 10 reviews
5★
40%
4★
60%
3★
0%
2★
0%
1★
0%
Not plug and play but can be done
Dave Gumble✓ Verified Purchase•August 2, 2023
As great as this product may be, it is not plug and play as the Furrion brand would be. With that said, if you have any DIY sense this product can be utilized with ease. All parts are included that are needed. 2 wire jumpers are included that are used to power the backup camera. Once they are properly affixed you can stuff them back where the adapter plate is. The adapter plate comes with longer screws that you will need to use to gain a good hold as the original screw that hold the plastic plate on will not suffice. Prior to that install you should affix the camera bracket to the adapter plate. This can be done by unscrewing the camera from the bracket to gain more room for ease of inputting the screws to attach it. Once you have all that done, you can finally attach it to your trailer. There are 4 other screws that you can use to keep your camera in a static position.
Moving into your vehicle. You are given a few options to either hard wire or a auxiliary plug to give your receiver monitor power. I was deceived but quickly realized that this is not a touch screen. The + and - are the cursor mover, and you can navigate through the menu. Syncing your monitor to the camera wasn't difficult. I've read other reviews that it only worked once. I powered down my vehicle and unplugged from the camper a few times and the monitor comes back with no issues. With all this said NOTE: The camera only works when you have your running lights on, which is how the camera gets its power.
I've installed my monitor in my 4Runner which has plenty of other gadgets for the driver. I have a Rago Fabrications center console molle with mounting bridge. Where I have my CB mounted, Amazon Alexa, and now the AMTIFO monitor that's hung upside-down. I could have this mounted on my dash but I have a dashcam and a rearview phone holder already cluttering my view. You have the option to change your view on the monitor to have the image mirrored so when the monitor is inverted you can still see whats behind you.
After the initial installation everything works as it should. I'm rather pleased with my purchase and will be using it to its extent. I haven't had the joy of using night vision and will report back later on this. As of this current juncture I'm writing this review on a desktop so images are not included, but will be added later today.
Easy install after I figured out mounting brackets. Connected easily and worked great.
Matt L. Hochstedler✓ Verified Purchase•July 13, 2023
This camera worked great at time of installation, I thought. Now that I have taken a trip with my camper, I realized the picture freezes after about 10-12 seconds after start up. At time of installation, it was in my barn pointed at the barn interior with no movement. It may have been freezing then, too. I just emailed tech support today and will update this review after they respond to help anyone else who may be experiencing this problem.
The mounting directions and operation manual are not great. So, I included some photos and notes for your install if you have a Furion pre wire on your camper.....
The first photo is of the Furion pre wire on my 2018 fifth wheel. I'm not sure if some are different due to age of camper.
The second photo is of my pre wire bracket with four screws and the plastic cover on the pre wire bracket removed.
Next use the small stainless bolts and lock nuts to bolt the metal U bracket to the flat metal bracket which will now become the new cover for the Furion pre wire bracket. Make sure the flat metal bracket is orientated with the small metal tab on top and angling back away from camera.
Install the jumper cable (approx. 6" cable with male and female ends) on the camera pigtail. Route the jumper cable through the center hole in brackets and plug the jumper cable into the Furion pre wire cable. Note*** This connection feels very loose and sloppy until the jumper bottoms out in the pre wire cable! But, it clicks together at the final insertion. I taped these connections with black electrical tape.
The third photo shows the new camera bracket installed on the Furion pre wire mount. Next, I folded some of the wire behind the bracket and stuffed most of it in the pre wire mount before I lined up the new cover plate with the four screw holes in the pre wire mount. Use the four new screws provided in the hardware pack to fasten the new cover plate (with U bracket attached) to the pre wire mount. These screws are about 1/2" long.
The fourth photo shows the mounted camera. Remove two allen screws from the camera, stuff the remaining wire through the hole into the Furion mount, if possible. Install those two removed allen screws through the U bracket and into camera. Install two additional allen screws provided in hardware pack through bracket into the camera. I installed both screws (on each side) through the semi-circle slot on the U bracket. Don't tighten these screws until you preview the image on screen monitor.
I plugged in my camper pigtail to truck and plugged the screen monitor into cig. lighter. Pressed the power button on the power cable and a very clear image came on the screen from the new camera! Apparently it was already paired at factory. I adjusted the camera angle by rotating the camera in the U bracket, then tightened all four allen screws snugly with the allen wrench provided in hardware pack.
The last photo shows the image on the monitor screen with the camper in my barn and door closed behind it about 30". (Low lighting, but still a clear image.)
I haven't had the pleasure of using it to back into a campsite yet. But, I think it will be a huge help for less then a 1/4 of the price of the Furion system!
Easy install but monitor glitches at startup - resolved for now
Bill in VA✓ Verified Purchase•June 14, 2023
ok, so the installation was quite easy, and the provided directions do not give you specifics, nor do 3 of the 4 You Tube links provided, work. All the components were provided, except the 3M sticky tape template on step 9 that allows you attach to your dash/etc. I ordered the window suction cup separately, (Amazon) and it should be received Oct 19, 2021.
That said, you can see in the first 5 pictures that I started with a Voyager brand fake camera cover on my Outback trailer, and as it turns out the wiring for a camera was already wired direct into the trailer running lights. Check the polarity of your wires with a voltmeter.
So I removed the cover plate, scraped off the old silicone, used stainless screws/washers to install the metal camera holder, directly onto the Voyager plastic plate. I drilled an additional 4 small holes in the plate, and also put a rubber grommet in the center hole to run the cable through. I used liquid electrical tape to add additional moisture protection at the T terminals. Then waterproof silicone to seal it all up.
The camera gauge wires are smaller than the trailer wiring, I believe they are 18 or 20 awg whereas the trailer is 16awg, so not a direct match. Does not seem to be a big deal so far, but recommend Amtifo use a larger gauge to match typical US wiring systems. I tested the system for connectivity before all wiring was completed, and it (pairing) did not go as smooth as I expected. Numerous restarts and connection/pairing issues.
The 6th picture is the final install - I used blue thread lock on the camera mount side screws because they would likely come loose at some point. That again should be a recommendation in the instructions. The last picture was the first road trip, 60 mph, camera worked fine. However there is a greenish halo/haze at the bottom third of the screen, that I need to address with Evan at Amtifo customer service. (He has responded to all 3 emails, timely)
I have not tried the backup option yet, nor night driving, so will update accordingly later. There was a final glitch after the road test - it was getting dark, I was backing the RV up, and could not see anything discernible. Then the monitor went black after I pressed the on/off button, and when it came back on, I kept getting a blinking screen showing I needed an SD card. Pretty random, eh? I did not have a caed handy, so deferred to the next day. I could not even get to the startup screen, it just kept blinking.
I informed Evan at Amtifo, and he asked what type vehicle I had (??) and what the voltage and current "of the car" was. Given the monitor and camera worked fine for 30 minutes on the test run, not sure why either question would be relevant to solving the "blackout".
Day 2, found a card, installed it. After running through the pairing steps twice again, including holding the monitor up close to the camera (used a 12v extension cord), I got them to pair and voila!! - a picture behind the RV!
So apparently you have to have a card installed to make this all work, which is not stated in the instructions - or - there is an intermittent glitch in the monitor / camera pairing and the solution remains unknown. At this point I am happy it works, the price point is pretty inexpensive for what you get, and there are a number of other brands that look identical to this unit, suggesting it is the same manufacturer in China but rebranded. They claim in the instruction manual, you can choose between a free 2nd camera, an SD card, or a cigarette lighter splitter, if you provide them a copy of your Amazon review - so here we are.
I chose the camera, we shall see...I am also deferring purchase of a 7db extended antenna to attach to the camera and place on the RV roof, as I would first like to see if any reception issues occur on the next trip. Some reviewers have noted they saw virtuallly no change in the video quality / reception.
Pros:
- Inexpensive solution to a trailering challenge (seeing behind and approaching sides)
- Easy install if you have at least basic DIY skills
- Quality of materials adequate for the purpose
Cons:
- the screen buttons are not that responsive to finger touch, and I have concerns once the monitor is attached to the windshield suction cup - don't want to be fiddling with buttons to make them work when Im zipping down the highway with a load.
- The camera antenna provided is very short, and does not clear the roof of the RV (though they suggest to mount it up high or on the roof or over the center parking lights). But who wants to drill more holes in their RV, or lose the center light? Just provide an 8" antenna - connectivity problem solved at close to zero added cost.
- the links in the instruction manual, pg 4 of the front side, clearly do not work, and you will get that msg from You Tube "Video not, or no longer, available". The 3rd video link (.......watch?v=5Z9KXXzXrqQ) takes you direct to a Furrion video link! huh?
Curious about others observations.....
Works OK, good value, some mounting fabrication required
Tomm R. Prickett✓ Verified Purchase•May 31, 2023
This is my first experience with a rear view camera for an RV. Like seemingly most, my travel trailer came prepped for a Furion camera. I didn't want to spend that much on a camera.
I used a different windshield mount, seems to work fairly well. Connectivity was no problem. I drive with fog lights on so the camera is always on. Display is decent though I'd like a bit wider (top to bottom) field of view. I'm compromising between seeing vehicles farther behind while on the road and seeing the ground closer to the trailer while backing into sites, driveway, etc.
The camera mounting was not a piece of cake. The stuff provided with this camera did not mount directly to the Furion mount. I got a cheap license plate bracket from Tractor Supply and cut it to fit. It wasn't too hard but it did take some shopping and a bit of fabrication.
Overall I'm happy with the purchase but it wasn't quite as simple as I expected. Just came back from first trip so can't review durability, etc.
I would recommend for the price
SCOTT J VANDEWARKER✓ Verified Purchase•May 31, 2023
I bought the camera a little over a year ago but didn't get a chance to use it until this year. Set up and use was easy as I have it on my travel trailer that was prewired for a camera system. The picture is brilliant and sharp. I particularly like that it's basically my rear view mirror when trailering.
I have noticed that there are occasional glitches with the connection that will cause the picture to freeze for a few moments but never long enough time that it affects my confidence of knowing what's behind me.
I don't want to put holes in my dash to mount it so I bought a dashboard mat for GPS from Amazon. That works pretty well unless your driving on bumpy roads.
Overall, I like it and would purchase again.
Page 1 of 2