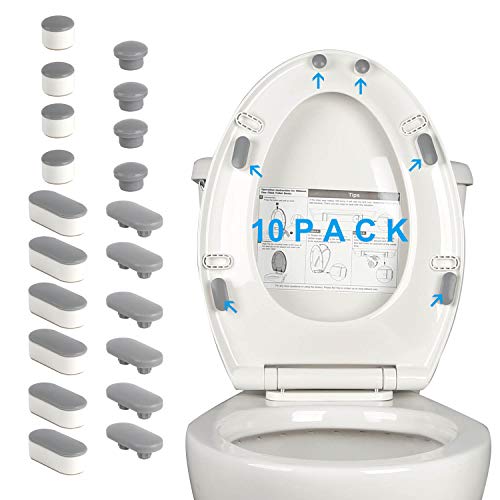
Hibbent 10 Pieces Toilet Seat Bumpers, Universal Buffer Toilet Lid Rubber Bumpers Each One with 2 Thickness TPE Pads(2 Heights) Strong Adhesive Bidet Bumpers Used for Home, Hotel, Hospital


Key features
- •1.【2 Different Height Options】 Each piece of toilet seat bumper comes with 2 TPE pads in different thickness to meet your requirement. Higher one: 0.75 inch/1.9cm and lower one: 0.63 inch/1.6cm.
- •2.【2 Kind of Shapes】 Hibbent toilet seat bumpers provide 2 kinds of shape: 6 oblong pieces and 4 round ones. When installation, please choose the fitting shape to make it easier to fit for different toilet seats.
- •3.【High Quality Material】 Made with ABS on white top and TPE on gray bottom, the toilet seat bumper make the seat more stable and strong. EVA cotton with strong self-adhesive strip, which ensures it stay in place firmly.
- •4.【Easy to Use】When Installed a bidet attachment, sometimes there is a space between toilet seat and the bowl. Clean and dry the toilet seat rings, remove the stick paper back side of the toilet seat bumper, and stick it on the toilet seat rings and press hard, then use it 10 minutes later after installation.
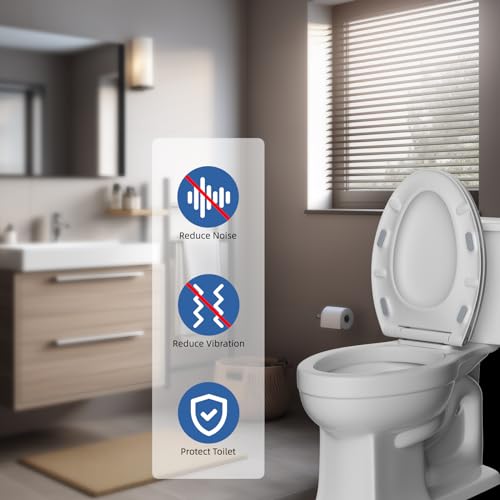
- •5.【Universal Design】The bumpers fit for most model of toilet seat, intended for toilet seat repair, can last for a long time use. Apply toilet lid bumpers to a wide range of surface, such as glass, ceramic, and you can stick on items where you want, prevent hard surface from damaging.
Hibbent 10 Pieces Toilet Seat Bumpers, Universal Buffer Toilet Lid Rubber Bumpers Each One with 2 Thickness TPE Pads(2 Heights) Strong Adhesive Bidet Bumpers Used for Home, Hotel, Hospital
List Price: $27.14$24.43DEALYou Save: $2.71 (10%)
Free shippingFree Returns – 30 daysFree Order CancellationSecure Payment2–3 Days DeliveryGet It June 25, 2026In Stock (30)No marketing spamNo account requiredFulfilment by FedEx / Amazon / UPS / ShipwirePayPal / Card Buyer Protection
Customer Reviews
Reviews sourced from verified Amazon purchasers4.2
out of 5
Based on 10 reviews
5★
80%
4★
20%
3★
0%
2★
0%
1★
0%
Big bumpers
Tech_user✓ Verified Purchase•February 24, 2024
I wish bumpers were not so thick, but otherwise fine.
Good for leveling toilet seat with a bidet
Carl Saltzberg✓ Verified Purchase•February 3, 2024
This product does a good job of leveling the toilet seat when you have installed a bidet which can lift the back of the toilet seat up and lead to bending/breaking of the seat or discomfort of having a slanted seating surface.
These spacers come with a strong adhesive on their backs, however after seeing mixed reviews for how long the adhesive lasts I wanted a more permanent solution (although you do get extra replacement adhesives).
My permanent solution was to screw the spacers inplace. This DIY was fairly easy to do if you have a wooden toilet seat following the 7 steps below.
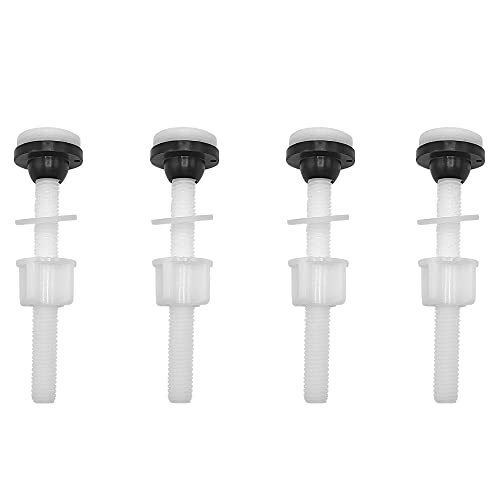
(Step 1 - Screws) First find screws at the hardware store that fit in the inner tubes of the long plastic spacers (you can see these in the product images, they kind of look like the underside of a Lego for reference). These screws have to be short enough so that they will not go through the seat and come out on the seat side!
(Step 2 - Remove Adhesive) Peel off the adhesive from the spacers (clean the spacer if needed).
(Step 3 - Modify Spacer) Use a drill or Dremel to make an opening through the bottom of the tubes so that that the screw will pass though easily but stop and hold the screw head (you don't want the screws to bite into the plastic as that might cause then to split).
(Step 4 - Position Spacers) Position the spacers on the underside of the seat where desired and mark with a pen the location of all the holes made in step 3.
(Step 5 - Drill) Using the marks made in step 4, drill pilot holes into the wooden toilet seat (make sure to not go all the way through, the pilot holes should be shorter than the screws length).
(Step 6 - Install) Using a screwdriver, screw the spacers directly onto the underside of the toilet seat (don't over tighten! the seat and the plastic spacers just need to be flush).
(Step 7 - Modify Rubber Bumpers) In a normal installation, the gray rubber bumpers have cylinder inserts that push into the place spacer tubes, which friction hold them tightly inplace (see product images). However, with this DIY the screw heads at the bottom of the tubes will stop the rubber cylinders from fitting properly. To fix this use scissors/knife and cut the lower part of the rubber cylinder off which will make room for screw heads (I suggest cutting a small amount off and then testing the fit, and repeating again nessesary).
(Step 8 - Optional) If you want the rubber bumpers to be permanent you might use a silicone adhesive to glue them inplace, but after several months I have not yet had any issues with them falling off.
These spacers come with a strong adhesive on their backs, however after seeing mixed reviews for how long the adhesive lasts I wanted a more permanent solution (although you do get extra replacement adhesives).
My permanent solution was to screw the spacers inplace. This DIY was fairly easy to do if you have a wooden toilet seat following the 7 steps below.
(Step 1 - Screws) First find screws at the hardware store that fit in the inner tubes of the long plastic spacers (you can see these in the product images, they kind of look like the underside of a Lego for reference). These screws have to be short enough so that they will not go through the seat and come out on the seat side!
(Step 2 - Remove Adhesive) Peel off the adhesive from the spacers (clean the spacer if needed).
(Step 3 - Modify Spacer) Use a drill or Dremel to make an opening through the bottom of the tubes so that that the screw will pass though easily but stop and hold the screw head (you don't want the screws to bite into the plastic as that might cause then to split).
(Step 4 - Position Spacers) Position the spacers on the underside of the seat where desired and mark with a pen the location of all the holes made in step 3.
(Step 5 - Drill) Using the marks made in step 4, drill pilot holes into the wooden toilet seat (make sure to not go all the way through, the pilot holes should be shorter than the screws length).
(Step 6 - Install) Using a screwdriver, screw the spacers directly onto the underside of the toilet seat (don't over tighten! the seat and the plastic spacers just need to be flush).
(Step 7 - Modify Rubber Bumpers) In a normal installation, the gray rubber bumpers have cylinder inserts that push into the place spacer tubes, which friction hold them tightly inplace (see product images). However, with this DIY the screw heads at the bottom of the tubes will stop the rubber cylinders from fitting properly. To fix this use scissors/knife and cut the lower part of the rubber cylinder off which will make room for screw heads (I suggest cutting a small amount off and then testing the fit, and repeating again nessesary).
(Step 8 - Optional) If you want the rubber bumpers to be permanent you might use a silicone adhesive to glue them inplace, but after several months I have not yet had any issues with them falling off.
A must for bidet attachments to a toilet
lexemdys✓ Verified Purchase•February 2, 2024
Added a few bidet attachments to our bathrooms and you really need something like these spacers. Had to replace a toilet seat where the hinge broke due to the seat not sitting flat on the toilet bowel. The constant movement cause the hinge to break and yes, you really do kind of move your bottom around just a bit to get clean but it's so worth it!
Used a couple of these to level out the seat due to the bidet making it higher on the back side.
Used a couple of these to level out the seat due to the bidet making it higher on the back side.
Easy peasy
Josh✓ Verified Purchase•January 10, 2024
These are just what I was looking for! So easy to put on!
VERY happy with these bumpers, even on wooden seat!
I.R.Stamper✓ Verified Purchase•January 1, 2024
I thought I had already reviewed this but seems not! Well, I'm very happy with this product. I have a wooden toilet seat, no paint, just dark wood. But the bumpers broke within a few months of use. So I replaced them with ones made for wooden seats, and again, within 2 months they were cracking and not doing the job. I was hesitant to try these, I didn't think they would stick to my wooden seat. But I was wrong! I used two per side, rather than the one that is suppose to be used, and positioned them a little behind and a little in front of the existing, broken bumpers. And they do sit a bit higher than the old ones did. But you don't notice it when you sit on the seat, and they WORK PERFECTLY! I was surprised with the pre-wipe the supply, as it was dry... I actually opened a second pack, thinking the first one was dried out. When I realized both were dry, I simply used it to wipe the pre-cleaned seat area where I intended to place the bumpers, and then placed them, closed the seat and at on it to set the bumpers. And they stuck perfectly! This was about a month ago, and absolutely NO sign of slipping or cracking! VERY happy with these bumpers, they truly are universal as they even work on wooden seats! Two thumbs up from me!
Page 1 of 2