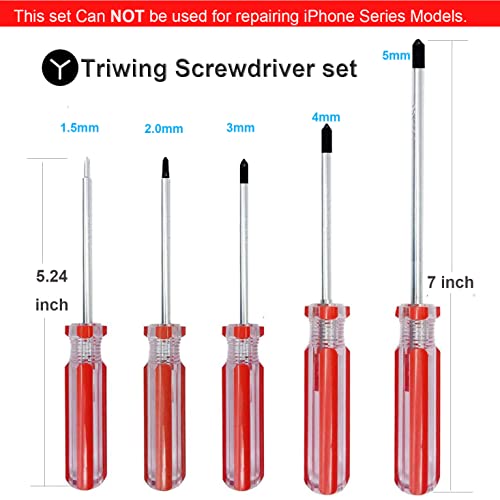
Triwing Screwdriver Set 5 Sizes 1.5mm 2mm 3mm 4mm 5mm, SKZIRI 5in1 3 Point Screwdriver Kit Magnetic Point Y Shaped Tri Point Tip Screwdriver Set


Key features
- •What's in Package:5x Triwing Screwdrivers.(Sizes 1.5mm, 2mm, 3mm, 4mm, 5mm)
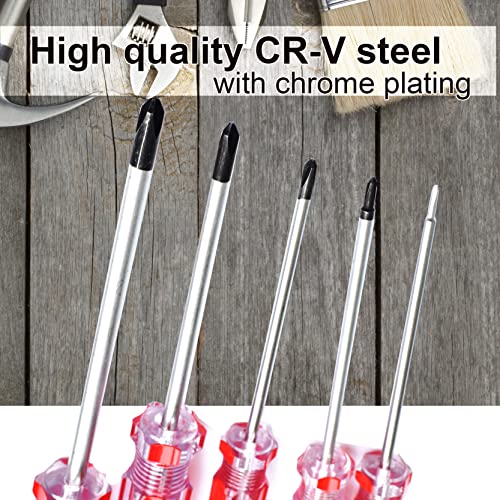
- •Quality Scewdrivers: The handle is made of Transparent PVC and lifter bit is made of high quality CR-V steel (chrome vanadium steel).
- •MAGNETIC TIP: MAGNETIC TIP can attract screws easily, and make it easy to take the screw out after unraveling.
- •Triwing Y1.5 2.0 3.0 : Perfect for unscrewing the triwing screws of video game consoles or controllers, such as Nintendo Switch Joy-Con Controller, GBA, GBA SP, NDS, NDS LitePSP1000, PSP2000, PSP3000PSV1000, PSV2000, NDSi, 3DS, NEW 3DS, 2DS. Nintendo Switch Console/Nintendo DSI XL, DSI LL, 3DS XL, 3DS LL, NEW 3DS XL, NEW 3DS LL., etc.
- •Triwing 4.0 5.0: Perfect for unscrewing the triwing screws of other electronic devices.
Triwing Screwdriver Set 5 Sizes 1.5mm 2mm 3mm 4mm 5mm, SKZIRI 5in1 3 Point Screwdriver Kit Magnetic Point Y Shaped Tri Point Tip Screwdriver Set
List Price: $19.38$17.44DEALYou Save: $1.94 (10%)
Free shippingFree Returns – 30 daysFree Order CancellationSecure Payment2–3 Days DeliveryGet It June 22, 2026In Stock (1)No marketing spamNo account requiredFulfilment by FedEx / Amazon / UPS / ShipwirePayPal / Card Buyer Protection
Customer Reviews
Reviews sourced from verified Amazon purchasers4.8
out of 5
Based on 10 reviews
5★
100%
4★
0%
3★
0%
2★
0%
1★
0%
popcorn maker
B. R.✓ Verified Purchase•November 8, 2023
We used these to open up the popcorn maker and fix the switch. It is as good as new, now.
Inexpensive, necessary tools
Lawrence✓ Verified Purchase•November 3, 2023
So many of my newer household appliances use tri-head screws now. I fix my own stuff whenever possible, so the new tri
screws were holding me up. This screwdriver set was reasonably priced, and so far, the various sizes have covered all my needs. I don't use them often, so no need for a more professional set.
screws were holding me up. This screwdriver set was reasonably priced, and so far, the various sizes have covered all my needs. I don't use them often, so no need for a more professional set.
May need Y2 size to fix (not replace) your Roomba side brush motor
The Passenger✓ Verified Purchase•October 21, 2023
If your Roomba side brush motor has failed, you might be able to fix it instead of replacing it. You may need the Y2 screwdriver such as the one this seller sells to remove the motor from the side brush motor/gear module (I did and it worked great).
There's lots of videos around to help you remove the side brush module from the Roomba. Once you remove the module, you may notice a single triangle Y2 screw. Remove that and then use a small screwdriver to gently pry away the latch on the opposite (gear side). Pull the top off of the housing and then you can unscrew the two Philips screws and drop the motor from the gear housing. There's a little hole on the top of the motor that lines it up with a pin molded into the plastic side brush housing but check and see how it comes out so it's easier to get back in there (just notice or take a picture of where the + is on the little circuit board before you remove it).
Once you remove the motor from the housing, there's six or so crimps that you have to loosen up with a small but strong screwdriver and/or small needle nose pliers. Once you get these bent back away from the plastic a bit, you can first take the small gear off the motor shaft (there is a flat side on the shaft and gear to line up when replacing) and then pop off the plastic housing - use the small screwdriver to wedge between the yellow plastic and the metal housing to pry the plastic out, working your way all around the motor. The motor is really three major pieces: the yellow top with the brushes attached inside, the rotor (thing that spins with the wire coils on it), and the metal housing with some magnets attached. When you put it back together, the brushes go over the little metal contacts near the end of the shaft at the top.
Basically, you need to take it apart, blow out any crud, and then put some grease on each shaft end. Not too much. Then, put it back together and and wipe the end clean where the gear goes. Note that when you put the yellow (circuit board) end back on, you have to spread the brushes apart, put the shaft in the little hole, and then let the brushes back down against the metal contacts. Might help to have two people here. Then you can just slide the entire yellow top and rotor/shaft back into the metal housing and kind of push the metal crimps back with a screwdriver. The yellow plastic top has a little tab that mates up with a groove on the metal housing. Make sure you line those up before you try to put it back together.
That's it! No need to solder or do anything else, just put the gear back on the end of the motor and slide it back into the side brush gear/motor housing, making sure to line up the little pin in the case, screw it back on, put the top back on and put in the Y2 screw, and reinstall the side motor module into the Roomba.
If for some reason the motor still doesn't work, you can buy a replacement motor on Amazon and/or eBay. Just match up the number on the side of the motor. Mine was RC500-XX/14440 (XX can be any letters it seems, but just check the measurements and buy same 5 digit number version as the one you have). If you do this, you will need to move the gear over as well as to desolder and remove the circuit board and resolder it to the new motor, taking care to observe the polarity or the motor will run backwards.
Good at decent price
ARFWAY✓ Verified Purchase•October 18, 2023
Seem to be of good quality.
Works fine
Chuck✓ Verified Purchase•September 30, 2023
Nice delivery and did the job
Page 1 of 2