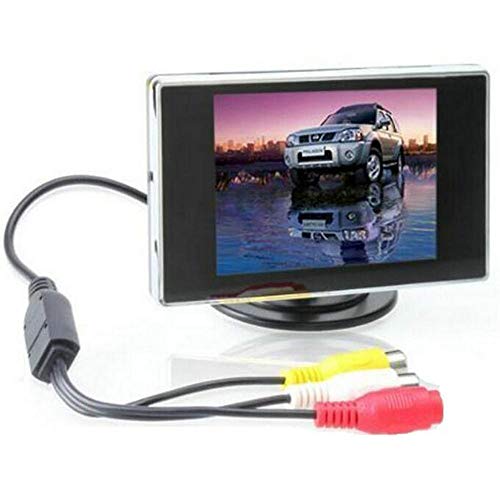
BW 3.5 Inch TFT LCD Monitor for Car / Automobile


Key features
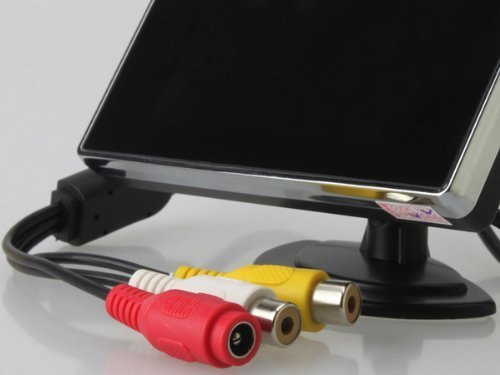
- •3.5" Car monitor High Definition Car Color TFT LCD Monitor Rearview DVD w/PAL/NTSC
- •With AV input, it can connect with reversing camera, DVD, VCD etc
- •With PAL/NTSC two systems, it supports two ways of video input V1, V2.
- •It can support multi-role display, suitable for reversing camera or reverse sensor
- •It can connect with car backing system.
BW 3.5 Inch TFT LCD Monitor for Car / Automobile
List Price: $38.72$34.85DEALYou Save: $3.87 (10%)
Free shippingFree Returns – 30 daysFree Order CancellationSecure Payment2–3 Days DeliveryGet It June 23, 2026In Stock (30)No marketing spamNo account requiredFulfilment by FedEx / Amazon / UPS / ShipwirePayPal / Card Buyer Protection
Customer Reviews
Reviews sourced from verified Amazon purchasers3.5
out of 5
Based on 10 reviews
5★
80%
4★
20%
3★
0%
2★
0%
1★
0%
Great for DIY Projects!
Logan•March 9, 2018
I bought this as a screen for my state-of-the-art Raspberry-PI-powered portable console inside an NES cartridge, and it works fantastic! Super easy to take apart! It was the cheapest screen I could find online and it arrived pretty fast. I did however have to modify the controller board to run off of 5V. Sudomod Wermy has a tutorial online for this, and it does require a little bit of soldering. The board is slightly different than his, so the transistors are in different locations. Also don't be like me and cut part of the LCD cable! I have a permanent pink hue to everything. :(
GBZ Screen
Steven•June 3, 2017
Bought this to use in a Gameboy Zero project. I received the "Variant 7" shown on sudomod wiki.
I removed the voltage regulator chip by snipping the legs off with some flush cut pliers and soldering a small wire between the voltage input pad & the regulator's output pin2 on the board because I was going to directly power it with 5v. Some guides suggest this is unnecessary but I noticed that leaving the regulator in place was dropping the input 5v down to 4.7v & causing screen flicker.
Works great, nice sharp picture with no flicker. It will run just fine without the input button board connected, so if you don't have a place for it don't worry about leaving it out. I peeled off the controller board & was hoping to reposition it but the flat ribbon cable is very finicky, if it isn't folded & bent at the correct angle you will get odd colors and flicker in the screen so I would suggest leaving it attached as is.
Only works Pi or with new consoles.
Amazon Customer•January 11, 2017
I am using this to make a portable pi console, when I tested it with my N64 and SNES it looked broken and kept scrolling up infinitely, however it works fine with any other console after N64 and works fine with Pi.
See the second photo for where to solder the wire to make it work with 5v. The voltage regulator chip the wire is soldered to looks the same on other versions of this screen and work the same.
There are apparently multiple screens by this one seller, some have buttons, some don't, some are labeled and others are not so it's a gamble but I think most work with Pi.
Mine was the kind that came with 3 unlabeled buttons on the back and no screws holding it together for anyone looking to make a portable raspberry pi screen.
The quality is not so good and there's no speaker but it comes with 2 inputs and displays whichever has power in the yellow and white rca plug and it's ridiculously cheap.
Epic.
Neil•August 22, 2016
Awesome little screen for electronic hobbies. Though I'm sure it'd work well as a backup camera as well. The picture is great from such an inexpensive unit. Assuming you get the same model as me. Mine runs off 5v without having to do anything special. I will be buying another soon.
Rasbperry Pi usage
Amazon Customer•May 10, 2016
I purchased this to use with my Raspberry Pi 2 model B, and it works quite well. I was able to power it on 5V perfectly fine, despite being designed for 12V supplies. The PCB-to-cable pinouts are on the bottom side of the PCB, and are as follows:
Red: VCC
Black: GND
Yellow: AV 1 - the primary video input line, connect this to your Pi's RCA video line.
White: AV 2 - a secondary video input line.
Be aware that you may need to tell your Pi to use composite video, since it may attempt to default to HDMI, which means if you have it hooked up to this and not an HDMI monitor, it will display on the monitor instead of this.
Page 1 of 2