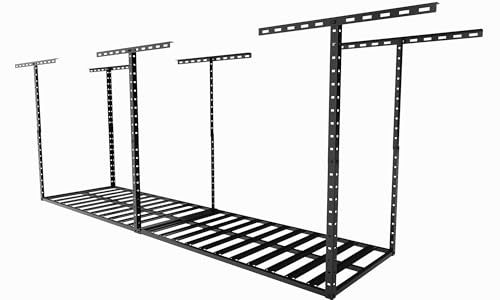
SafeRacks 4x8 Overhead Garage Storage Rack Heavy Duty - White (18"-33") - Holds 600 lb


Key features
- •Customizable Ceiling Drop-Length, Best in Class
- •Easy Step-by-Step Instructions and a Full Support Center to Assist You
- •Industrial Strength with a Powder Coat Finish
- •Holds 600 Pounds and has a Limited Lifetime Warranty
- •Get $125 Installation in Select Markets
BrandSafeRacks
CategoryCeiling Mounted Storage Racks
Size18"-33"
ColorWhite
WarrantyLimited Lifetime Warranty when purchased directly from manufacturer (Fulfilment By Eagle) or SafeRacks
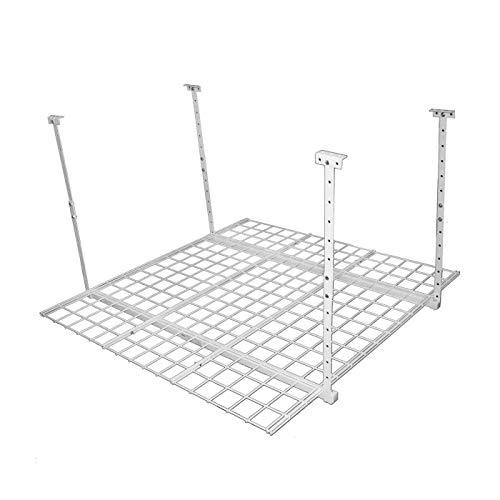
SafeRacks 4x8 Overhead Garage Storage Rack Heavy Duty - White (18"-33") - Holds 600 lb
List Price: $261.87$235.68DEALYou Save: $26.19 (10%)
Free shippingFree Returns – 30 daysFree Order CancellationSecure Payment2–3 Days DeliveryGet It June 23, 2026In Stock (2)No marketing spamNo account requiredFulfilment by FedEx / Amazon / UPS / ShipwirePayPal / Card Buyer Protection
Customer Reviews
Reviews sourced from verified Amazon purchasers4.6
out of 5
Based on 10 reviews
5★
70%
4★
30%
3★
0%
2★
0%
1★
0%
SAFE RACK
JUAN C.✓ Verified Purchase•July 14, 2023
EXCELLENT PRODUCT
Great shelves, nice design, slight disconnect in logistics
R.C.✓ Verified Purchase•July 9, 2023
(the best part)
Without a doubt this was the best designed overhead storage system for my needs. I had way more height adjustments then some of the other brands, and can handle more weight then I needed. I also liked that they clicked together like gorilla or Husky upright shelves with the locking pin and keyhole system that you set with a mallet.
I took my time with the assembly and measured everything often because I had such close tolerances to the garage door when opened. I was able to install the entire system by myself thanks in part to the shelf system that's divided up into four sections, each one is two foot by four that you can easily drop in.
(The okay part)
The design of the shelves is a wire grid with two strong back metal ridges underneath that are welded to each wire that it passes under. This is to keep the shelves from flexing under the load. However one of my shelves had one of the ridges with about a one foot section on the end that the weld was broken off... Possibly damaged in shipping. This kept me from putting much weight on that shelf. I contacted the vendor and they were very quick to respond and said they would get a shelf out to me immediately.
(The not so good)
Customer service was very prompt in their communications, and seemed to be trying to do the right thing. However to get the replacement shelf it took about four or five emails back, and forth and about two months time before the shelf ever showed up.
INSTALL TIPS
jbv✓ Verified Purchase•July 4, 2023
These overhead garage storage racks are very well made. They're not easy to install, but not difficult either. The instructions are clear, but it does take a good few hours to install if you've never done something like this before.
I received this tip from the Costco website reviews -- instead of using a stud finder which you may or may not find helpful in finding the studs, use a magnet instead (see picture). You can use a small magnet to find where the drywall screws are in your ceiling, once you have found a couple, you can use a yard stick to find the rest very easy. Once you know where the drywall screws are, you know exactly where the center of the stud is to drill in so you won't miss. I bought two different expensive stud finders from Lowe's which were absolute crap in finding the studs in my garage ceiling. For the walls in my house they were fine, but for my garage ceiling they did nothing.
Another tip from a review here on Amazon is to use your phone on a selfie stick to record a video of what your rafters look like --- this only works if you have attic access in your garage, or someplace where you can see the attic above the garage. That was helpful in telling me where the studs were located and which direction they went in (side to side in my case).
The hardest part in installing is just finding the studs and measuring out the proper distances. Once you know where the studs are and have triple checked your measurements, then install is simple and only takes an hour or two. And since you're drilling into the ceiling, it's good to have another person look from below and make sure that you are drilling straight up and not at an angle.
I put my racks above the garage door so that I could access the racks while the garage door is still open. The instructions say you need to use two supports, but that's not possible if your ceiling has standard studs. I used one support in the center with 3 screws for extra support (two on the outsides and one in the center). This is more than sturdy enough to hold both racks (see picture). I put them about 6-8 inches apart so they would clear the garage opener railing and give me more ceiling space. I left about 1-2 inches of clearance above the garage door itself.
The only things I would recommend after install, are to use some bungee cord or rope to seal off the front, back and sides of the racks. The grates are very slippery so anything you put up there will slide around easily, and potentially fall off the rack. Then the grates themselves need to be secured with some zip/cable ties to hold them down. They are only held in place by gravity and can easily be knocked out of place with the possibility of falling off the racks. I used two zip ties on each grate, front and back to hold them down. I used white zip ties, you don't notice them unless you look closely.
Overall, very high quality racks and I'm happy with them. The racks shake a little from side to side if you push them, but they're very solid up there. SafeRacks provide some extra bolts, nuts and washers which is nice to have - I think because people complained in the past about not having enough hardware to finish the job. I wanted the grey colored racks, but they were out so I got white instead. Very happy with white because they match the garage and blend in nicely. They look very, very nice installed above my garage door. I'm thinking about ordering two more racks to install on the sides of my garage.
I definitely recommend ordering from SafeRacks instead of the other chinese made/provided racks available on Amazon. SafeRacks is an established company in the US and has been selling in Costco for many years. High quality, clear instructions, and very affordable. Wait for the price to go down (use keepa or honey extension) to get a good deal as the price constantly changes for these racks.
Worth the effort!
M. Smith✓ Verified Purchase•May 24, 2023
The instructions tell you to measure 48.5" from the inside of the first bracket to the inside of the second bracket. Okay, how can both brackets be up if you're still measuring? You're trying to make sure the hole you need to pre-drill for the second bracket is inline with the first, but your measuring to a bracket that's not up yet.
How about you tell me how far apart the holes need to be? It worked out, but that part was troublesome for me. I had my wife hold the measuring tape, I marked 48.5" and then found the stud and marked the center of that, using a level to make sure I was still at 48.5". Then I lined up the bracket such that I could mark the hole in the bracket where the screw would need to go. That mark is where I needed to drill and it did work, but measuring to something that's not yet installed is a bit odd. Maybe they could provide a paper template. Place over one drill hole and the other end of the template gives your your 48.5", then you just need to find the middle of the stud, which if you held your template fairly straight, should be very nearby.
Now, once I got them up there and hung the two vertical posts, the cross member was too short. That's because I put the verticals on the outside aspect of both brackets. Okay, back on the ladder, move both to the inside aspect of both brackets, and viola! From there on it was cake and I'm pretty happy with this product.
One more thing, think through your install location. My A/C unit was installed with the tubes running along would would have been the perfect joist for me to mount to, but that option wouldn't work so then trying to fit this monster without interfering with the garage door, or my lighting, got a little tougher. My garage door-hanging angle-irons are actually inside my hanging rack, but the door itself does not touch it, so it's all awesome now. The angle-irons cost me just a few inches of storage space, but I love where the rack is located, it's perfect in every other respect.
I will finally have some floor space back in my garage!
Adds much needed storage space and frees up floor space!
Robert S.✓ Verified Purchase•May 21, 2023
Adds much needed storage space and frees up floor space! Was disappointing that BJ's did not give the same discounted price as the two shorter "drop from ceiling heights" as the 24 to 45" drop down height model. Hence purchasing from Amazon for a better than BJ's discounted price and free shipping. It took my son and I, 5 hours for the first rack and one hour to finish the second rack once we got the right tools and got the hang of how it needed to be installed.
Page 1 of 2