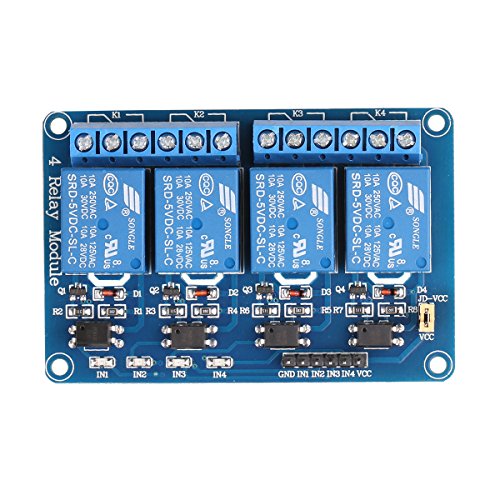
JBtek 4 Channel DC 5V Relay Module for Arduino Raspberry Pi DSP AVR PIC ARM


Key features
- •Equiped with high-current relay, AC250V 10A ; DC30V 10A
- •5V 4-Channel Relay interface board, and each one needs 50-60mA Driver Current
- •Be able to control various appliances, and other equipments with large current
- •Application:Supports all MCU control, The industrial field, PLC control, Smart home control
- •Indication LED's for Relay output status
BrandJBtek
CategorySingle Board Computers
JBtek 4 Channel DC 5V Relay Module for Arduino Raspberry Pi DSP AVR PIC ARM
List Price: $11.54$10.39DEALYou Save: $1.15 (10%)
Free shippingFree Returns – 30 daysFree Order CancellationSecure Payment2–3 Days DeliveryGet It June 23, 2026In Stock (1)No marketing spamNo account requiredFulfilment by FedEx / Amazon / UPS / ShipwirePayPal / Card Buyer Protection
Customer Reviews
Reviews sourced from verified Amazon purchasers4.2
out of 5
Based on 10 reviews
5★
50%
4★
20%
3★
10%
2★
10%
1★
10%
Was a nice relay board...
Chris C.•January 29, 2018
Worked great for 2 mos. still gets power but relays will not switch over any longer with 120v AC power on otherside. Tried supplying direct 5v to unit no fix. Relays appear to have gone bad already. Board itself is a nice setup with indicating LEDs built in. Easy to read pinout. Just don't know if I got defective relays or what.
Very easy setup, very reliable
Dusty Wilson•July 8, 2017
Absolutely zero problems with this relay bank. I used this with a Raspberry Pi 2 to control a uxcell® DC 24V 3 Bulbs Red Green Yellow Lamp Industrial Signal Tower Light. Perfect! It's trivial to setup GPIO output on a Raspberry Pi to control this relay bank.
Worked great!
Country Nerd•May 9, 2017
This is a solid board that is easy to use. It can be triggered by either 3.3V or 5V Arduinos and probably most other controllers. (3.3V setup is different than 5V setup) I used this board with an e-cig cartridge and high amp batteries to create a steampunk hat that puffs "steam".
Simple Setup (using Arduino UNO):
Connect the VCC to the 5V power supply
Connect the GND to the ground on the controller
Connect IN1-4 to DIO pins on the controller
Leave the JD-VCC to VCC jumper
Connect your common to the center pole on the relay and your feed line to the left pole for Normally Open (off) and right pole for Normally Closed (on).
Program your controller to digitalWrite(pin, LOW) when you want the relays to switch.
Pros:
Simple design
10A relays are good for most requirements
Compact
Cons:
None
Lacking Documentation, but Can Supplement.
Smoke0101•March 31, 2017
I bought this to switch some 24V LED lights and after getting it working, it looks like it is going to work great. Couple things to note:
1) Listen to the other reviews when they say that the relay is "on" when you command the digital out pin to low
2) Documentation is pretty sparse, but I was able to find this link which basically walks you setting it up for an arduino UNO. When I was fighting to get mine working, my issue was that I did not set the digital out pinmode to OUTPUT. If you google this part number/ description and look for a link to a site called "Henry's Bench" he has a full demo on connecting it to an arduino uno.
Great little relay module
CMYK Josh•December 6, 2016
Great little relay module. Wired it right up and it worked on the first firing. This is the first time I've ever used a multi-channel relay board with an Arduino. The build seemed to comparable to brand-name Arduino card. It's mechanical so there's a click -- you can hear it in the video. All pins were well marked, each channel has its own SMD to let you know when it's active. Terminals screwed down tight. Nothing about it was an issue. I saw some complaints before I ordered it so I was a little nervous but most of them regarded the lack of documentation. It does require a certain knowledge base. There's an Instructable: [...] I'm probably going to order a few more just to have on hand.
Page 1 of 2


