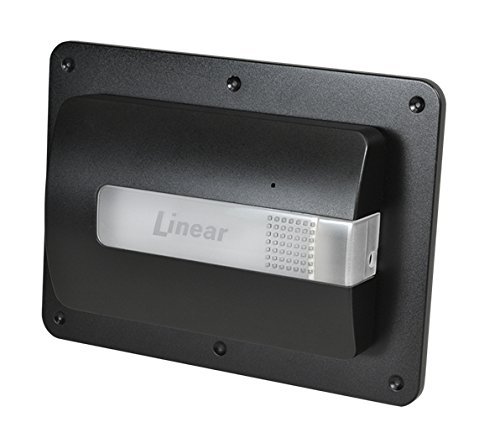
Linear Z-Wave Garage Door Remote Controller, Nexia Certified

Key features
- •Add a Nexia Certified Z-Wave control to your current garage door opener
- •Open/close your garage door from anywhere using your smart phone, tablet or computer through your Z-wave based app such as Nexia.
- •Monitors and reports the open or closed state of the garage door.
- •Provides both audible and visual warnings prior to door movement
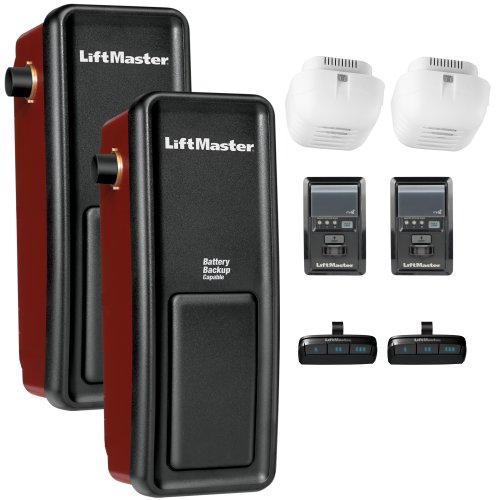
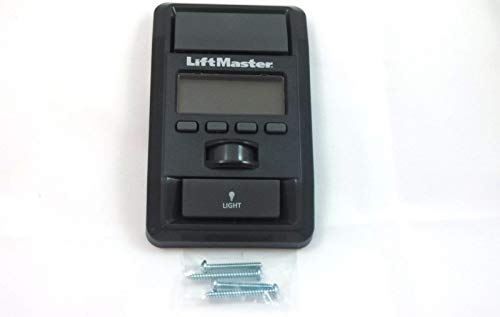
- •LiftMaster / Chamberlain / Craftsman garage door motors connected to a Smart Control Panel (these have an LCD display for the time and a motion sensor that turns on the light) are not compatible with the GD00Z-3.
BrandGoControl
CategoryKeypads & Remotes
SizeSmall
ColorBlack
Warranty1 year warranty against manufacturer defects
Linear Z-Wave Garage Door Remote Controller, Nexia Certified
List Price: $178.80$160.92DEALYou Save: $17.88 (10%)
Free shippingFree Returns – 30 daysFree Order CancellationSecure Payment2–3 Days DeliveryGet It June 22, 2026In Stock (3)No marketing spamNo account requiredFulfilment by FedEx / Amazon / UPS / ShipwirePayPal / Card Buyer Protection
Customer Reviews
Reviews sourced from verified Amazon purchasers3.6
out of 5
Based on 10 reviews
5★
30%
4★
20%
3★
10%
2★
0%
1★
40%
Peace of Mind!
GO HAWGS•September 11, 2017
I have two Trane XL824 Thermostats. One is the main Z-Wave bridge, the other serves as a repeater on the 2nd floor HVAC. I've been thinking for some time about integrating Nexia Z-Wave devices into my overall security system. I am very pleased with the Garage Door Controller. Installation is a breeze. Be sure and verify your garage door opener is compatible with the Z-Wave Garage Door Controller before purchase. Once you've received and familiarized yourself with the components of the garage door opener, log into your "My Nexia" account. You can go ahead and plug in the Linear Controller, just be reasonably close to your Z-Wave bridge. The instructions indicate you click on "Security and Sensors," then click on add device. I didn't see that as an option under "Security and Sensors.". On the main page when you log in to your "My Nexia Account" there is a green colored "add device" button. Click that, then security and sensors, etc. and when prompted you'll push a small button on the controller. It will only be a few moments for the Bridge to recognize the garage door opener. I had already checked the compatibility with my Lift Master garage door so I was confident there would be no issues. There were none. It took less than twenty minutes to do the entire install. It is that easy. I downloaded the Android app and it worked with no problems noted. I have numerous cameras and a monitored security system but I like being able to look at my phone and see the state of my garage door. You can set any number of events to notify you of changes in the status of your garage door. I suspect I'll be purchasing additional Nexia Z-Wave Certified devices in the future. I definitely recommend the garage door controller.
I have been unable to get this device to work ...
Amazon Customer•May 29, 2017
I have been unable to get this device to work with my garage door opener. The description states "Compatible with virtually any garage door opener", well apparently not Chamberlain. I will look for a work around and if I cannot get this to work I will return and look for another option
doesn't stay connected to hub - wouldn't buy again
T. Vik•February 24, 2017
Doesn't stay connected to smartthings hub. Have had to reset it several times. Works for a few weeks then disconnects again. Very frustrated. Had no problems with fortrezz mimo lite opener disconnecting. It is also cheaper (except you have to buy a separate sensor for open/closed state for 13 bucks)
Great Product, Works and Expected
Shane's Reviews•December 31, 2016
The Linear Z-Wave Garage Door Remote Controller has so far been an amazing product. My wife and I have left the garage door open many times and it is great knowing that it is actually shut. I would highly recommended the product to everyone that has a compatible system. The system I use this product with is Samsung SmartThings. The contents include:
Remote Controller (which was bigger than I thought)
Tilt Sensor
Mounting Screws for a few different configurations
Optional Mounting Bracket for the Remote Controller for existing hardware
I am one of those people that a simple project takes about 3 times as long to complete. So I will go through the steps/heartache that got everything hooked up. It says to mount the Title Sensor first which I decided against since what if the system does not even work in the first place.As I hooked up the Remote Controller it says to connect the 2 wires to two different PUSHBUTTON terminals on the back of the Garage Door Unit. I had PUSHBUTTON, COMMON, and BEAM. It says it does not matter which wire goes to which terminal as long as it is PUSHBUTTON. I hooked both up to the one terminal (WRONG). The right way was one wire to PUSHBUTTON and one to COMMON. I then plugged the power back in and in the SmartThings app went to add device. I clicked the button on the Remote Controller unit one time and it synced with SmartThings. I then Opened and Closed the Garage Door. Make sure that the Title Sensor battery is in place and push down on the small button under the battery. You should then see in the app that the garage is closed. Click the open button and after about 5 seconds of beeping the Garage Door should open right up.
I originally wanted to mount the device to the existing Garage Door hardware but on the back of the Remote Controller the hole was not threaded for it so the screw fell right in. In the end I mounted it to the Ceiling only using the 4 long screws not the drywall mounting brackets. My Garage Door is metal so I used one of the screws for in a preexisting whole in the Garage Frame to mount.
Cannot complete device enrolment on Nexia system
Luc A. Beauchamp•December 11, 2016
I was unable to complete the device enrolment, despite spending 45 mins on the phone with Nexia technicians. They advised me to order a replacement GD00Z-3 unit, which I couldn't connect either @#$%&&. I have a Trane XL824 smart control for my Nexia system - there must be some incompatibility between it and the GD00Z-3. I'm otherwise very happy with the Nexia system; I installed two cameras, a Schlage door lock and an RP200 light dimmer; everything works well.
Page 1 of 2