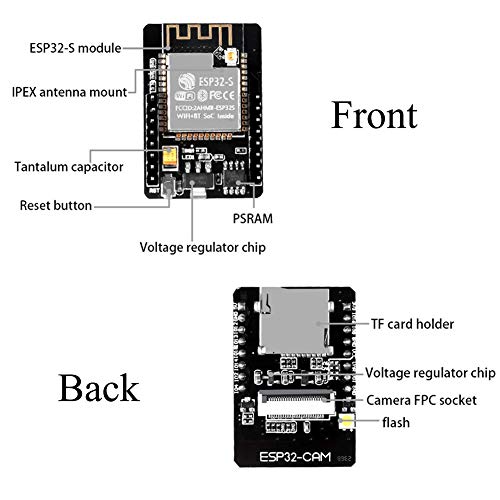
AITRIP 3 Pack ESP32-CAM WiFi + Bluetooth Module Development Board with OV2640 Camera Module Compatible with Arduino


Key features
- •This WLAN board contains 11 digital input / output pins, all pins have interrupt / pwm / I2C / 1-wire and a micro-USB connection.
- •Our D1 mini development board is 100% compatible with Arduino WeMos and can be programmed in the Arduino IDE.
- •WIFI Development Board,4M bytes; Support OTA on line.Arduino ompatibility. Using the Arduino IDE for programming.
- •This D1 mini module is a mini WIFI board based on ESP-8266EX.
- •11 digital input/output pins, all pins have interrupt/pwm/I2C/one-wire supported(except D0).1 analog input (3.2V max input).
AITRIP 3 Pack ESP32-CAM WiFi + Bluetooth Module Development Board with OV2640 Camera Module Compatible with Arduino
List Price: $36.84$33.16DEALYou Save: $3.68 (10%)
Free shippingFree Returns – 30 daysFree Order CancellationSecure Payment2–3 Days DeliveryGet It June 22, 2026In Stock (1)No marketing spamNo account requiredFulfilment by FedEx / Amazon / UPS / ShipwirePayPal / Card Buyer Protection
Customer Reviews
Reviews sourced from verified Amazon purchasers4.1
out of 5
Based on 10 reviews
5★
40%
4★
60%
3★
0%
2★
0%
1★
0%
Functional ESP-32 Modules, Manufactured Poorly
BringTheBandalore✓ Verified Purchase•August 31, 2023
I got a 3 pack of these cameras and all of them are functional.
They use the CAMERA_MODEL_AI_THINKER version in the Arduino sketch I got working with them.
The cameras are sub par quality, with lots of signal interference and dead rows. If you need a clean signal, then you should probably get a bunch and find the best one.
The stencil is applied wrong so the pin labels are impossible to read, making it less fun to develop on than if they were readable. It means keeping a reference handy.
I think this is a good hobby product but it would be a good idea to get better camera modules if this is going somewhere important.
Good product, little supporting documentation.
Marc Arias✓ Verified Purchase•August 26, 2023
Nicely built and soldering. Comes with a double-sided tape to hold the camera on top of the SD socket.
No IR ability. Works well with ESP Home
jblues✓ Verified Purchase•August 4, 2023
The unit worked fine, I used it with home assistant and esphome with no issue. These have a infrared filter so night viewing is a no go without full spectrum lights. Easy to deploy and cheap, just wished I could use ir
Works as expected
Ron✓ Verified Purchase•July 25, 2023
This ESP32 Cam draws more power than others I have used but other than that it works as well the others.
The orientation of the camera is 90° different from my other units which requires a design change to my holder. If what I have read online is correct the camera comes in two versions so it's kind of the luck of the draw as to which orientation you will get.
The orientation of the camera is 90° different from my other units which requires a design change to my holder. If what I have read online is correct the camera comes in two versions so it's kind of the luck of the draw as to which orientation you will get.
Works fine and having fun!
Kurt C.✓ Verified Purchase•July 14, 2023
So in order to get this to work, in the arduino sketch you select the Camera model AI Thinker. Enter in your ssid and password for your router and make sure you use the 2.4ghz not the 5ghz if you have that option. Program the device using 3.3 volts. Now I had problems running at 3.3 volts, I was getting a brown out error so I moved over my jumper on my FTDI adapter to 5 volts and moved the wire from the esp32 3.3v pin to the 5v pin.
Go to the serial monitor on the arduino IDE and press the reset button on the esp32 and hold it for at least 3 seconds then release.
You should get info out showing you the IP address that you're router gave the device.
Open chrome or Firefox and enter in that IP address. A screen will come up with all kinds of settings. Go to the bottom of the page and click on the Start Stream button. Now you will see the camera image. Scroll back up and try changing the resolution.
Dronebot.com had a very good write up so check him out!
I hope this helps someone.
Page 1 of 2


