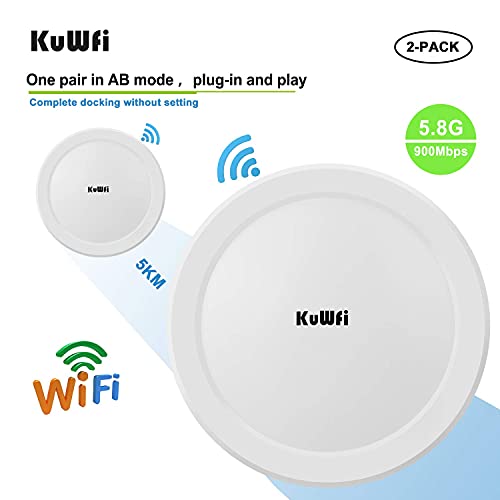
Outdoor Wireless Ethernet Bridge, KuWFi Long Range 5KM 11ac WiFi Bridge Point to Point Outdoor Get Faster Signal Built in Strong Powerful Antenna 5.8G High Speeds for starlink router丨2-Packs


Key features
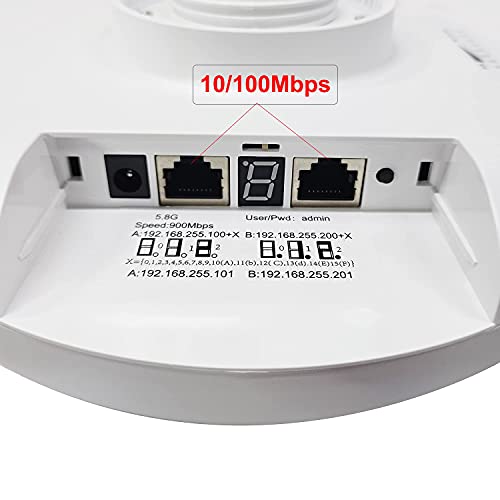
- •KuWFi CPE550 Outdoor Wireless Bridge is a 5 GHz high-powered long-distance 11AC wireless outdoor AP/client bridge offering dual-PoE Ethernet ports and a high-gain directional antenna that emits a narrow signal beam, limiting interference and ensuring stable connectivity, high-bandwidth and 867 Mbps speeds over long distances.
- •Long-Range 11ac Outdoor Access Point/Wireless Bridge High Speeds & Optimal Bandwidth at Extended Point-to-Point or Point-to-Multi-Point Ranges
- •Powerful 18dBi High-Gain Antennas Extend Networks to 5 Miles Point-to-Point
- •Optimal Bandwidth Supports Heavy Video Delivery Over Long Distances
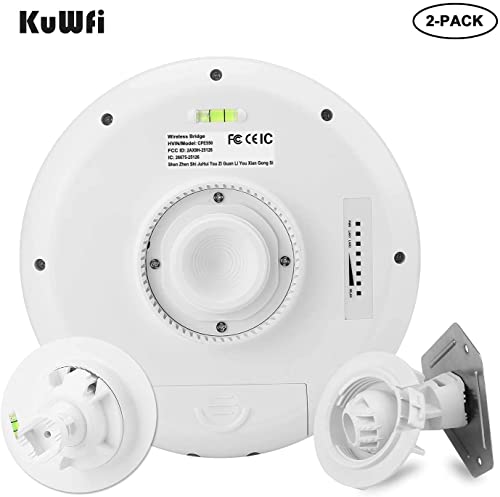
- •PoE-Compliant Ports Offer Flexible Power Options for an IP Camera or AP,360-Degree, 3-Axis Pivoting Arm Locks for Precision Alignment
Outdoor Wireless Ethernet Bridge, KuWFi Long Range 5KM 11ac WiFi Bridge Point to Point Outdoor Get Faster Signal Built in Strong Powerful Antenna 5.8G High Speeds for starlink router丨2-Packs
List Price: $145.49$130.94DEALYou Save: $14.55 (10%)
Free shippingFree Returns – 30 daysFree Order CancellationSecure Payment2–3 Days DeliveryGet It June 25, 2026In Stock (1)No marketing spamNo account requiredFulfilment by FedEx / Amazon / UPS / ShipwirePayPal / Card Buyer Protection
Customer Reviews
Reviews sourced from verified Amazon purchasers3.8
out of 5
Based on 10 reviews
5★
50%
4★
50%
3★
0%
2★
0%
1★
0%
Great price easy install
James Bailey✓ Verified Purchase•February 24, 2024
I never rate anything 5 stars, so 4 stars is about as good as it gets. Instructions aren't good, but it got me in the ballpark. In the end it was easy to set up and install. The cost was very good. Have a US based company rewrite the instructions. It's been a month and everything works very well.
Obviously not obvious for initial setup, but it will work well
Grinchy✓ Verified Purchase•February 24, 2024
- got a faster ethernet / usbc dongle. I get 280/280 on the wired connection and have seen mid 200s on mesh wifi. all working fine at this point. final last bits of configuration to set timed reboots and get sync to time server working, but that is simply extra, not required>
i finalized the install with a gigabit switch downstream. seeing the same speeds on the mesh after the ptp/kuwfi. 240/240 wireless mesh. my ethernet dongle shows 100/100, but its a 100 mbit dongle. 4ms additional latency (6ms vs 2ms). source connection is around 500/500; i suspect if i had a gigabit dongle id see most of this on the wired side. support willing to help and responsive (with 24 hr turnaround).
Summary: pce 2200 model. if using as ptp you need to use the lan port on the slave radio for the output/bridged network, not the lan port on the poe injector. The master uses the wan port on the radio and runs the wan thru the poe injector. So the master is a one Ethernet wire install, and the slave a two Ethernet wire install. It took me a long time to come to this conclusion.
Total signal path: switch with WAN -> Poe injector lan -> Poe injector Poe -> master wan slave lan -> garage switch -> garage lan
The slave is powered using the provided injector Poe to slave wan.
Long version
have the 1200mbs pce 2200 pair. I noticed on install that the slave 5g Wi-Fi light didn't light. I did a bunch of "˜evaluating' to try to resolve, but believe the root cause is the initial pairing is done on the 2.4g radio only. The master lights both 2.4g and 5g lights.
So they pair on 2.4g channel 9 from factory.
As part of the troubleshooting I tried both set to repeater, this eventually locked one radio and I had to push button reset it.
My successful config is master as a 5g only access point. I also set the wifi to USA, and ac as the type. I'm bridging 50 ft, so I put the distance to .05 km and the radio to standard power. With these settings the bridge reads around 30 db.
The slave is set to repeater. The radios are both off. I chose the master 5g network, and set the Wi-Fi settings the same as the master.
You'll want to note the mac addresses as this aids in choosing the correct Wi-Fi to bridge on. It increments the last digit of the mac for the 2.4g radio, and again for the 5g radio.
I found that a hard wire connection at the Poe injector lan point was the best way to access the radios, especially since the repeater will likely have both radios off.
Performance is really poor at the moment. Around 50/ 60 mps up. My wan runs around 500/500, and my mesh is around 250/300 usually. I'm waiting for night and will aim the radios by laser, perhaps that will help.
I'm not sure how to make the connection more ideal, it's only 50 feet, and the signal reads already as strong.
Works well after a perplexing setup
D_at_the_Lake✓ Verified Purchase•February 23, 2024
This is not even close to plug-and-play. I have some previous experience with Ethernet bridges; this was a somewhat frustrating setup. The manual is not helpful, fortunately there is a (wordless) video that gives some minimal guidance.
After all that, I see full ISP speed in a steel building that's 100' from the main building. We installed the bridge to get a wifi signal into the steel space for security cameras.
On balance, it's a good system once you have surmounted the setup.
After all that, I see full ISP speed in a steel building that's 100' from the main building. We installed the bridge to get a wifi signal into the steel space for security cameras.
On balance, it's a good system once you have surmounted the setup.
Seems like a good unit but instructions weren't obvious.
Andrew D.✓ Verified Purchase•February 20, 2024
I have these setup and working, bridging a 200M distance from a house to a shed. There was only one useful thing on the instructions and that was what the default IP of the devices would be when initially turned on. Everything else on the instructions wasn't overly useful. However once you can get to the web based management page (and find the English button on the top right) you can get them setup quite quickly. One of the units will be A (your source) and the other B (the receiving end), I marked mine so that it was easy to tell which one was which after they were configured. After that I setup another access point (plugged into the PoE adapter) and was able to get it all functional before installing the units.
I haven't tested actual throughput but it can max out the 30/30 connection from our ISP and speedtests ran at source and recieving end are almost identical (the radios add about 2MS to your ping, but not too bad).
I gave it 4 stars just due to the instructions and the fact that the web interface has a lot of extra options that don't seem to be honored (e.g. there are options to disable the LED lights but when I disabled them nothing changed).
Good quality and not too bad to set up
Tommy H.✓ Verified Purchase•February 18, 2024
First, the instructions suck. It would have been better to have pictures of the steps to install than them attempting to try using English in the instructions. That is the reason for 4 stars. make sure to set your computer up to the same IP range as the default on the routers because that is how you get into the admin console on the device. Once that is done, logging in to the device is easy. The interface looks very similar to ASUS in the way the settings menus are.
Make sure to set the little switch up for Master and Slave so they will talk to one another.
Except for the instructions, these seem as fast or faster than the Ubiquity units I am replacing.
Did I mention the Instructions suck and are nearly useless? The little pamphlet has one use, starting a campfire with.....
Page 1 of 2
![Wireless Bridge, KuWFi 2.4G Outdoor CPE Point to Point Long Range Access Nano Station with 12dBi Panel Antenna, Support 24V POE[2-Pack, Pre-Pairing]](https://m.media-amazon.com/images/I/31iv+aADLxL._SL500_.jpg)


![[New Upgraded] VIEWISE Outdoor Wireless WiFi Bridge, Point to Point or Point to Multi-Point, EZ Setup via Dip Switches, 5GHz, 900Mbps 48V PoE (5GHz / 900Mbps)](https://m.media-amazon.com/images/I/21WXzzy6KfL._SL500_.jpg)
![ZyXEL Wireless Access Point with AP / Universal Repeater / Client Mode [WAP3205V2]](https://m.media-amazon.com/images/I/41bQQjwODqL._SL500_.jpg)