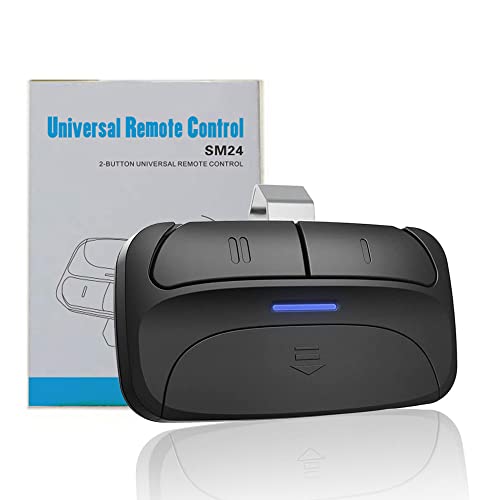
Universal 2-Button Garage Door Opener Remote, Works with Chamberlain, LiftMaster, Craftsman, Genie, DIP Switch and More, Replacement for Clicker KLIK1U 375UT 373LM 973LM 893LM 893MAX


Key features
- •Compatibility: The Acvoce garage door remote SM24 is compatible with Chamberlain, Craftsman, Liftmaster, Genie, Linear, Stanley, Overhead Door and more. Compatible model numbers 371LM 373LM 375LM 139.53753 139.18191 950CD 953CD 971LM 973LM 139.53680 139.53681 950CB 953CB 891LM 893LM 950ESTD 81LM 850CB 853CB 856CB 139.53879 893MAX KLIK1U and more.
- •*IMPORTANT: PLEASE READ CAREFULLY BEFORE PURCHASING! NOT compatible with garage door openers manufactured by Wayne-Dalton, Allstar, Marantec, Hormann, or the Newer Liftmaster myQ type openers.
- •Learn Button Color: The Acvoce universal remote is compatible with Green/Red/Orange/Purple/Yellow learn buttons and DIP Switches garage door openers.
- •Two Channels: Features two buttons to control up to two garage doors or gates. The remote can even operate up to two different brands of garage door openers.
- •Package Contents: Remote control, Visor clip, instruction manual, battery(contained in remote). If you have any concerns regarding the compatibility of your garage door opener, please contact us through our store front page " Ask a question", we will check it for you.
Universal 2-Button Garage Door Opener Remote, Works with Chamberlain, LiftMaster, Craftsman, Genie, DIP Switch and More, Replacement for Clicker KLIK1U 375UT 373LM 973LM 893LM 893MAX
List Price: $27.14$24.43DEALYou Save: $2.71 (10%)
Free shippingFree Returns – 30 daysFree Order CancellationSecure Payment2–3 Days DeliveryGet It June 24, 2026In Stock (1)No marketing spamNo account requiredFulfilment by FedEx / Amazon / UPS / ShipwirePayPal / Card Buyer Protection
Customer Reviews
Reviews sourced from verified Amazon purchasers4.2
out of 5
Based on 10 reviews
5★
70%
4★
30%
3★
0%
2★
0%
1★
0%
It works!
David B✓ Verified Purchase•September 6, 2023
Took a few times to get the programing to take, hence 4 stars. But after several attempts it does do the job.
Here is how I programed them.
No_Pen_Name✓ Verified Purchase•August 4, 2023
These work great. I highly recommend them. They work on my old garage door opener as well as the new one next to it. I'm embarrassed to say how many different interpretations of the instructions I tried before I guessed correctly how to program them.
The term "learn-button" refers to the program or learn-button on the door operating motor.
The term "program-button" refers to button 5 on the remote-control and is next to the row of DIP switches.
Identify the doors to be operated as door I and II. While programing the remote-control for door I, use button I. While programing the remote-control for door II, use button II. Repeating the setup procedure for each door will allow a single remote-control to operate one or two different types of doors.
For each door opener, identify its brand and the type of learn-button, located on the motor. Use the table in step 3 of the manufacturer's User Manual to determine the number of times that you will need to press the remote-control button I or II when programming the remote-control.
Remove the remote-control battery cover and locate the program-button (button 5).
Then do these steps within one minute to program the remote:
1. Press and hold the program-button on the remote-control until the blue light on the remote-control turns on, then release the program-button.
2. On the remote press the I or II button (corresponding to the door you are programming) the number of times indicated in the table in step 3 of the manufacturer's User Manual. Allow the blue light to flicker after each press of the button before pressing again.
3. Press the program-button on the remote to store the setting in the remote. The blue light will extinguish.
4. Press the motor learn-button. It will light up.
5. Press the I or I button (corresponding to the door you are programming) one last time. The light on the motor learn-button will extinguish.
Example 1:
1. Press and hold the program-button on the remote until the blue light comes on.
2. Since the motor is a Chamberlain and has a yellow learn-button, press the I button on the remote 8 times, allowing the blue light to flicker after each press.
3. Press the program-button on the remote to store the setting in the remote. The blue light will extinguish.
4. Press the motor learn-button. It will light up.
5. Press the I button on the remote. The motor learn-button will extinguish.
6. Test the remote control.
Example 2:
1. Press and hold the program-button on the remote until the blue light comes on.
2. Since the motor is a Chamberlain and has a purple learn-button, press the II button on the remote 3 times, allowing the blue light to flicker after each press.
3. Press the program-button on the remote to store the setting in the remote. The blue light will extinguish.
4. Press the motor learn-button. It will light up.
5. Press the II button on the remote. The motor learn-button will extinguish.
6. Test the remote control.
Amazing!
English✓ Verified Purchase•July 5, 2023
This product is worth the money, as a woman who knows nothing about garages or garage doors, I was able to figure it out and it works flawlessly. I love that I can be down the road and it still sends the signal without having to double push. Just get it!
Works Great
Dale Lerback✓ Verified Purchase•June 19, 2023
This programs easily, and works. Guess it works almost to well. It's very sensitive (to sensitive). Not kidding. Barely touch it and doors opened or closed.
Gave a 4 because of how sensitive it is.
Gave a 4 because of how sensitive it is.
Love the two-doors-in-one feature
Cranky*Girl✓ Verified Purchase•June 19, 2023
Once I figured out what "press and release this button certain times continuously corresponding your brand" meant, these controls were a breeze to set up. I really like being able to carry one control that can open both doors. It received 4 stars instead of 5 for the poorly translated instructions and for the fact that it only comes with a clip. I really wanted something I could hook to a strap.
Page 1 of 2