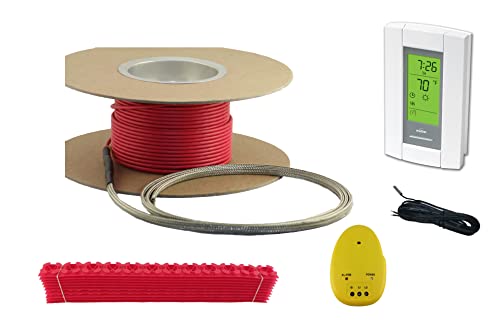
60 Sqft Cable Set, Electric Radiant Floor Heat Heating System with Digital Floor Sensing Thermostat, Including Thermostat Sensor, Installation Monitor and Cable Guides


Key features
- •60 Square Foot Under Tile Heating "Cable Set" (spool of wire), 120 Volts
- •Highest Quality Heating Cable, Twisted Pair for Zero EMF, Single Cold Lead, Very Thin, 1/8" thk
- •Wire is laid out 3" apart acroos the area to heat. Allows easy heating of odd shapes
- •Includes Honeywell/Aube Digital Floor Sensing Thermostat with Floor Sensor Wire(model TH115-AF-120S)
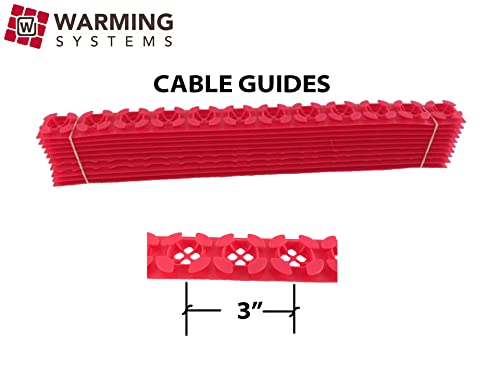
- •Includes Cable Guide to secure wire to floor, Installation Monitor, and is UL LISTED for USA and Canada.
60 Sqft Cable Set, Electric Radiant Floor Heat Heating System with Digital Floor Sensing Thermostat, Including Thermostat Sensor, Installation Monitor and Cable Guides
List Price: $501.98$451.78DEALYou Save: $50.20 (10%)
Free shippingFree Returns – 30 daysFree Order CancellationSecure Payment2–3 Days DeliveryGet It June 24, 2026In Stock (2)No marketing spamNo account requiredFulfilment by FedEx / Amazon / UPS / ShipwirePayPal / Card Buyer Protection
Customer Reviews
Reviews sourced from verified Amazon purchasers4.6
out of 5
Based on 10 reviews
5★
70%
4★
30%
3★
0%
2★
0%
1★
0%
Great value
NY girl✓ Verified Purchase•September 3, 2023
I purchased this and a separate coupling mat. My contractor thought it was better protection to have a mat that covered the whole floor so that the tile would all be at the same level, since we are not putting heat everywhere. It was still less expensive than some of the other systems. Also bought a second sensor.
Great product, good price
Jabbalocky✓ Verified Purchase•August 19, 2023
The thermostat has a nice usable format. It has some quick push buttons for common temperature needs. Very intuitive programming for daily and long term heat cycles. It's a good balance of simple use with complete programmability. The heating element seems of good construction. I've used two different versions 50 Sq ft spool and 100 Sq ft mat both with the same thermostat. This will be my go to product for floor heat. It works.
Pay more for the mats!! (an installation review)
Jennie Wigginton✓ Verified Purchase•August 14, 2023
I have only installed this product, the tile has not been laid and we're not moving in for another month.
BLUF: Spend the extra $60 and get a mat-based set unless it absolutely will not work.
Planning:
Take the time to layout the best way to meet your room dimensions and needs. Take into account where you will actually be standing/walking. You don't typically put your foot within 4" of a wall unless the room is super narrow, but you might stand right up to the edge of a tub/shower while turning on the water. Keep it 6" away from the toilet to prevent the wax ring from melting (some people debate this point, I figure its not worth the risk for no reward)
You can actually heat the room with several different approach, if you have a massive Roman Bath you might want to focus the heat on certain areas (main path/vanities/toilet/makeup bench) or do what I did and just heat it all.
Both the cable and mat will require some thought while laying out. Breakup the room into areas that will be heated and think of where the cable will "enter" and "exit" the current area being heated. This is critical with the cable set because if your last run is going in the wrong direction you'll be spending a lot of time shifting runs.
Thermostat Installation:
I won't get into where to locate the wall Thermostat or how to get electricity to it. Make sure to put this on a GFCI protected circuit (i went dedicated to the main panel). Pull a permit and follow code or hire an electrician.
The struggle I had was getting the hole for the cable and floor sensor as close to the floor as possible since in most modern construction there is a 2x4 bottom plate located down there. I had access to the backside so I bore down with a 3/4" spade bit to the subfloor then came in sideways with a 3/8" bit from the drywall side. I used a fishtape to help them make the bend since the sensor wire is so thin. If you don't have access to the backside I guess my next option would be to drill a hole 2" off the floor and find a way to mount the baseboard so it doesn't pinch the wires (shimmed out or route/chisel a recess in the back)
The thermostat itself was easy to connect. 4 wires on the thermostat itself, 2 black and 2 whites. One goes to your Line (house wiring), the other to the Load (Cable, also connects to ground). You also need to pull the floor sensor to connect in the front of the unit. It is very thin wire and they give you a jewelers style screwdriver to secure. Pay the extra $15 and get a second floor sensor in case your first one were ever to fail.
Cable Installation:
If you typically skip directions here's the simple jest of it, each wire will heat 1 1/2" on each side, so space your wires 3" apart and 1 1/2" away from wherever you want heated. Beyond that will not be heated. Unroll it with as little tangles as possible (yeah right) and tape it to the floor. Simple as that. I ripped the tape off in 1-2" sections to hold it to the floor. Once applied the tape cannot be reused (once you remove the tape it lost all grip).
I unrolled the entire reel as best as I could and put the coil in the tub while I laid the wire so it wouldn't get tangled at my feet. The last 10 feet were very springy so I'm glad I had some extra tape to hold it down.
Mark your floor about before each bend in 3" increments (I just used a pencil). My method was to mark on alternating sides of the tape measure which helped indicate which direction the wire was going which helped me verify my layout.
Their picture shows taping the tip of each bend, I chose to tape each side prior to the bend, this helped maintain spacing and provided more support. I went along securing each end but skipped reinforcing the middle of each section. This way if I needed to make an adjustment I wouldn't be doing as much rework (or wasting more tape). Plus your eye will pickup spacing discrepencies much better against a large pattern than focusing only on one or two rows.
Overall it took less than 90 minutes to clean the room, mark everything out (my engineers mind laid out 4 different layouts before it was satisfied), and install all the cable.
Small rework is easy, pull up a couple pieces of tape which will no longer adhere to the floor, move what you need to move, and add new tape. Significant rework is a major PITA. For some stupid reason I thought I had bought the 60 sqft cable and was too aggressive on my original rows so I didn't have enough to heat the watercloset. I could have loosened my spacing to gain another 5sqft to heat the area in front of the toilet but after trying to adjust the first 3 rows I figured it wasn't worth all the work and the risk of running out of tape (since they were tiling first thing the next morning and the hardware stores were already closed).
This is where I realized using mats would have been such a better idea. I could have laid them out and realized my mistake before securing them to the floor. You can't do that with cable because it won't hold its shape unless secured to the floor.
In Use:
Weren't you reading?! I'm not living in the house yet and won't write a review until I've used it for a bit. Check back in the Spring.
Rating: 5/5
I rate a product based on what it is supposed to be, in this case the Cable Set provides all the flexibility needed to fit any unique room with odd shapes. Installation was easy for both the electrical and the cable mat set. I give it 5/5 stars for those aspects. The thermostat has its own reviews so go read those reviews there.
Great Product... Here's a Few Suggestions.
kale✓ Verified Purchase•August 12, 2023
install was a breeze. Their is a physical setting in the back of the thermostat to select floor sensor rather then air sensor. I bought this for a bathroom that measures 5 by 8 and my corner shower is a 38" which we did not run this under. If I could go back I would go to a 30 Sq foot system and run tighter lines...maybe 2 inch rather then 3.5... the wires are not hot to the point that if you had to curl a bunch of extra up in one spot it would be hazardous. you can easily hold this bare in your hands while its running. it can take 8 hours to heat up but I live in Canada and the temp is -35 this morning. I leave mine running all the time and set it at 27. I figured the electrical cost of this to run 24/7 is about 50 to 60 cents a day. well worth it if you could feel this floor where the cables are not running...COLD!....Don't hesitate on this product. With shipping it was under 200 us. ...Canada Home Depot sells a similar package with only 15 Sq feet for 309.99 plus tax.
Note... If you are putting this in self leveling cement as I did I will give you a major heads up.... prep the floor. ...prep the floor.....prep the floor....I wish someone had drilled that into my head. One spot about 18 inches around sounded hollow... we managed to fix it by drilling many 1 inch holes down into the concrete (making sure not to hit the wires of coarse) and filling them with a concrete epoxy which seems to have bonded it all together..... prep your concrete floor first so the self level adheres..... you don't really get a second chance once the wires are embedded in the floor.
Hope this helps....Happy Heating!
Great product for the money
HomeDIYer✓ Verified Purchase•August 9, 2023
When I got this cable i wasn't sure how well it would work because I expected it to be a little thicker. I thought it would not snap in and stay in the ditra heat sheets that i installed. Well it stayed in pretty well because every loop (turn) would hold it tight. The directions are fairly straightforward and the cable was not flimsy and of good quality.
A word of caution, when estimating how much you need to order: either measure precisely, or if you think you will guesstimate and deal with it later (haha) guesstimate on the lesser side. They're generous and they give you a lot (exactly what you order!). They probably don't want to get complaints for not sending out enough. I even drew on a scaled drawing to see how much I needed and still ended up with more than enough which I had to spend hours to figure out how to incorporate in my application. The heating part of cable can not be cut . The cold lead (non heating) part can be cut, as well as any excess of the temperature sensor wire. So take off your vanity cabinet and toilet from your square footage. My extra had to go to a shower bench seat. The specs on all or most heat wires call for 3 studs at time or alternating 3 then 2. They (Warming Systems) do give you an out by saying that if you have way too much it can be 2 studs apart. All this was on me and not on anything negative of this heating cable.
Also, it would be helpful to offer to sell as part of this package (either by Amazon or by the seller) the recommended 2nd temperature sensor on the same web page and not having to search and for and have to make a separate purchase for it.
The digital thermostat appears sturdy and of good quality and design.
Once the layout was worked out the laying of the cable and the routing to the electrical box went like a breeze.
I performed the resistance checks (you'll need a digital multi-meter) when I opened the box, after I laid it down and after the mortar went on top, all good. Haven't laid the tile down yet so I don't know how well it works yet.
Page 1 of 2