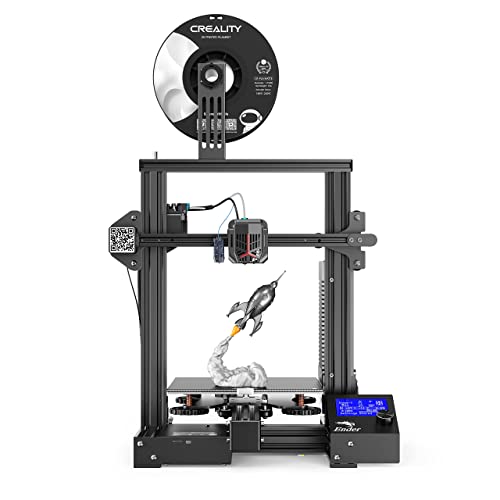
Creality Ender 3 V3 SE 3D Printer, 250mm/s Printing Speed DIY 3D Printers with CR Touch Auto Leveling, Sprite Direct Extruder Auto-Load Filament Dual Z-axis Y-axis, Printing Size 8.66x8.66x9.84 inch


Key features
- •FULLY OPEN SOURCE: Creality 3D is working with its wonderful community that has lots of users and contributors to improve this open-sourced product every day. A design is culminating from some of the best and brightest minds in the 3D printing world.
- •Resume Print Function: Creality Ender 3 3d printer has the ability to resume printing even after a power outage or lapse occurs.
- •Easy and Qucik Assembly: Package comes with several assembled parts, you only need about 2 hours to assemble 20 nuts well.
- •Advanced Extruder Technology: Upgraded extruder greatly reduces plugging risk and bad extrustion; V-Shape with POM wheels make it move noiseless, smoothly and durable.
- •Safety Protected Power Supply: Hot bed Only needs 5 minute TO reach 110℃.
Creality Ender 3 V3 SE 3D Printer, 250mm/s Printing Speed DIY 3D Printers with CR Touch Auto Leveling, Sprite Direct Extruder Auto-Load Filament Dual Z-axis Y-axis, Printing Size 8.66x8.66x9.84 inch
List Price: $318.65$286.79DEALYou Save: $31.86 (10%)
Free shippingFree Returns – 30 daysFree Order CancellationSecure Payment2–3 Days DeliveryGet It June 24, 2026In Stock (1)No marketing spamNo account requiredFulfilment by FedEx / Amazon / UPS / ShipwirePayPal / Card Buyer Protection
Customer Reviews
Reviews sourced from verified Amazon purchasers4.2
out of 5
Based on 10 reviews
5★
60%
4★
40%
3★
0%
2★
0%
1★
0%
Take your time, build it, don't just assemble it. Make the build quality right and your prints will turn out right.
Roger T. Moore✓ Verified Purchase•May 5, 2024
You might be able to assemble this printer in a couple of hours but you can't build it in that time. There is a significant difference in building something correctly and assembling it. Assembly is the easy part, anyone can throw things together. The build is now complete and to do it correctly takes 4 to 5 hours.
When you stand the Z axis uprights on their ends on a granite surface plate it's clear that the ends aren't machined square. After machining the ends they are square and flat enough to assemble now. The Z axis bracket that the leadscrew nut bolts to was not fully bent so the leadscrew didn't line up with the coupler and had to be straightened to make it parallel to the Z uprights so it would line up with the coupler. Check yours to make sure that bracket was bent at 90 degrees. The two uprights had to be shimmed to get them square to the bottom supports and parallel with each other so that the X axis rail would go up and down in a straight line without binding. Colored plastic shim stock of various thickness and an accurate machinist square is paramount to your success here. Even a small Framing square or a plastic triangle from an office supply store would assist in getting the uprights square to the base. The two uprights have to be parallel to one another and hopefully square to the base in order for the top rail to mate up correctly.
If you want accurate prints the X and Y axis has to be able to move squarely to one another. The Z axis has to move perpendicular to the build plate once the X and Y axis are square. If this isn't accurate it will affect your print quality. Once the mechanics are built you will need to tidy up the wiring, check the hot end and build plate heating and make sure the extruder will extrude plastic from the nozzle.
Prints can be made directly to the build plate, to a piece of borosilicate glass, mirrored glass or tempered plate glass resting on the heated bed. Once the Z stop is set close so that the Z homes with the nozzle close to the bed plate the you can level up the bed plate with a stainless steel feeler gage and you should be good to go. I would use a .005" feeler gage to start as a comparable piece of paper is .004" thickness.
Summary:
Pros:
1. Good value for money.
2. Everything bolted up and worked
3. Spare parts were a nice touch and much appreciated.
4. Good selection of software to slice and handle STL files.
5. Fastener quality was good enough to get the job done.
Cons:
1. Instructions are abysmal. The illustrations are too small, not well explained and the references are sorely lacking for someone that has no experience with building small CNC type electronics. In short the instructions are just enough to get the job done but the neophyte will struggle.
2. Build photos would be a big help. You can't depend on a bunch of folks on the Internet to cover your failings with YT videos and websites that may be doing it wrong to start with. The factory needs to own it.
3. Use a full size SD card. Micro SD cards are OK for phones and tablets because they get installed and stay installed, they have no business in a 3D printer they are simply too small to use all the time.
4. The 24V wiring coming from the power supply had insulation nicks on both the + and - wires and had to have heat shrink applied to keep them from possibly shorting out. The screws on the terminal block at the bottom of the power supply were just barely tight so check yours.
5. XT 60 connectors are rated for up to 65 amps continuous but they were never designed to be permanent connections. In RC model applications you may fly for 5 to 10 minutes and then the packs are disconnected. Most of the time the connectors aren't even in use. I would prefer to see a metal enclosure with a terminal strip for the power connections.
6. The uprights are cut on a cold saw and this is a common operation for extrusions. The problem is that the resulting surface isn't flat, straight or square. When you bolt the uprights onto the lower frame they aren't square and parallel. You will have to shim them to get them to be square and perpendicular. Note to the factory; you can do better.
Suggestions to Creality:
Look at the Pro's and Con's, take note of some of the issues and make corrections to the new kits coming out of China. It takes just as long to do something wrong as it does to make it right. Making it right is easier.
There should be an adjustable Z stop instead of a fixed one.
The homing speed needs to be lowered slightly as the hot end and table hit too hard when homing. I can do this in the Marlin Firmware but the factory just needs to lower the speed slightly.
All in all, this is a great way to spend a couple of evenings and the print quality is really good, especially for the money. Despite the issues this is a great printer. Don't let the issues cloud your decision about buying it. All the issues can be resolved by the builder and that's you. This should be a 3.5 star printer but it could be a 5 star printer with just a little work by the factory.
Suggestions:
Amazing and infuriating device
djecoed✓ Verified Purchase•April 16, 2024
I had been wanting a 3D printer for some time with a specific purpose in mind. I co-worker recommended the Ender 3 so I bit. I watched some videos on getting started, leveling, etc., and got to work. Sort of.
First, the cons: it is necessary to "level" the bed before use, which means to adjust for a constant distance between the print bed and where the plastic comes out (the extruder) using a set of four screws on the bottom of the bed. This can be very tricky. And it needs to be done a lot. It took me a LONG time to get good at leveling, and I was frequently exasperated. So if you do not like tinkering with your devices, you would probably be better spending your money elsewhere.
Also, in regard to the half dozen or so unhelpful videos that will tell you turning the screw this way tightens it and turning it this way loosens it, a useful translation is:
- turning the screw clockwise (as viewed from above) RAISES the bed and reduces the distance between the bed and the extruder
- turning the screw counter-wise (ditto) LOWERS the bed and increases the distance between the bed and the extruder
Having said that, the pros:
When this thing is leveled and working well, it is absolutely amazing what you can do. I tell people all the time how useful and amazing it is. Want a clip to keep your power tool cords in check? Print one. Want a belt clip for your reacher-grabber for when you are in the yard? Print one. Want a mount to put your cell phone on your camera tripod? Print one. Want some splints to repair those broken glasses? Print them. Want some custom "Letsgo" building blocks, doors, and window dividers? PRINT THEM ! ! ! (That, by the way, is the "specific purpose" I mentioned earlier.) It is astonishing the range of useful and fun things you can make with this.
A couple of caveats:
- you need 3D models to print. There are many available online but for your particular needs you will have to make the models yourself. All of the designs above are custom designs I made.
- if you are going to design your own models it is necessary to couple this device with some design software. I use TinkerCAD, which is available online for free from Autodesk. It is amazingly easy to use and yet very capable if you are clever. But you do have to learn how to use it.
- if you are going to design your own models it is necessary to couple this device with a "slicer", a program that takes your 3D model and buts it into layers the Ender can print. Once again, you will have to learn to use it. I recommend Cura, also free and easy to use.
Whatever the problems with this device, I am enormously pleased with it. It might be my favorite thing ever, and maybe the best money I ever spent. So, with the qualifications above, I highly recommend the Ender 3 Pro.
Great beginner printer
jim✓ Verified Purchase•March 7, 2024
Bit of assembly. It's good to know what parts go where and why tho. I leveled the bed like it said to do with a piece of paper and printed the cat wonderfully. The next few prints were hard to get to stick. I slowed it down to 65 for first layer then 90 after that. Solved the problem. I printed a larger groot flawlessly. Then printed a three dragon that moves. Worked fine. The only thing it that is loud af and slow. Took like 14 hours for the dragon. I'm hesitant to leave it unattended but it's a great starter printer.
Great for an intermediate-skilled experience
Tarren A Hubbard✓ Verified Purchase•March 6, 2024
The first few weeks with this printer were actually pretty rocky. I was having lots of printing failures and quirky problems. Many were due to user error and lack of experience, a few were made worse by poor usability design. Whoever designed this printer didn't really think through some things. This takes tweaking out of the box.
With that said, I highly recommend this printer to someone who is looking for an amazing printer at a lower price, is good at troubleshooting prints, and is capable of problem solving and addressing some out of the box product issues. The cons list, while long, is all easily fixable. For the price you pay, these types of adjustments are completely worth it.
Cons:
-You must assemble yourself. This majorly increases the risk of breaking something or installing something wrong resulting in crazy printing problems. This also raises the risk of voiding your warranty. So, be really good at building things and able to fix your way out of mistakes
- The out of the box filament holder/location is just flat out ridiculous. You'll need to print several additional parts if you want filament that doesn't interfere with your z-axis lead rod.
-The frame is very prone to vibrations that affect the print. You'll need to print out feet to absorb the vibrations
-The fan on the computer unit is in about the worst place imaginable. you'll need to print out a shield that redirects the airflow to avoid filament falling into the unit and the front left corner of the bed cooling off.
-The wires were seemingly designed to get hung on the frame. you'll need to print several parts to slope the edges of the frame and do some cable management to avoid them getting hung on other parts.
- The LCD screen has no backplate so you have a bare circuitboard exposed to whatever decides to bump into it. You'll need to print a backplate if you want to keep it protected.
-The bed is so dad-gum hard to get level and keep that way. One tiny little nudge can throw the whole thing off. The springs are very weak and don't really hold in place for the first few weeks of use. You'll probably want to buy replacement springs or be VERY CAREFUL when interacting with the bed or anything remotely near the bed.
-The x-axis belt is slightly too big, meaning that you're going to get ovals instead of circles out of the box. I used one of the included zip-ties to tighten the belt where it fits into the printhead notch and now it works fine.
-the z-axis lead rod is crooked. IDK how to explain this or why it is this way, or how I fixed it but it is legit out of the box crooked. I think I blacked out while fixing it because I can't figure out how I straightened it out. Mine still has a slight slope when the arm is towards the bottom of the bed. IDK. Maybe I'll never understand. There are some parts you can print that are spacers for the unit, but keep in mind the frame acts as a heat sink so you'll need to add some raspberry pi heat sinks to the z motor to keep it from overheating.
-this thing grounds by plugging in to the wall. That is fine and normal, but KEEP THIS IN MIND and make sure whatever you plug it into has a verified working ground. My surge protector was broken and the ground wasn't working. So I kept having massive crashes with the machine. Turns out static was building up during long prints and shorting out the machine. Yikes. Again though, this isn't the machine's fault. Just adding this in because it's pretty important to understand.
-Cura doesn't have this printer listed in presets. You have to take the cura 10 settings and tweak them. There are lots of tutorials on youtube on how to get the best out of this printer so prepare to watch a lot of videos and have a lot of filament sacrificed to the test print gods.
Pros:
-price is like...wow. Amazing
-the bed size is huge and really gives you room to create some awesome stuff
-you can get some incredible quality prints off this puppy. Once I got mine in a good state I was astonished with the quality
-can print at pretty high speeds and retain quality
-it has print recovery that works surprisingly well in the case of a power interruption.
-Is at it's core a very good little printer that is highly capable and reliable ONCE YOU ADDRESS THE ABOVE CONCERNS.
If you're a beginner and you're looking for something easy to get started with, skip this and go with something like the monoprice mini v2. If you've been working with a beginner printer for a while and are starting to feel limited, and you're good at troubleshooting - I highly recommend this printer. It's worth it.
Great 3D printer.
Chewy✓ Verified Purchase•February 24, 2024
For being a novice 3D printer person, this device can do a lot of things. A friend of mine has this same printer and with his help and previous knowledge from using the same printer, I have really learned a lot and his expertise has helped me with a lot of questions that I would have had to ask others about. I ordered this 3D printer on 28 Jan 2021 and it was delivered on 04 Feb 2021. Creality really does a great job packing all of the parts and pieces. It took a little bit of setting up, but watching several YouTube videoes on how to unbox and setup this printer really was a big help. The most critical thing with this printer, is making sure that the bed is level. If your bed is not level, then the filament will not stick to the surface of the bed. It will take 30-45 minutes to level your bed. There are several videos on YouTube on "How to level your Ender 3 v2 printer". Also, depending on what type of filament you are going to use, you need to know what is the best nozzle temperature to set. I found that the GEEETECH, MILKA and HATCHBOX PLA filaments are the best, but that is my own opinion. I found that 185 Celsius for the nozzle temp and the bed temp of 50 degree Celsius was the best settings. But, most manufacturers will have printed on the side of the spool what temps to use and also when you use the "slicer program" for the things you want to print it will already be programmed into the "gcode". But, still set the temps to 185C and 50C for the PLA filaments and see how that works.
I also ordered the "Ender 3 Springs, Creality Upgraded 4PCS Hot Bed Die Springs with 4PCS Aluminium Hand Twist Leveling Nut for Ender 3/3 Pro/3 V2, Ender 5/5 Pro/5 Plus, CR-10, CR10S/10S Pro, CR 20 3D Printer" kit. This replaces the springs that come with the Ender 3 printer and is a more sturdier spring (hot die spring) instead of the less sturdier spring that comes standard on this printer. It will keep your bed level after several prints.
Also, make sure that you check the belts for the X and Y axis after several prints. All you have to do is to tighten the knobs just a fraction of a turn, but make sure not to overtighten.
My friend printed me some additions, which we found on "Thingiverse.com", to add onto my printer which really helps, one is a pulley wheel that attaches to the side of the printer to help streamline the filament from the spooler to the extrueder so that it doesn't crimp when printing. Also, I have printed several items that I downloaded from THINGIVERSE.COM and all of them turned out great. I found out from my friend that using blue painters tape and the Elmer's Purple glue stick really helps the different filaments to stick to the surface. Put the blue painters tape down and then level your bed and once leveled, then use the purple glue stick on the painters tape and smooth with your finger. I also downloaded the slicer software "CURA" (the "slicer software") to create the "gcode" that this 3D printer uses to print your items that you download from "THINGIVERSE.com". There is a "slicer" program that comes with the printer on the SD Card and it looks just like "CURA" but Creality just added a few other things to make it look a little different. Either "slicer program" will work. I have also purchased about $200 worth of PLA (harder) and PETG (softer) filaments. Should not be running out of that anytime soon. Overall, Creality does make a great printer and so far, I have not had any issues to be really concerned about. Overall, I give this printer a 5 out of 5 stars. Just do your research on what you and your friends are likely to use. I am very pleased and recommend this printer to everyone. Those people that are giving this device bad reviews are ones that have no idea on what they are doing and have not done the reasearch in order to make this thing enjoyable. You just can not setup this printer and expect it to automatically print. There is some work involved and once you do the research and learn from those that have gone thru these situations, i guarantee that this device will be the next fun thing that you will ever own and have fun using day-in and day-out. I am glad i had the expertise from my friend or I might be giving some critical reviews also. Do your homework. I think this is the future toy that everyone will have in their household. Happy 3D printing!
19 April 2021
I have had this printer for almost 3 months now, and i can say that I have had no really big problems with this 3D printer from Ender. Yes, there is a few twikking that needs to be done from time-to-time, but if you have the patience, this thing can really be fun for you and the family. Once again, the biggest thing is getting the bed level but usually you don't have to worry with that until after 8-10 prints. Again, i use the Blue Painter's tape for the filament to adhere to and i also used the Purple Glue Sticker. For smaller and more detailed prints, using these 2 things can make for removing your print a little difficult. I use a little rubbing alcohol and it will come loose. For finer prints where things are more detailed, you might also want to slow the speed of the print from 100% to about 50-70%. I have printed some pedals or flowers for the hummingbird feeder that i made and the print speed needed to be adjusted and really did a fine job. Using the faster speed (100%), the detailed flowers were messed up. I would still recommend this to everyone. I enjoy my Ender 3D printer everytime i print something. Good luck.
Page 1 of 2