armoglaze USA-Made Bathtub Refinishing Kit - Easy Pour-on Application, Odorless, White Epoxy-Coating - 2.7 kg


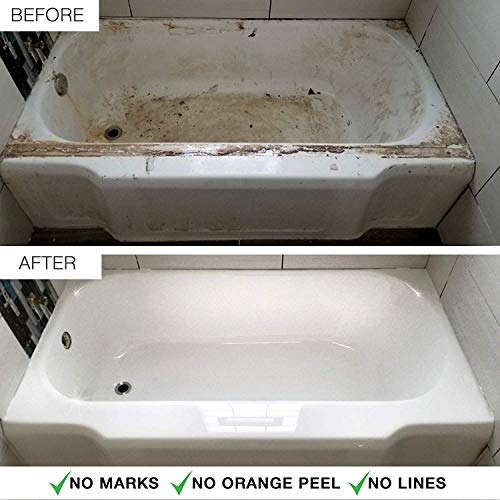


Key features
- •✅ FAST FREE SHIPPING ON ALL ORDERS with first class mail receive in 2-4 days depending on location. PRICE DIRECTLY FROM THE MANUFACTURER .ArmoGlaze Original Odorless Bathtub Refinishing Kit. Safer than other DIY tub reglazing kits ✅ 32x Thicker than regular spray kits ✅1/16 Thickness (synthetic porcelain) ✅ Mirror-like finish ✅Color: white
- •✅ Easy, no mess use with pour-on application. Anyone can do it!. Bathtub refinishing kit includes step-by-step video & printable instructions.
- •✅100% Original, heavy duty coating, made in the USA. Created by our team of experts for easy application, highest quality. NO PEELING UNDER BATHMAT, NO PEELING UNDER LEAKY FAUCET! Follow preparation instructions and ArmoGlaze WILL NEVER PEEL. Dries completely and ready to use in 24 hours, like new!
- •✅ No need for ventilation, advanced odorless formula. 1/16 inch THICKNESS is extremely durable.
- •✅ Step by step video instruction here https://youtu.be/IsqcQQvaWBo Perfect for all bathtubs shower bases and sinks. Use to refurbish bathtubs (cast iron, porcelain, plastic); shower bases (plastic, terrazzo, ceramic tiles, concrete); kitchen and bathroom sinks ( porcelain, plastic ); not meant for stainless steel sinks.
armoglaze USA-Made Bathtub Refinishing Kit - Easy Pour-on Application, Odorless, White Epoxy-Coating - 2.7 kg
List Price: $225.53$202.98DEALYou Save: $22.55 (10%)
Free shippingFree Returns – 30 daysFree Order CancellationSecure Payment2–3 Days DeliveryGet It October 25, 2026In Stock (2)No marketing spamNo account requiredFulfilment by FedEx / Amazon / UPS / ShipwirePayPal / Card Buyer Protection
Customer Reviews
Reviews sourced from verified Amazon purchasers4.4
out of 5
Based on 10 reviews
5★
70%
4★
30%
3★
0%
2★
0%
1★
0%
OH MY GOD! OH MY GOD! OH MY GOD!
Lee✓ Verified Purchase•July 19, 2023
I am a complete amateur! I don't do "Do it yourself' projects," but I'm living in a rental house right now that is over 50 years old, and my bathroom had a horrible blue bathtub that had chips and stains all over it! Obviously, I'm not putting a lot of money into a house I don't own, but I hated that bathtub so much! It felt dirty every time I got in it no matter how much I cleaned. So---I had already painted and epoxied the horrible blue counter, and that turned out beautiful (mixed in some pearl pigment, the whole counter looks like pearl marble now). So--I figured if I could do a counter, why not a bathtub? I read up about different products, and nearly everyone seemed to have had total failures with the cheap Rust-oleum products, so I decided I'd rather put a little more money into it and get it right the first time! I was so proud of myself! I work 40 hrs. a week, so I had to devote weekends to prepping the tub, and I literally spent two weekends on it. I scrubbed it with everything, sanded it twice, fixed the chips. Then I poured the stuff and got started! Oh my God! You know that video where the guy goes through it so fast and makes it look like it is the easiest thing in the world? Looked like he never even spilled a drop? I should have made a video of myself doing it, and they could have played that one first and called it, "What not to do!" I had paint everywhere! My nice taped plastic came up 10 minutes after I started, and it was crumbling up all over the place, hitting the sides of the tub, and my comb and trowel kept getting lost in it. I had paint covering half my face, my neck, both arms, one of my ears, both feet and my stomach (never quite figured out how it got there)! I was sweating like a pig after 10 minutes in that hot bathroom! If you sweat--it's a problem because you can't get this stuff wet. I sweated a lot of drops into it. I did figure out that I could tell the difference between the sweat and the bubbles because the sweat had a yellowish look to it, and those drops wouldn't go away with the heat gun like the bubbles would. It was actually fixable if I went over it with some more paint, but I had to constantly turn around and wipe my face on a hanging towel (be sure you have one because your gloved hands are going to be covered in paint, so you can't just pick up a towel and wipe your face). Also, if you are a sweater, tie a tight headband around your head to catch some of the sweat. Given the fact that my plastic was all over the place instead of taped in front of the tub, when I poured the paint on the outside, I had about a five inch pool on the floor all along the outside of the tub. Luckily, I'm planning to cover the old ugly linoleum with stick tiles anyway (which cost $8 a box at Roses), so it was no big problem for me, but I'm sure it would be for someone who plans to keep their floor. After an hour and a half, I was so hot and so tired and so thirsty that I thought I'd die if I didn't get out of there. I had just tried to fix a couple of places on the front, and I had drips running all over the place, and it looked horrible. I thought, "Okay, it was worth a try. I'll just have to scrape it all off." Then, I went out and went to the other bathroom and spent 30 minutes pouring acetone all over myself trying to get the paint off. My clothes went into the garbage--don't even think you're going to be able to save your clothes so wear something you hate! Once I was finally clean and cleaned up the paint marks on the floor where I tracked it with my bare feet, and had a nice glass of ice tea, I felt better--when to my horror I suddenly realized I hadn't taken the tape off the drains! I think I actually cried a little at the thought of going back in there. But when I went in, I was amazed that all that dripping on the front was gone, and it was level! Taking the tape off the drains was a nasty little mess--nothing like the easy little job they did in the video, but I did manage to get them off. The RESULT! After all that mess and sweating and crumpled plastic---the tub turned out perfect! There is not a single drip or mistake anywhere! It looks like a new tub! So, the moral of this story is---if I could do this with all of my amateur mistakes--ANYONE can do it. If you put your time into the prep work, it's really hard to mess this up, (even though doing it is a horrible mess--you just have to know that going in and decide whether saving a few thousands bucks on a tub is worth a couple hours of mind-numbing horror!) I LOVE the new tub! Wish I had some pictures, but I have the first Trac Phone that was ever invented, and it doesn't take pictures, do voicemail, and sometimes it doesn't even ring. So--I'll have to leave it all to your imagination, but I'm thrilled! My bathtub looks amazing! After all of that--I'd try buy this stuff & try it again!
Harder than advertised and some direction discrepancies
Braden J Moore✓ Verified Purchase•July 8, 2023
This project is a tremendous amount of work, much more difficult than the instruction video conveys.
It took me a solid 2.5 days to scrape off the previous enamel from the tub. The written directions say, if you have a previously enabled tub, to use a scraper and to OPTIONALLY use paint stripper to remove it. The optional use of paint stripper was a total joke in my case - it was a requirement! I would have saved myself some trips to Lowe's if I had bought 3-4 cans of Jasco spray on paint stripper and about 20 razor scraper blades to begin with. Just be sure to use appropriate safety practices and personal protective equipment when using paint stripper.
The enamel pouring process was messy. With the solo cup in one hand, and the plastic spreader tool in the other hand, I found that I immediately had two sources of constant enamel drip coming from my hands that I had to be diligently aware of for the 2-3 hour period of pouring and managing the spread of the enamel. Have a can of isopropyl / denatured alcohol and a ton of paper towels in the room so you can clean up spilled enamel from the tile and other surfaces before it sets.
One other thing. The written directions and the instruction video have some discrepancies between each other. For example, they provide different guidance on what the ambient room temperature should be in the bathroom to ensure the enamel cures properly. One of them calls for the room being fairly warm, I think over 75F. The other calls for a more comfortable temperature, like 68F+. I went with closer to 69-70F and it appears to have worked out fine. Further, if you have the room at 75F+, you will be sweating profusely throughout this project and will likely end up hospitalized. Even at the 68F temp I was sweating a lot and it was dripping into the tub which was not desirable.
One thing the directions don't warn you about is the fact that hairs and other debris will magically appear on the tun in the hours after you pour it and remain engrained in the tub permanently. I recommend deep cleaning your bathroom and any area of the house you will be going into and back into the bathroom while the enamel is curing. Then turn off the air to prevent the bathroom vent from stirring things up into the air. Also, especially if you have pets, lint roll yourself before entering the bathroom.
I give 4 stars because of the instructions discrepancies and it he fact that the video catfishes you into thinking this is an easy project. But I love the end result.
It took me a solid 2.5 days to scrape off the previous enamel from the tub. The written directions say, if you have a previously enabled tub, to use a scraper and to OPTIONALLY use paint stripper to remove it. The optional use of paint stripper was a total joke in my case - it was a requirement! I would have saved myself some trips to Lowe's if I had bought 3-4 cans of Jasco spray on paint stripper and about 20 razor scraper blades to begin with. Just be sure to use appropriate safety practices and personal protective equipment when using paint stripper.
The enamel pouring process was messy. With the solo cup in one hand, and the plastic spreader tool in the other hand, I found that I immediately had two sources of constant enamel drip coming from my hands that I had to be diligently aware of for the 2-3 hour period of pouring and managing the spread of the enamel. Have a can of isopropyl / denatured alcohol and a ton of paper towels in the room so you can clean up spilled enamel from the tile and other surfaces before it sets.
One other thing. The written directions and the instruction video have some discrepancies between each other. For example, they provide different guidance on what the ambient room temperature should be in the bathroom to ensure the enamel cures properly. One of them calls for the room being fairly warm, I think over 75F. The other calls for a more comfortable temperature, like 68F+. I went with closer to 69-70F and it appears to have worked out fine. Further, if you have the room at 75F+, you will be sweating profusely throughout this project and will likely end up hospitalized. Even at the 68F temp I was sweating a lot and it was dripping into the tub which was not desirable.
One thing the directions don't warn you about is the fact that hairs and other debris will magically appear on the tun in the hours after you pour it and remain engrained in the tub permanently. I recommend deep cleaning your bathroom and any area of the house you will be going into and back into the bathroom while the enamel is curing. Then turn off the air to prevent the bathroom vent from stirring things up into the air. Also, especially if you have pets, lint roll yourself before entering the bathroom.
I give 4 stars because of the instructions discrepancies and it he fact that the video catfishes you into thinking this is an easy project. But I love the end result.
Great product when applied CORECTLY
KR✓ Verified Purchase•June 14, 2023
I would have given 5 stars, if not for the ease of application. There are many detailed reviews, read as many as you can, there are a lot of little details that can make or break this project.
here's another with some more tips....
My first attempt was done with a very expired box of this product that had been in my closet (3+ years). Clearly, I waited too long, and it was too thick for a proper application. It came out horrible with drips everywhere. MY FAULT. Also, I did not follow the directions well, again my fault.
In speaking with the staff at ArmoGlaze I learned a few things: The proper preparation, pour technique and use of tools supplied. Here's a few tips: First, before taping outside bottom of tub area between grout and tub, use melted SOY Wax, or bar soap on the grout ONLY. I melted wax in microwave and applied with a small paint brush, then taped over grout. This will give you a very nice clean line, and after the glaze is dry, you can use a razor knife and wire brush to clean any overspill. Second tip, use several layers of protection on floor. The first layer should be plastic, the second and third layers should be loosely taped paper. This can be a messy project, so being able to remove a messy layer for a clean one will be very helpful when leaning over the tub to do the final bottom coating. Third tip would be to have on hand a large bottle of rubbing alcohol and paper towels, as you can clean your hands and any drips you might track from stepping in the overspill on the floor.
Final tip, Stir product well 7 minutes (and ONLY 7 minutes), Pour Pour Pour, when scraping from bottom of tub to cover any LOWER area LESS than 1/3 height of wall use Vertical swipes. Don't forget the heat gun, and don't get too close or pause on any spot, wave the gun back and forth.
I hope this helps, take your time to prepare. I prepped the first day, and poured the second day. It took nearly 4 hours plus clean up on the second day.
Final thought, I work with epoxy resin on many projects, artwork, framing etc. and have my own woodshop and am no novice. This stuff is tricky and not something to be done "on the fly". Have your game plan ready, and take your time. The results can be fantastic!
here's another with some more tips....
My first attempt was done with a very expired box of this product that had been in my closet (3+ years). Clearly, I waited too long, and it was too thick for a proper application. It came out horrible with drips everywhere. MY FAULT. Also, I did not follow the directions well, again my fault.
In speaking with the staff at ArmoGlaze I learned a few things: The proper preparation, pour technique and use of tools supplied. Here's a few tips: First, before taping outside bottom of tub area between grout and tub, use melted SOY Wax, or bar soap on the grout ONLY. I melted wax in microwave and applied with a small paint brush, then taped over grout. This will give you a very nice clean line, and after the glaze is dry, you can use a razor knife and wire brush to clean any overspill. Second tip, use several layers of protection on floor. The first layer should be plastic, the second and third layers should be loosely taped paper. This can be a messy project, so being able to remove a messy layer for a clean one will be very helpful when leaning over the tub to do the final bottom coating. Third tip would be to have on hand a large bottle of rubbing alcohol and paper towels, as you can clean your hands and any drips you might track from stepping in the overspill on the floor.
Final tip, Stir product well 7 minutes (and ONLY 7 minutes), Pour Pour Pour, when scraping from bottom of tub to cover any LOWER area LESS than 1/3 height of wall use Vertical swipes. Don't forget the heat gun, and don't get too close or pause on any spot, wave the gun back and forth.
I hope this helps, take your time to prepare. I prepped the first day, and poured the second day. It took nearly 4 hours plus clean up on the second day.
Final thought, I work with epoxy resin on many projects, artwork, framing etc. and have my own woodshop and am no novice. This stuff is tricky and not something to be done "on the fly". Have your game plan ready, and take your time. The results can be fantastic!
More complicated than what is advertised (A long review but hopefully helpful)
Lindsay McCabe✓ Verified Purchase•June 4, 2023
I'll start off with saying that the product itself seems to be a great quality. But! It is WAY more involved than expected and the supplies they provide (combs) are a joke. The only useful tool you will get is the yellow plastic trowel.
The instructions were easy to follow, and detailed. I recommend going to the website and downloading the pdf of the detailed instructions. DO NOT go off of the video alone. There is no dialogue, and it is extremely misleading. The hardest part will be the prep work. Our tub was previously restored (badly) by the first homeowner. There is a step in the instructions telling you to determine if your tub has been previously restored. If so- prepare for the longest prep of your life. The instructions suggest using paint stripper- easy enough- so we went to purchase some. On every can of paint stripper, however, there is a warning on the container that says DO NOT USE TO STRIP BATHTUBS. Ok...this left us with power sanding the old paint off. The instructions didn't say to do this, instead they suggested using a razor blade scraper. Ha! You'd be there all week long razor blading your tub. Not too efficient. Power sanding seemed to do the trick in just a couple of hours.
Once the prep work was complete and the bathroom floor taped up with a plastic drop cloth, we were ready to pour. Note that you will need to clean the entire bathroom, not just the tub as instructed. Every piece of dust and strands of hair will magically settle onto the tub otherwise. Mix in part B SLOWLY to part A. Air bubbles form very easily and get on the tub, ruining the finish. If this happens the instructions say to use a blow dryer on the bubbles, but that makes the substance TACKY and difficult to work with. (Also, once the product is mixed be sure to set a timer for 2 hours, because time flies when you're stressed out, crying, and trying not to mess up this home improvement project that you thought would be a fantastic idea...) The epoxy starts to cure just before the two hour mark, making smoothing out virtually impossible.
The instructional video makes pouring and spreading look so easy! It looks like the material flows smoothly and it is easy to disperse. Nope! This stuff is thick. THIIIIIICK. Moving it is laborious and the comb only works to move giant puddles or blobs around. The comb will not work for anything else. It actually leaves groove marks in the epoxy itself and you'd think that it would smooth itself out as it settles, right? No. The epoxy appears to smooth out when in reality there are tiny ridges EVERYWHERE you tried to comb. Don't do it unless you comb first thing to get the product dispersed, then smooth it out with the yellow trowel. The yellow trowel is your savior. Curves and ridges in the tub are your enemy.
We used maybe half of the material provided. There was so much left over we thought we did something wrong...but the instructions say that the thickness should only be about 1/16th of an inch. You'll need to keep up on the epoxy pooling at the base of the tub, too. Scrape from the base of the tub up the walls and get that extra material back into the bucket. You'll do this quite a few times. Still though puddles manage to form at the base...which you can see in one of the pictures I attached. It was already past the two hour mark so that's unfortunately how it'll have to be. If this happens it's not the end of the world, just frustrating. Especially if you're a perfectionist.
Overall, the tub looks better than it did before, just be aware of what you're getting into and prepare for an entire days work. Hopefully you have a second bathroom, or a friend or family member who will let you shower at their place afterwards, because you'll be dirty and can't use your shower for at least 24 hours. Enjoy!
The instructions were easy to follow, and detailed. I recommend going to the website and downloading the pdf of the detailed instructions. DO NOT go off of the video alone. There is no dialogue, and it is extremely misleading. The hardest part will be the prep work. Our tub was previously restored (badly) by the first homeowner. There is a step in the instructions telling you to determine if your tub has been previously restored. If so- prepare for the longest prep of your life. The instructions suggest using paint stripper- easy enough- so we went to purchase some. On every can of paint stripper, however, there is a warning on the container that says DO NOT USE TO STRIP BATHTUBS. Ok...this left us with power sanding the old paint off. The instructions didn't say to do this, instead they suggested using a razor blade scraper. Ha! You'd be there all week long razor blading your tub. Not too efficient. Power sanding seemed to do the trick in just a couple of hours.
Once the prep work was complete and the bathroom floor taped up with a plastic drop cloth, we were ready to pour. Note that you will need to clean the entire bathroom, not just the tub as instructed. Every piece of dust and strands of hair will magically settle onto the tub otherwise. Mix in part B SLOWLY to part A. Air bubbles form very easily and get on the tub, ruining the finish. If this happens the instructions say to use a blow dryer on the bubbles, but that makes the substance TACKY and difficult to work with. (Also, once the product is mixed be sure to set a timer for 2 hours, because time flies when you're stressed out, crying, and trying not to mess up this home improvement project that you thought would be a fantastic idea...) The epoxy starts to cure just before the two hour mark, making smoothing out virtually impossible.
The instructional video makes pouring and spreading look so easy! It looks like the material flows smoothly and it is easy to disperse. Nope! This stuff is thick. THIIIIIICK. Moving it is laborious and the comb only works to move giant puddles or blobs around. The comb will not work for anything else. It actually leaves groove marks in the epoxy itself and you'd think that it would smooth itself out as it settles, right? No. The epoxy appears to smooth out when in reality there are tiny ridges EVERYWHERE you tried to comb. Don't do it unless you comb first thing to get the product dispersed, then smooth it out with the yellow trowel. The yellow trowel is your savior. Curves and ridges in the tub are your enemy.
We used maybe half of the material provided. There was so much left over we thought we did something wrong...but the instructions say that the thickness should only be about 1/16th of an inch. You'll need to keep up on the epoxy pooling at the base of the tub, too. Scrape from the base of the tub up the walls and get that extra material back into the bucket. You'll do this quite a few times. Still though puddles manage to form at the base...which you can see in one of the pictures I attached. It was already past the two hour mark so that's unfortunately how it'll have to be. If this happens it's not the end of the world, just frustrating. Especially if you're a perfectionist.
Overall, the tub looks better than it did before, just be aware of what you're getting into and prepare for an entire days work. Hopefully you have a second bathroom, or a friend or family member who will let you shower at their place afterwards, because you'll be dirty and can't use your shower for at least 24 hours. Enjoy!
It’s a solid 2 hour project, but the end results are awesome
Chris✓ Verified Purchase•May 30, 2023
Used this product on an old plastic shower pan. There is a smaller kit, but I got this one as my shower is "full sized" and I didn't want to fear I'd run out of epoxy during the application process. I pretty much used 75% of the kit for this project. There was a ton of prep work ahead of this to remove old caulking and wash any chemicals or dirt from the pan. We washed and scrubbed and scrubbed and washed probably 4 or 5 times after we were 100% sure any old caulking was gone. Final cleaning was with a rubbing alcohol.
After taping off the walls and drain, I put a couple of layers of plastic on the bathroom floor so that I could remove a layer periodically to keep the working area clean. Think I read this in someone else's review. This didn't work so well, it was such a mess, I wasn't about to try removing a a layer of covering in the middle of the project. When you are ready to apply, be ready to be on your knees for 2 solid hours.
Application was exactly as seen in the videos online. After 7 minutes of slow mixing the chemicals, Just put some epoxy in a red solo cup and pour it out on the edges letting it run down to the bottom of the pan. The kit came with some brushes and a yellow squeegee. I literally only used the yellow squeegee. I tried the brush once which put lines in the epoxy, so tossed it aside to use the squeegee. Way more efficient. Probably took me 25 minutes to finish the application.
The remaining hour and a half was spent hunched over the drain scrapping out the excess that flowed. I used the yellow squeegee, but it probably would have been easier with a smaller or curved device. Maybe even a large spoon. Just take it slow and scoop it out. Over time the chemicals thicken and the paint you scoop out comes less and less.
Once I was done, I left the tape in the drain and on the edges of the floor overnight while everything dried. This made it a bit difficult to remove the tape the next day. Probably should have taken it off when it was still "moist" but not still flowing. Anyway, I cut it with a razor blade carefully and it was fine. The final product is about 1/16" or more thick. This was at our vacation home, so we left the next day. The epoxy cured for 2 weeks before we returned and stepped on it. Visually it looks awesome. In an up close inspection there are a few minor flaws, but nothing that would stand out if you weren't aware. My wife and I are very happy with the outcome. Spending the money on this was a 100 times cheaper than replacing the pan by a professional. Time will tell how it holds up, but for us, it's not used daily so should be good for years to come.
Oh one other thing to add, because the shower pan is plastic, there was no need to use the etching chemical. I called the company and spoke with the owner who said that is only needed for application on a metal tub. For a plastic pan, you can apply the epoxy directly after doing the appropriate prep work.
After taping off the walls and drain, I put a couple of layers of plastic on the bathroom floor so that I could remove a layer periodically to keep the working area clean. Think I read this in someone else's review. This didn't work so well, it was such a mess, I wasn't about to try removing a a layer of covering in the middle of the project. When you are ready to apply, be ready to be on your knees for 2 solid hours.
Application was exactly as seen in the videos online. After 7 minutes of slow mixing the chemicals, Just put some epoxy in a red solo cup and pour it out on the edges letting it run down to the bottom of the pan. The kit came with some brushes and a yellow squeegee. I literally only used the yellow squeegee. I tried the brush once which put lines in the epoxy, so tossed it aside to use the squeegee. Way more efficient. Probably took me 25 minutes to finish the application.
The remaining hour and a half was spent hunched over the drain scrapping out the excess that flowed. I used the yellow squeegee, but it probably would have been easier with a smaller or curved device. Maybe even a large spoon. Just take it slow and scoop it out. Over time the chemicals thicken and the paint you scoop out comes less and less.
Once I was done, I left the tape in the drain and on the edges of the floor overnight while everything dried. This made it a bit difficult to remove the tape the next day. Probably should have taken it off when it was still "moist" but not still flowing. Anyway, I cut it with a razor blade carefully and it was fine. The final product is about 1/16" or more thick. This was at our vacation home, so we left the next day. The epoxy cured for 2 weeks before we returned and stepped on it. Visually it looks awesome. In an up close inspection there are a few minor flaws, but nothing that would stand out if you weren't aware. My wife and I are very happy with the outcome. Spending the money on this was a 100 times cheaper than replacing the pan by a professional. Time will tell how it holds up, but for us, it's not used daily so should be good for years to come.
Oh one other thing to add, because the shower pan is plastic, there was no need to use the etching chemical. I called the company and spoke with the owner who said that is only needed for application on a metal tub. For a plastic pan, you can apply the epoxy directly after doing the appropriate prep work.
Page 1 of 2
Related products


RUST-OLEUM 7860519 Acrylic Tub and Tile Refinishing 2-Part Kit, White 2 Pack
List: $133.37$120.03DEAL


