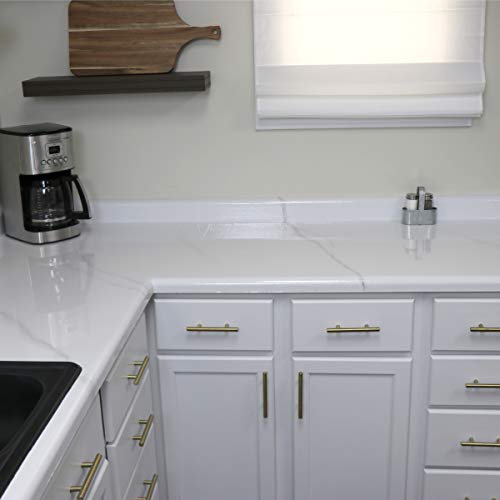
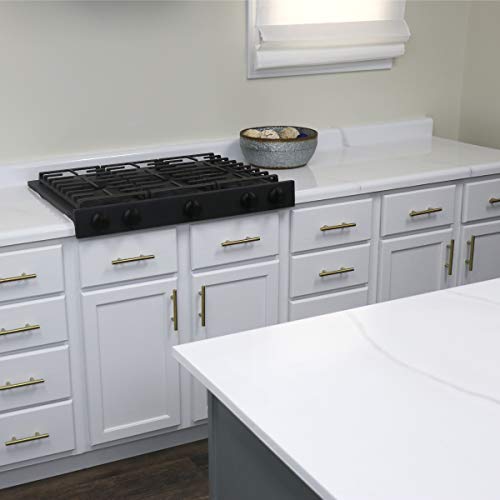
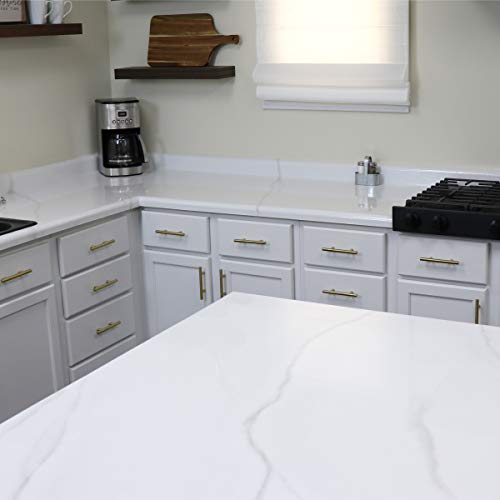
Giani Marble Easy Epoxy Countertop Paint Kit (Carrara White)


Key features
- •Giani Countertop Paint is a simple, three-step application that will transform Formica, laminate, Corian, ceramic tile, butcher block, cultured marble, and traditional granite in a single weekend.
- •Each kit contains all necessary tools and covers 35 square feet of surface, which is the average amount of countertop area in a kitchen.
- •The updated Giani Marble Kit comes with a NEW ultra-durable, high-gloss Epoxy Resin Topcoat that finishes and protects the application against the everyday use of your countertops.
- •Giani Countertop Paint is safe for interior use, very low odor, and zero VOC. The specialized primer hides existing discoloration, burns, stains, and minor scratches, while the mineral colors create the characteristics of marbled quartz
- •AVAILABLE AND IMPROVED! Giani Marble now includes our brand new Ultra Epoxy Resin Topcoat for an even more durable and glossy finish. Stain and water-resistant, and as tough as engineered quartz, this second generation of our countertop paint kit will help you remake your kitchen into the space you've always dreamed of.
BrandGiani Granite
CategoryCountertop & Tile Paint
Size1 Count (Pack of 1)
ColorCarrara White
WarrantyContact manufacturer regarding details of limited warranty
Giani Marble Easy Epoxy Countertop Paint Kit (Carrara White)
List Price: $290.93$261.84DEALYou Save: $29.09 (10%)
Free shippingFree Returns – 30 daysFree Order CancellationSecure Payment2–3 Days DeliveryGet It June 23, 2026In Stock (2)No marketing spamNo account requiredFulfilment by FedEx / Amazon / UPS / ShipwirePayPal / Card Buyer Protection
Customer Reviews
Reviews sourced from verified Amazon purchasers4.5
out of 5
Based on 10 reviews
5★
80%
4★
20%
3★
0%
2★
0%
1★
0%
This is a great and inexpensive alternative to getting new countertops
Omega Supreme✓ Verified Purchase•October 7, 2023
This is an incredible deal for less than $200 for my kitchen (basic countertop kit only). You get about a quart of primer and two small cans of color pigment for the marble look. You also get a ton of resin/epoxy, plus brushes and enough accessories to do the job; no multiple trips to the store are needed. As long as you are patient and careful, your results should come out really good. It will look even better if you have a bit of artistic talent.
Regardless of this kit, you really do need to make sure all deep scratches and divots are sanded down and filled (wood putty is the best choice). My counter is old and had already been painted over once with Rustoleums counter paint. That stuff was ok for a while but not good at all for a long term solution; it scratched and chipped easily. Just stick with this product. I did a quick sanding on the old counter and that was more than enough to scuff the surface for the primer to stick to.
I was very thorough on the sanding and filling, but once you prime over, any parts you missed will become very obvious. The epoxy coat will do a good job with gap filling so the top is smooth, but those scratches and imperfections underneath may still be noticeable. You may want to do a 2nd round of puttying after the 1st coat of primer if you see lots of bad spots. Then do the next primer coat to top it off.
You have to do 2 full coats of primer; the counter needs to look as white as possible so you see none of the previous countertop color underneath. You get 2 colors for the marble look, white and a dark grey. I ended up mixing some of the grey and white to get a lighter grey color, which helped blend and smooth things out. The grey is pretty dark so a little goes a long way. I like a more subtle marble style so I needed very little grey. I ended up using almost all the white for blending and covering spots with too much grey . I found that this kit included far more epoxy than needed. 1 can of the resin & activator took care of over 20 square feet. While the process takes time and is a bit tedious, the results do look great.
-----------------------------------
Things to take into consideration:
Hair & dust! If you can, try to tarp off the kitchen to minimize any of those particles, especially if you have pets. I had the kitchen fully closed off and still found so many hairs getting in the epoxy, so I bet everyone will have at least a few to deal with. Tweezers will likely be needed to get those hairs out.
Air bubbles. Unless you are a pro with liquid resin like this, you will likely get some small air bubbles. Instead of trying to poke them out, it is easier to use a needle or safety pin tip and do a light swirl to get the bubble to the surface. Unless you live in a sterile vacuum, expect at least a few air bubbles or hairs to get stuck in the epoxy. They probably won't show much, but still good to set your expectations properly.
If you want an ultra smooth finish with no imperfections you may want to do an extra step not in the instructions. I would wet sand with ultra ultra fine grit sandpaper (1000+ grit) Wet sanding is great to prevent excess dust. You may be able to use an orbital buffer to restore the shine after sanding, but a 2nd epoxy coat may be needed after. Either way, these steps are not necessary unless you are a bit 'particular' about perfection.
-----------------------------------
Overall this kit does what it says and does a very good job at it. That being said, you will likely spend half the money or less if you buy the components separately. The pigment colors are about the size of those 'sample' cans of paint you can get at the hardware store; about a pint or so in size. If you wanted to experiments with a pearl like tone or replace the grey with a color, then any water based indoor paint will work. This kit takes about a week to fully cure so don't put anything heavy on it until then. Even after a few days when the epoxy is partially cure, you should still be careful. This product is really good and highly recommend it.
Excellent Product!
C✓ Verified Purchase•September 30, 2023
The media could not be loaded. The only prep I did was a thorough cleaning of the surface. It was some type of dark manufactured stone. I hated it.
The most challenging part of this product is the epoxy resin. I had zero experience prior to using it. It's less viscous than you might think.
Do's:
Read some reviews and watch a few videos.
Cannot stress enough about taking your time on the final step. All of your hard work and effort will be wasted if you rush. I don't mind so much because it's such a small space and I live alone. I'm probably the only person who's going to notice all the little imperfections.
Make yourself a checklist for applying the epoxy resin before, during and after.
The kit comes with the roller and brush but any lint or other debris on the brushes will end up in your final product. Guaranteed. Remove any lint. I would suggest doing some research on the best lint free applicators for this kind of process.
Have a second set of eyes. I left a fairly large bare spot but fortunately it was not in an obvious place. The second set of eyes is very helpful for finding and removing any hair or lint in the epoxy.
Use a bright light to scan the surface. This is in the directions and is very helpful.
Do whatever it takes to keep dust, pet hair, etc from getting in the epoxy while it sets. I walked away from my countertops to watch a movie, came home an few hours later and all the dust had settled in the surface. You won't see it until it's too late. In my video you can see all the dust that settled in the surface of my counter top. The appearance is small divets or ripples in the surface. You can feel them when you run your hand over the countertop. I would suggest buying additional plastic drop cloths and taping them up in a way where it will protect your surface while it is drying. Kinda like a little clean room for each portion you're covering.
The epoxy will run everywhere. Make sure you tape and cover everything. A large puddle formed on the floor and I almost missed cleaning it up before it hardened.
I'm still very satisfied with the outcome despite the sorta hacky way I did it. I think if you take the time and have some help on the final stage you can get an incredible result without spending a ton of money.
Follow instructions work fast with the epoxy
OntheHuntforHealth✓ Verified Purchase•September 2, 2023
This is the second Giani kit I have used. I did my kitchen counters in a granite. I opted for marble for my green 1970's bathroom.
I am dumbfounded as to why in the 70's they felt that green counters, green flooring and speckled green tile was attractive. The original owner even adorned it with matching towels and hand soap. Kermit the frog would be proud.
The bathroom made my IBS flare every time I went in there. So out of desperation, I opted to do the counters and also with another product, paint the wall tile. If you are someone on a budget like me - go for it. The way I saw it was I had absolutely nothing to lose and everything to gain. So below I am going to offer you advice as a two timing Giani user - I learned from both times things you should and should not do. If you carefully follow these instructions (and read the brochure that comes with the kit), you will be pleased. So here we go:
1. CLOSE ALL VENTS IN THE ROOM your working on. If you do not do this and you keep them blowing, you will find tons of particles that lodge themselves permanently into your resin compound. You will have to enjoy lint pieces for the next several years.
2. Prep your surface. If doing a sink like mine, remove all drains and hardware. Use sandpaper even though they say you don't need to. I used a fine grit paper and it really did help.
3. After removing your sink hardware unhook your plumbing under the sink so you have a big open hole - be sure to place a box or bucket under the sink to catch drain off that seeps down the sink hole - you want it to go down there so the entire sink gets drain plug area gets covered. The drain will be your first fail spot if you miss anything. If you fail to unhook your plumbing you will be replacing all your pipes as this will go down and permanently destroy your pipes.
4. Work fast with the epoxy. Have all your tools handy and ready to go. If you have long hair, tie it back because you don't want to try and move it with epoxy coated fingers. Think honey, that is the consistency of the epoxy. Wear the gloves and buy extra's. If you miss a spot quickly go back. You've got about 15 min to make corrections - the longer you wait to find a bad spot once you go over it, it will level but may look lumpy. Move fast.
5. As your epoxy is beginning to cure, take a butter knife or a putty knife and run it under the seam edge drip off of your counter. If you do not do this you will be left with epoxy ices sickles. It will harden lumpy and with drips underneath the drip edge of your counter.
6. Look at photos of marble - and try and replicate it the way you see fit. The priming and marble effect are the easy part and less risky. Prime thick and well. Let your primer dry over night - why rush it? The more dry your primer is, the better things will turn out for you.
If you’re artistic and have any experience with epoxy, this is an incredible product!
Lacey✓ Verified Purchase•August 20, 2023
I've used epoxy a couple of times, but nothing major and I'd consider myself to be pretty artistic, but again, nothing major. This was such a fun project for me and the results are mind blowing! I have had so many compliments on my countertops! Everyone is shocked when I tell them I just painted/epoxied our old ones. Now I want to epoxy all the things!!! 😜 Well worth the money, just take your time, watch videos, have everything ready to go, and you'll be golden.
Easy enough to complete a project with
In Analogue✓ Verified Purchase•July 31, 2023
I have used other more complicated epoxy counter top systems in the past (requiring blow torches, electric mixer attachments etc.) that worked well, so I was sceptical about this product. However, I was attracted to the simple application and the fact that it requires fewer steps.
I am happy with the final result. It was simple to follow the written instructions and the company video content makes understanding the steps easy to accomplish. I was not particularly talented at painting the marble patterns, but I was satisfied enough with my attempts. Note: This process is also forgiving because you can always reapply primer if you change your mind about your marbling attempts.
Positives:
Easy to follow instructions
Minimal mess and prep compared to other epoxy systems
Marbling process is forgiving
Cost is minimal compared to other epoxy products
Negatives:
A few minor bubbles - despite obsessive prep
Likely not a very long term durable solution for many years of use
Can't accommodate tall backsplashes over 3 or 4 inches (this is declared in the instructions but wasn't highlighted)
Overall:
Was easy to apply and not as intimidating for a DIYer compared to other solutions. I would recommend for a lower cost update but not something meant for permanent use (+5 years or more). It was enjoyable to paint the marble effect and the product covered my square footage as advertised. The countertop prep, cleaning, dust and lint removal between each step is the most tedious aspect of the project.
Page 1 of 2
Related products


RUST-OLEUM 7860519 Acrylic Tub and Tile Refinishing 2-Part Kit, White 2 Pack
List: $133.37$120.03DEAL


