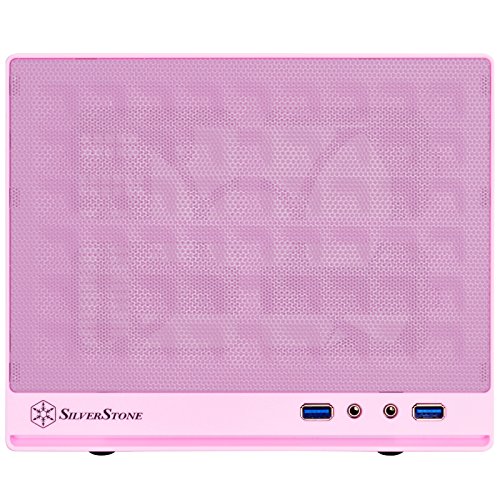
SilverStone Technology Ultra Small Form Factor Computer Case Mini-ITX in Pink SG13P


Key features
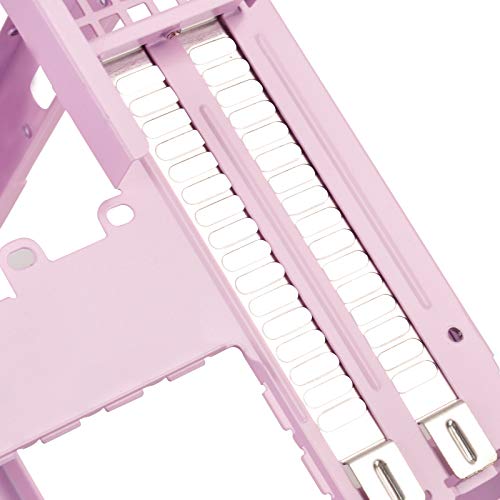
- •Support standard-length expansion cards (10. 5 inches)
- •Mini-dtx/Mini-ITX motherboard and ATX PSU compatible
- •Support 120mm or 140mm single fan all-in-one liquid cooler
- •Support 2. 5" And 3. 5" Hard drives
- •Elevated standoff for motherboard back side components
SilverStone Technology Ultra Small Form Factor Computer Case Mini-ITX in Pink SG13P
List Price: $110.68$99.61DEALYou Save: $11.07 (10%)
Free shippingFree Returns – 30 daysFree Order CancellationSecure Payment2–3 Days DeliveryGet It June 23, 2026In Stock (8)No marketing spamNo account requiredFulfilment by FedEx / Amazon / UPS / ShipwirePayPal / Card Buyer Protection
Customer Reviews
Reviews sourced from verified Amazon purchasers4.6
out of 5
Based on 10 reviews
5★
60%
4★
40%
3★
0%
2★
0%
1★
0%
Great Versatile Easy to Use Case
Issac✓ Verified Purchase•July 18, 2023
Easy to assemble and fits a full size ATX (assuming you have an AIO for the CPU). Really only spot for 1 120mm fan, but I have no issues with cooling the system as the venting doesn't trap any heat.
This is a small case at 11.5 liters which looks great. The lighting for power and drive activity is subtle and look good. No PCIe cable to deal with nor any issue with GPU sag since the GPU is vertical.
The only con is that you are limited to what GPU you use as the length of the case is
This is a small case at 11.5 liters which looks great. The lighting for power and drive activity is subtle and look good. No PCIe cable to deal with nor any issue with GPU sag since the GPU is vertical.
The only con is that you are limited to what GPU you use as the length of the case is
Carefull on the AIO cooler you get, space is very limited.
Bryan✓ Verified Purchase•June 23, 2023
Nice case but does have a few flaws.
Why have air vents where the PSU will block?
Also the front grill, if you use a 120mm AIO cooler even configured as exhaust, a lot of the hot air ends up back in the case because it doesn't sit flush/close enough to the mesh and results in it just bouncing off and back in. This MAY not occur on the larger one (which makes you lose ability for full size GPU) because the top and right side gap would be less so no place for air to go but out.
Similar could happen on intake because it's easier to pull the air inside the case around the frame vs. through the mesh and because it's not sealed in any way this occurs.
I'd have like to see the case maybe an inch taller though. To allow for oversize GPU and also help with AIO coolers better. Right now I have an H80i GT and if I could go back I wouldn't do it because the space and the required force to make it bend. Making that extra inch adjustable would be cool too. In that case you could either give more clearance to the CPU cooler, OR keep it as positioned but fit a small fan on the top for exhaust.
I've got my PSU setup so fan is facing down sucking in and out the back to try to help exhaust more. This can make the PSU get warmer but it keeps the rest of the case cooler.
I've got an 6700k (these are thinner vs. prior chips and are known to bend and break under pressure if you google it so am worried about the cooler still) and it seems to idle in the low 30's and 60's under load or mid 70s under prime95 small test (worst one for heat). I only have the one fan on cooler and have a 980 TI FTW card. I've not yet done anything to warm the card up but I suspect that will increase the case temps since not a blower style card. The card temps will probably be decent given the side vent is right against the fans almost.
Overall nice case though. Hope some of this info can help some of you.
Also FWIW I had to exchange the case once. The first case had one tab broken on the front cover when I removed it. I figured I'd just build it and not put cover on and when replacement comes just swap the covers only. NOPE, found out one of the mounts for the MB is also bent. So had to wait for a case with all the fancy parts sitting. Was a little sad for a bit hah.
Great Case With Some Caveats
Ian✓ Verified Purchase•May 24, 2023
I originally ordered the model with the faux aluminum front, but the front plastic panel had several scratches. Because I couldn't have a case with a scratched up face, and because I was disappointed by the look of the faux aluminum, I contacted Amazon and had a case with the mesh front panel sent out as a replacement.
This time, when the case came, I immediately noticed a small dent in the mesh front panel which made the panel uneven compared to the bottom border where the Silverstone logo and USB ports were located. I was frustrated, but I was still in love with the design enough to get another replacement and hope for the best.
The third case came and as they say, the third time's a charm. The third case came with no quality control issues that I could immediately see. Upon closer inspection, I did notice that the removable top and side panels did not sit completely flush with the rest of the frame, but it was only noticeable if I was looking for it.
Now that I had a case I was happy (enough) with I began the build process. I usually ignore manuals and figure things out as I go, which made things painful for building in this case, as there is a pretty specific order things need to be done in. Refer to the manual often.
After getting every component into the case, I realized I hadn't plugged in the SATA and power cables into my SSD which is located at the bottom of the case under the CPU liquid cooler fan and video card. I had to remove these components to connect the cables, then reinstall them. After these were installed, I installed my power supply. Then I realized with the power supply installed, I had no access to the motherboard power connectors. So I uninstalled the power supply, plugged in all cables, then screwed the power supply into place (I recommend installing it with the fan facing down to provide some airflow to the motherboard and RAM. After this was done, I did some cable management to try and tidy things up a bit. The last part was installing the top 3.5 inch hard drive panel. I could not get the panel holes to match up to the holes on the frame to screw it in because the power supplie's modular cables stuck out too far. The hard drive in secured to the panel but the panel is not secured to the case. I only have to worry about this if I am moving my case, which I rarely ever do. If you get a shorter power supply (mine is 140mm), you may not have issues.
Overall, I'm very happy with the end product, as I was able to fit a liquid-cooled 4670k and reference GTX 780 in a very small enclosure. I realized the build process would be painful because the case is so small, so I won't take of any stars for that. I will also not take off any stars for the hard drive panel not lining up with the holes, as my power supply caused this. I will take off one star for the quality control issues I experienced, but I am a very picky person, so you may not have the same problems.
If you're the type of person who needs things to work the first time around and can't afford to put time into your build, this case isn't for you. If you are more concerned about aesthetics and are willing to work through a few problems to make sure your computer looks good and performs well, the I can easily recommend this case.
Pretty good case
James✓ Verified Purchase•May 4, 2023
I got this pink case as a gift because it's nice and small. It's pretty good all around except for the limited airflow options.
However, some front panel wires on mine were damaged because whoever assembled it tightened a ziptie too tight around them. I had to splice 2 of the wires.
However, some front panel wires on mine were damaged because whoever assembled it tightened a ziptie too tight around them. I had to splice 2 of the wires.
A tight fight, but has some breathing room with proper cable management.
Earl Jay O. Caoile✓ Verified Purchase•April 20, 2023
Before getting into the review, here is my build:
Intel Core i7-4770K Quad-Core Desktop Processor (3.5 GHz, 8 MB Cache, Intel HD graphics, BX80646I74770K)
Corsair Hydro Series H80i v2 Extreme Performance Liquid CPU Cooler, Black
MSI Mini-ITX DDR3 LGA 1150 USB 3.0 + SATA (6Gb/s) Motherboard (H81I)
Corsair Vengeance 16GB (2x8GB) DDR3 1600 MHz (PC3 12800) Desktop Memory 1.5V
Samsung Electronics 840 Pro Series 2.5-Inch Solid State Drive, 256GB
Seagate 6TB BarraCuda Pro SATA 6Gb/s 256MB Cache 3.5-Inch Internal Hard Drive (ST6000DM004)
Gigabyte GeForce GTX 1060 Mini ITX OC 3GB GDDR5 Graphics Card (GV-N1060IXOC-3GD)
SilverStone Technology Platinum Certified Single +12V Rail ATX Power Supply, PS-ST55F-PT
I decided to take my old full tower build and fit as many parts as I could into a mini-ITX build. Clearly an ATX motherboard wouldn't fit in here. The MSI motherboard is fine, but I do have a minor annoyance with the layout. The front audio cable has to go all the way to other side of the case. I did have to get a new power supply because the old one (Corsair AX760) was too big. The PSU I got instead is adequate since it's 180 mm x 140 mm versus the standard 180 x 160 mm, but the cables are longer than I'd like them to be. An SFX form PSU would save a little more space, but you need to buy an extra mounting bracket for it. Low profile RAM would have saved even more space, but I wasn't about to buy more old DDR3 ram when mine still works fine. If I were feeling froggy, I would have taken off the heat spreaders.1
Installation was honestly a little frustrating but kinda fun at the same time. I had to put the build together and take it apart several times to figure out an optimal setup. Since I have a mini-ITX video card, I had space in the corner to cram excess cabling (looking at you, Silverstone PSU). I also had some space to put some of cables to the side of the video card as well (see 3rd picture).
Part of me wants to give this case 4 stars. There were tiny scratches on the front of the case, and I ended up creating more scratches while trying to install everything. That was partly my fault, though. Also, the right blue LED that shows up on the bottom front of the case came loose, so it doesn't look as bright as the left LED. That could have also been my fault when I was pulling out the front panel during installation.
I included a screenshot of my temperature range using RealTemp 3.70. Be sure to test your temps under load and also long afterwards to see if your build is properly getting rid of the heat. I actually had the fan in the wrong direction because I was going with the setup shown in the H80i v2 manual. It doesn't work the same way for this setup. You're trying to get rid of the hot air, not push it in. You are also limited to one 120mm fan. My PSU is also oriented with the fan facing down to blow cool air under load. You can't do that with air cooling solution that would have a fan typically blowing air up; therefore, I would recommend AIO liquid cooling.
If you're willing to be patient, I would highly recommend a mini-ITX build. When Ryzen and Vega come out later, I will probably keep this case and change out a few parts. For my purposes, there is no need for anything bigger. If it weren't for the AIO liquid cooler, I could probably get away with bringing it as a carry-on and traveling abroad.
Page 1 of 2