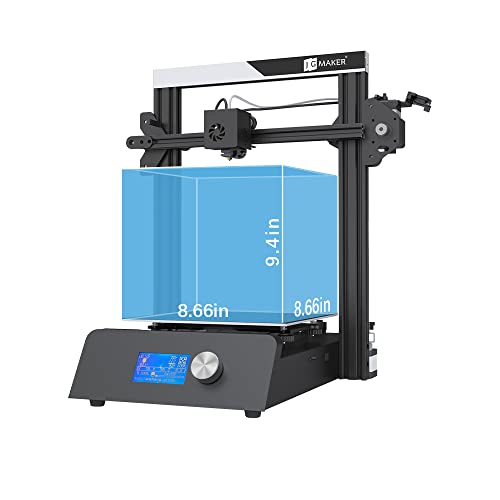
JGMAKER Magic Upgraded 3D Printer DIY Kits Fast Assemble Open Source with Metal Base Resume Printing Filament Sensor Function 8.66x8.66x9.4inch ABS PLA 3D Filament DIY Lover Home School Use


Key features
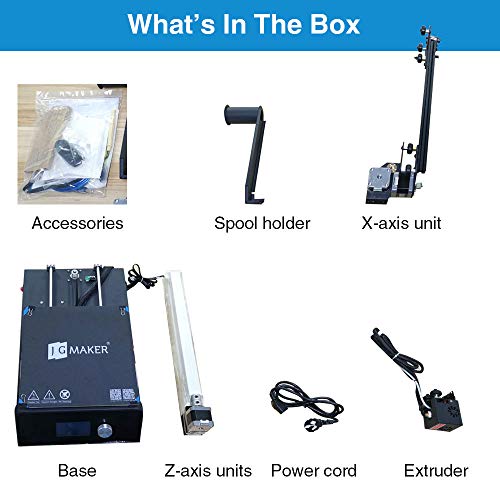
- •FAST ASSEMBLE: New Magic comes with three module, only base, Frame and filament spool, total assembly of the machine can typically be completed in under 20 minies
- •METAL BASE and Dual Polished Rod: Use sturdy new frame and One-piece metal base, equiped with dual Polished Rod, which can print more accurately model
- •RESUME PRINTING: printer has filament sensor and power failure detection, when the filament used up or there is a sudden power failure, it can resume printing.
- •Auto Feed Filament and SD card hot plug in: only first time you need manually send the filament to the nozzle, then you can automatically feed and retreat through the operation screen
- •Safey Printing: Use build-in power supply, the heat bed temp reach to 100℃ within 5 minutes
JGMAKER Magic Upgraded 3D Printer DIY Kits Fast Assemble Open Source with Metal Base Resume Printing Filament Sensor Function 8.66x8.66x9.4inch ABS PLA 3D Filament DIY Lover Home School Use
List Price: $261.89$235.70DEALYou Save: $26.19 (10%)
Free shippingFree Returns – 30 daysFree Order CancellationSecure Payment2–3 Days DeliveryGet It June 23, 2026In Stock (2)No marketing spamNo account requiredFulfilment by FedEx / Amazon / UPS / ShipwirePayPal / Card Buyer Protection
Customer Reviews
Reviews sourced from verified Amazon purchasers3.9
out of 5
Based on 10 reviews
5★
40%
4★
60%
3★
0%
2★
0%
1★
0%
Good but hard to level the bed
Jamie✓ Verified Purchase•October 28, 2023
I'm a 3D beginner. This is my first printer, and technically i got it for my kid but he never uses it. I've waited a while to review. It was a Christmas gift. I've printed several things and I'm still far from great at it but it's taken me this long to get the bed to where it's pretty level. It's finally not having super thin spots on the bottom layers. I'm sure it'd be easier if I knew more. But it works well overall. I'm happy with it and the price I paid for it. It's easy to use as far as printing goes and the assembly was easy as well. I'd say if you're new and wanting to see if you like 3D printing without spending a ton this is a good one to try
Huge bed, great quality print, not exactly novice friendly.
Rita Brouillette✓ Verified Purchase•September 24, 2023
The media could not be loaded. I am brand new to the world of 3D printing and this is my first 3D printer. After doing a lot of research into different printers, and reading many reviews I decided on the JGAurora A5S as many reviews indicated that it was good for beginners while also providing a good quality print. From what I can tell in the short amount of time that I've had it, the following are my observations and experiences.
The printer arrived packaged well, in a sturdy box encapsulated in form fitting foam. Everything was well protected and in good shape when I opened the box. All of the parts were there and there was a sheet included to walk me through the process of putting it together.
The assembly was not difficult and I had it put together and turned on within 30 minutes. There was an SD card and USB stick included, which I was then able to use to install the JGcreat slicing software and look through a user manual (although, the user's manual only covers assembly - it does not actually give any guidance for actually using the printer, which at this point is my biggest complaint and the reason for 4 stars instead of 5 - coupled with the additional difficulty I've had in operating the printer).
While installing their software on my computer I was asked to select my printer model from a dropbox so that it could auto fill some parameters for slicing and printing, however there was no option for the A5S and I instead had to select the older A5 model. I'm not sure if this is leading to some of my printing issues or not, as I'm so new to this hobby and admittedly don't understand yet what all of the parameters mean or what settings should be used.
I was able to print the included test piece from the included SD card within about 12 minutes and was very impressed with how it turned out. I was excited to try printing additional pieces, but unfortunately, I have not been able to get the machine to print anything other than the test piece from that original SD card.
I tried downloading multiple (4) different files from Thingiverse that seemed to be pretty simple prints (2 different filament clips and 2 different playing card holders). I downloaded them with the JGcreat software, sliced them and saved them to the SD card as .gcode files and attempted to print. This is where things went wrong. The printer recognized the files, allowed me to select them to print, but then wouldn't print. The bed and nozzle heated up, the print progress went through from 0% to 100% and said print complete, but it had not moved at all or actually printed anything. This happened with each file that I tried. Sometimes, instead of the previous issue, the printer would not heat up at all and would just continuously count up as if it were in the process of getting ready to print, but would never do anything beyond count up until I finally pressed cancel (I waited as much as 30 minutes). It's certainly possible that I'm missing a step as, like I've admitted, I'm completely new to this, or it could be an issue with the software (I don't know if having to select A5 instead of A5S is causing an issue) but I have no way to troubleshoot or know what is wrong since there is no user manual to give me any guidance.
Additionally, I downloaded Cura version 4.0 and attempted to print each file using that software instead of the JGcreat, and received the same results. Overall, although the printer was easy to assemble and get the test print going, I would argue the point of it being good for beginners. It seems that you are expected to already have a great deal of knowledge on both the process of 3D printing and the mechanics of how these machines work and the software required. I expected that I should be able to print ready made files and then learn the process of creating my own over time, but it seems that there is a lot to learn before you can even really get started on a novice level.
I will say, their tech support is very responsive. I found a facebook page for users of JGAurora printers and explained my problem, asking for guidance and received replies both from other users and from a member of tech support at JGAurora. I will try to go through the suggestions I've received and do lots more research on the process until I am able to get it going.
Overall, I do think this is a good printer, I just wish it were a bit more user friendly for beginners and included a user guide to explain the settings and walk you through actually using the printer and software that's included. I'm optimistic that I'll get it figured out with the help of tech support and still would recommend this printer, with the caveat that you really need to be willing to do a lot of research on your own and have a solid understand of the 3D printing process before getting started.
Not bad for the price
OneEffGeof✓ Verified Purchase•September 24, 2023
I'm not a beginner at 3D printer and certainly not an expert but here are my thoughts. General construction quality is very good. It has a nice stable frame and the LCD panel mounted in the front lessens the number of wires I'm used to seeing but it still has several dragging around during the printing process. The instructions were a little confusing because a number of the construction steps had already been done at the factory (a good thing) but confusing nonetheless.
The position of the Z end stop switch has to be adjusted so the extruder nozzle doesn't jam into the bed. I found this out the hard way and there are no cautions in the instructions on how to avoid this. A simple line such as "Mount bracket 1/8" above lower frame" would have been nice or words tp that effect.
The SD card came in a smashed holder/case that someone at the factory taped up with shipping tape. Too cheap to give me one that wasn't wrecked? I guess so,
If you watch some of the videos on YouTube on unboxing and building this printer, there many differences that will become apparent when YOU build it but nothing to get in a dither about.
I really HATE the build plate platform. If you are going to print relatively thin prints (like 3mm or so) as I do, removing them is impossible. Even the 'sample' recipe that came on the SD chip was destroyed when I tried to remove it with Vice Grips! Though the printing surface can be removed from the aluminum base and flexed, my prints stayed put. I ended up ruining it in my attempts to get my prints off in one piece so I ordered a more standard build plate material.
The owner's manual is included on the SD chip (though some YouTube videos show hard copies included with the machine (mine didn't) as a PDF file along with an ancient version of Cura ( a slicing program to you need to make files or recipes that the printer can make) which is probably better left alone. Download the latest version which is free. Again, YouTube has dozens of videos explaining how this slicer works and the tweaks you can use to improve your prints.
A Real Point of View and Some Instructions for New Buyers.
Michele Pridgeon✓ Verified Purchase•September 11, 2023
Let me start off with saying I've been doing 3d printing for a long time now. I bought a Makerbot Replicator 2 when they first came out if that gives you any idea. So I've been in the game of 3d printing for quite some time.
I bought this printer for my wife who is going to be doing some crafting and I wanted her to have her own dedicated printer. So I wanted to get one that would be easy enough for her to handle but yet had all the features I like to see in printers now. So lets jump right into the review.
Packaging was great, and was double boxed from Amazon so thats always a plus. Tons of Foam holding everything in nice and tight. The skill of how the shrink wrap was done is amazing and everything required a sharp knife to open up (thats a good thing). After verifying all the parts they do even include a Spare parts bag in case you lose a T-Nut or screw which is very handy. It also comes with this little spatula and some test filament. My advice.. don't use the test filament. The stuff that came with mine looked like it had seen better days. If you don't have any filament then you will need to buy a spool. Hatch Box is one that's got a lot of Amazon Choice picks and works really good. Tons of reviews and prints really nice and its good for someone starting out since its not very expensive either.
Assembly was easy, don't bother with the instruction sheet they give you, but instead just do the instructions off the SD Card thats included, you can zoom the PDF. The SD card reader they give you is for standard SD Cards and they give you an SDHC card that it can't read so be prepared for that. Save some of the larger foam blanks from the packaging trust me you'll need it! There is a part where you would basically be setting the print head down directly onto the build plate DON'T DO IT. Set it on the foam instead of the build plate. You'll thank me later by not having to replace the nozzle.
In the install instructions they want you to use their config profile in Cura which locks the printer to no more than 30mm/s (thats pretty slow btw) for all movements.... However after playing with the software on the board I found that it can go all the way up to 80mm/s for printing and 100mm/s for just basic movements without extrusion. I tested it with a print and it worked granted going at full 80mm/s didn't result in the best quality but it worked just fine.
I would recommend the default profile settings in Cura at 60mm/s as a good balance it runs smooth and doesn't take 4 days to print something of average size and the printer seems to handle it just fine. One HUGE thing, do NOT use Z Hop setting from Cura. It locks up the board and it has no idea what to do with that instruction and makes the printer freak out. I almost had to replace a stepper motor and a nozzle because of it.
They include a removable build sheet (some call it a plate) thats a direct knock off of BuildTak, but it works good. They call it "Magnetic" its not, and has no magnets or metal in the removable build sheet. Plus the heat bed is aluminum. I'll let that sink in your brain for a moment. No issues with layer adhesion if you use it but it does pickup oils from your skin really well and that can cause problems. Using gloves is a good idea because then you can pickup the prints off the hot bed and pull them off much easier when they are warm. The cold plate is a pain to pull single lines of scrap filament off of. I have an old pair of grey leather bargain bin gloves (farmers gloves) you can get pretty much anywhere and they work perfect on protecting your hands from the heat.
You can use blue 3M painters tape but for anything big forget it. Small stuff its fine with but large stuff it has issues with it for some reason. Also don't use the tape if you heat the bed above 60c because all your doing is cooking the tape and its no longer effective.
Bed leveling is really easy on this, There is basically no detailed instructions on how to do it so here are your instructions. If you have dealt with printers before then you know this process and can skip the next paragraph.
With the printer off tighten all the screws on the build plate (large knobs) A LOT. Remember, righty tighty lefty loosey.
Once you think you have them down far enough turn the printer on.
Select Prepare / then Auto Home.
Once Its done then select Disable Steppers.
Get an index card, any size. Make sure the print head nozzle doesn't come into contact with the build sheet. If it looks like it will then tighten the 4 knobs more until it clears it.
Now move the print head nozzle and the print bed so the print nozzle is above 1 of the knobs. Slide the card between the nozzle and the build sheet and loosen or tighten the knob until moving the card feels a bit "snaggy" or rough. You want it to lightly snag not feel like 100 grit sand paper. Do the same to all 4 corners above the knobs. Do this until all of them feel they have the same level of resistance. Make sure you can still move the card completely out from under the nozzle and are still able to slide it between the build sheet and the nozzle without it ripping or tearing the card.
Auto Home the printer again and your done leveling and ready to print.
All the Resume print on Failed for (insert whatever reason here) kind of sorta work... some times it will repeat the same layer it was on which can cause problems. Other times if it had to resume the print more than 2 times it wouldn't or the printer would start acting weird and printing where it shouldn't be.
We do have a small design flaw in this printer. It is on the Filament feed for the "filament sensor", its tipped downward at a 45 degree angle. To fix this, bend the support up to a full 90 strait up and down so the filament sensor is level. Then you'll have no feed issues with 1kg spools. It does work at a 45 but is a really tight bend if you have a full spool on it and causes the filament to bend very aggressively. I had to put a spool that was half used on it to get a good print out of it. First print with a brand new spool snapped the filament in half before the sensor due to the angle it was having to bend. If you don't want to bend the metal or are not strong enough for that, then look at printing a stand alone spool holder and remove the one it comes with. There are tons on Thing-a-verse that will work.
So now to the ratings.
Price: 5/5 ( I got it on Amazon Prime day at $179) non-sale I would call it a 4.5/5 comparing to other printers in the same price range. Compared to my Makerbot its a 20/5 since my Makerbot was a little over $2500 at the time and I've had to mod it and tweak the settings so much to get the same reliability of prints this can do.
Assembly: 3/5 I give it this rating only if you never bought or built a printer before. For some one who has its a 5/5. There are common sense things thats not said in the instructions that you would know if you've been around these printers before. Like, don't let the print nozzle rest on the built plate while your screw it together kind of stuff. The instructions are pretty decent for a product like this (which I do honestly give props to them on this) however you still have some areas where you just have to figure it out. However if you've ever put together anything from IKEA by just looking at pictures then you're going to be just fine.
Print Quality: 3.5/5 (I gave it a 3 for Amazon due to they don't do half stars). Only reason for this is because if your PLA filament is good in any other printer at 200c you'll need to run it at 210-212c in this one to get the same quality (my printers room temp is about 74F). I have a feeling the thermal settings are a bit "off" on this printer or the quality of heater they use is on the cheap side. It honestly could just be mine, but after adjusting the temps it was 4/5. It does maintain the temp you set it to very well but you do have to play and tweak with the temp settings for your print a bit to get the best quality. I still had some errors in the print and it was not 100% perfect but it was still a good quality print I would be willing to hand to a customer. These tests were done at 0.2mm layer height (see picture).
Side note 1 on printing: We only use PLA and don't use ABS or PETG so I have no information on how well it is able to print those other filaments. The area in which our printers are in is vented but not well enough to IMO safely print ABS or any other material that might off gas toxins when heated.
Side note 2 on printing: To secure the removable build sheet they give you binder clips... Here is a tip, only use 2 on the very back and 2 on the very right side of the build plate. Anywhere on the left side or the front the print head can collide with the binder clip during normal travel and bad things happen from there on out. You can use tape to secure the build sheet as well but its not as stable.
Reliability: 2/5 Yeah, this ones a low mark. I've already had to re-initialize the firmware on the board 2 times due to weird errors. I had an error of "Bed Heater Fail" and I power cycled it 4 times and still wouldn't work. Re-initialized the firmware and bam its back to working so there's a bug somewhere in the software on that one. The board is a pretty generic board so I may replace it if it continues to have errors. Hardware-wise once its off and printing its rock solid. Just make sure you put a UPS (battery backup) on it so that you don't have to deal with weird power outage resume glitches because I wouldn't trust the resume function to work 100% every time.
Remote printing with OctoPrint: 5/5 Had zero issues setting it up and it was off and printing within 10 minutes after adding the OctoPrint Plugin for Cura. It really works well with it. Also just to note, the Raspberry Pi 3 B+ is able to power the control board without the main power on. When your Pi is plugged in make sure your main power to the printer is turned on as well. Otherwise unplug it from the Pi when you turn the main power off.
Things to consider: This printer comes with a main board that has no power surge protection at all. If the printer is off and you move a stepper motor, it will light up the board and surge power to it causing the LCD to light up. In my experience, this is normal for the cheap boards. Just be aware when moving steppers with it powered off. Also this printer doesn't keep a memory of where its steppers positions are. So before you do any function on the printer at all that the printer it self is going to move a stepper in anyway always auto home it first! In octoprint you can do this by using the terminal and sending the command G28.
Overall I consider this printer to be a good buy and if I come across needing another small format printer I would more than likely pickup another one of these. They are quirky little printers but the cost is cheap enough to deal with any odd quirks.
Very capable and affordable 3D printer but it's not perfect plug and play.
Timothy K Knechtly✓ Verified Purchase•August 20, 2023
Very affordable 3D printer however, this is a kit that requires careful mechanical assembly. All electronics are preassembled. The supplied cables to connect the various assemblies are preassembled and seem to be perfect.
I didn't even try to follow the printed instructions because they are not very complete, and the print is tiny as someone previously noted. I used the " Magic User Guide FINAL.pdf" on a laptop computer that I placed specifically in the assembly area so I could follow the instructions precisely. This file was on the supplied SD card. It provided detailed instructions in perfect English (not in the usual terribly-translated from Chinese to English) and was capable of extreme zooming-in to view details when the detailed instructions presented precautions of incorrect assembly (the vertical aluminum pieces really should have been labeled as left and right as their holes are different). If you use the wrong part you'll have to take it apart and switch around the parts. They tell you that but they don't really tell you exactly what is different between the parts. Cable routing requires great attention during assembly. A video shows cable installation error results if you don't catch the detailed precautions at the extruder (failure to place cable in the cable clamp on the extruder as an oversight). Also, you must use extra cable ties to make it look like it does in their other videos otherwise the cables might hang up during movement. Cable ties are provided but you're not told where to put them on the printer in the manual. Obviously, all cable placements and paths need to be considered for bed and extruder movements in the various directions during assembly and in final placement. If you are going to put it in a cabinet you should allow extra space for bed cables to move freely.
After much research I am convinced that most people looking at these in this price range are doing this as a hobby or have significant prior experience using completed 3D printers. With absolutely no prior experience I (a retired, disabled veteran and senior citizen) purchased it to print what I consider to be unusual highly practical things: adapters for hoses, 12 to 16 gram CO2 cylinder adapter, caps for tubes of sealant/glue, boxes for electronic projects, and the like. No vases, art or toy projects just to prove I can print them.
I had little idea how it should look when completed or how to adjust it and start printing because I had dismissed 3D printers as very expensive and impractical when I first saw them at Microcenter many years ago and had ignored them ever since. Prices have dropped dramatically over the years since introduction and you can print a myriad of things at a reasonable price.
I knew it would interface with my Windows 10 computer but it wasn't easy. In case you are wondering yes, you can print from up to a maximum 32GB SD card (or yes, it works with a micro SD card with adapter) without using the computer connected directly to the printer. And, yes, you can find many items ready to print from the internet. If you want to design your own items, you can learn CAD and print your projects with this printer.
This printer is not directly supported in Windows 10. Once connected to a Windows 10 computer, it only shows up in Windows Device Manager under Ports (COM & LPT), USB-Serial CH340 (COMn) which is actually only the interface from the printer's computer TTL to the PC USB. Windows 10 automatically loaded the correct driver but if you're using an older version of Windows you might have to hunt down the drivers on the internet. It DOES NOT show up as a Windows printer even though the latest update to Windows 10 adds support for some 3D printers. This means you can't use most Windows 3D applications (apps) and you can't share the printer with your other networked Windows computers.
I found it worked well with the included JGCREAT Windows software that was supplied with the printer kit on an SD card even without having to specify which Com Port the printer is connected to. Unfortunately, after each print is complete the JGCREAT application must be closed and reopened with the next project. It works OK through a very long USB cable on either USB 2 or 3.0 ports.
Bed leveling must be done to print successfully. JGAurora3d has an excellent video showing the procedure however, I still haven't mastered the positional controls from the printer. Apparently I can't tell it to position for adjustment from Windows. I did manage to position bed height from the extruder at the proper height with the on printer controls then I carefully moved the extruder head and the bed around to all four corners and adjusted height with the adjuster wheels using copy paper as a feeler gauge.
It works. You don't need "build plate adhesion" in JGCREAT. If you use it you'll have an awful time getting the thin extra edges off the build surface. Trust me on this.
Upgrades? Sure. I've ordered several magnetic build plates so I can swap them out easily. Adhesion is fine with the heated bed and PLA filament. You won't need painter's tape (that blue tape) or some kind of high temperature tape and certainly not hair spray to get your parts to stick. The bed is true, so I don't see the point in getting a glass bed surface for now.
Page 1 of 2