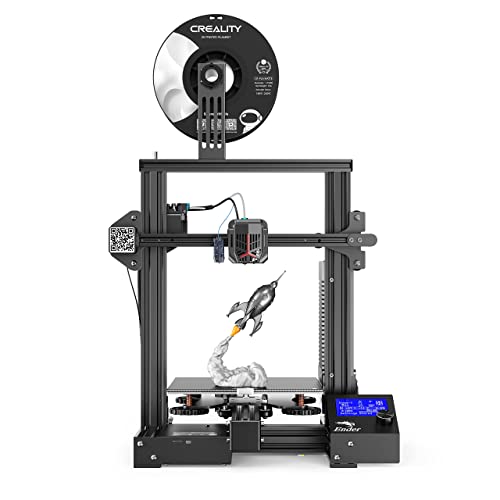
Voxelab Aquila C2 3D Printer with Improved Alloy Frame Structure,UL Certified Power Supply,Removable Build Surface Plate, Fully Open Source and Resume Printing Function,Printing Size 8.66x8.66x9.84in


Key features
- •Improved Structure with Safe Power Supply: The lightweighted new structure made Aquila C2 easier to carry and operation, also it comes with a UL Certified power supply, protecting your printer from unexpected power surges, that can heat the hot bed to 110℃ in just 5 minutes.
- •Resume Printing Function: Aquila 3D printer could automatically resume printing when power comes on. It won't print from scratch once meeting filament breakage, saving time and avoiding waste.
- •Semi-Assembled Kit: The easy-to-setup kit comes partially assembled, enabling you to learn about the basic construction of 3D printers as you finish putting it together.
- •Fully Open Source: Aquila is a straight forward BD printer based on open source technology. It allows for flexible upgrades and various modifications. Meanwhile, you are able to choose your favorite software as VoxelMaker, Cura and more...
- •Warranty and Service: All Voxelab 3D printers provides Lifetime technical support and 12 months warranty, with 24 hours quick response.
Voxelab Aquila C2 3D Printer with Improved Alloy Frame Structure,UL Certified Power Supply,Removable Build Surface Plate, Fully Open Source and Resume Printing Function,Printing Size 8.66x8.66x9.84in
List Price: $232.79$209.51DEALYou Save: $23.28 (10%)
Free shippingFree Returns – 30 daysFree Order CancellationSecure Payment2–3 Days DeliveryGet It June 23, 2026In Stock (1)No marketing spamNo account requiredFulfilment by FedEx / Amazon / UPS / ShipwirePayPal / Card Buyer Protection
Customer Reviews
Reviews sourced from verified Amazon purchasers4.2
out of 5
Based on 10 reviews
5★
50%
4★
50%
3★
0%
2★
0%
1★
0%
So far, Im fairly happy with this purchase.
Grumpy Dad✓ Verified Purchase•August 28, 2023
We are completely new to 3d printing.
The box clearly shows what it is, but doesnt have alot of glamor to it like a retail box would. Which is fine. It is well packed however.
When you take everything out, be careful with things connected to wires. Lay everything out and then go watch the video over and over and over. There are little things not listed in the video, like mountain the limiter where the print head raises up and down the tower sides of the printer (I think called the z axis). You can adjust this so that when you level your bed your print head actually almost touches the bed.
For the life of me I couldnt get the print head close enough adjusting the bed. The wheels would fall off and I would still be far from touching the bed with the print head. Until I realized you could adjust that z axis limiting switch, set the bed to about mid way level between the two knob extremes from totally raised or totally lowered, then hit home and it will be much closer. Now you can use the knobs to fine tune the bed adjustment.
Onto the bed. Im not SUPER happy with this setup. I have to readjust every time. And when you do one adjustment and just bump the bed, it goes out of adjustment. Ive heard better springs help. You may also notice like me that when you adjust all four corners to the point that paper slides through fairly easily under the head and the bed, that when you go to center the head is UNCOMFORTABLY close. In fact once when we started a print it scratched the bed glass a bit. So that makes me worry about large prints, how well it will adhere to the surface.
I thought maybe I was making a bit to do about nothing, but that isnt the case. I didnt relevel for the next print a couple of days later for something that covered the center and only about 1/8th of the total size of the bed, and my first couple of layers were all messed up.
So the bed really needs some help honestly.
We had NO problem with the auto feed.
And most important, we are printing some really nice stuff. Ive seen people print benchy and show their pride in their prints, most of which you can really see lines that arent lined up super perfect. Our benchy was absolutely perfect. It still amazes me that it could print openings without supports! The words on the back and bottom were difficult to see, Im not sure why when the rest of the ship looks so great. We also printed a baby yoda with zero supports, and it somehow printed the hands fairly well (including fingers!)
Also I should mention when we start up a preheat, we hear this fan noise and a loud buzzing/rubbing sound that goes away after about ten seconds. I also heard some whinning when the z axis goes home for the first time. It made sure it was perfectly straight when installed so, not sure if that needs grease or?
I should also mention that one of the pieces of metal that are used to mount the xaxis to the arm, was bent on the end. But it looked like it was by design. It took me about an hour watching videos and posts from people putting this together to realize this should have been. So I had to take this out into a vice and hammer it straight, then screw it tight which seemed to make it seat well. But that was a major OH CRAP moment, and I thought we were taking this xmas present back which would have been a real bummer.
One more annoyance that I can't get my head around. The printer estimates the time remaining, but is about as accurate as the federal government on managing anything. One minute it will say 7 hours remaining, then another it will say 9 hours, then 13, then 6. It's all over the place. You really cant trust it until it's almost finished and even then, not.
I should also note it took a LONG time to print our benchy, more than what most are reporting from what I can tell. So without knowing much about printers Im not sure whats going on or how to test if we have something wrong. All I know is it prints what it printed so far really nicely, with some pains on leveling the bed every time. And for the price, what a great way to get into the hobby. BUT, I dont know that I will have the patience to print something for 12 hours that is so small.
Perfect for beginner or more advanced.
Amazon Customer✓ Verified Purchase•August 21, 2023
This is my first printer. I got it about 3 months ago.
Researched it on YouTube because the price was so good. It had great reviews from qualified experts.
YouTube also has many great tips and about everything you need for this exact printer. With a pretty responsive community you can ask questions to they will answer fast. Great for beginners, and free extra ;-)
As a beginner this has been a very consistent machine. Super durable with good quality components (especially for the price) and very forgivable as you might trouble shoot as you run into problems along the way.
It's prints almost every kind of filament I know about. I haven't tried very advanced filaments and probably wouldn't have a reason to, so I don't know if it has limitations there.
The digital display is very nice and straight forward. And the included models and software are flawless with it on a good micro SD card included. The software is actual good free software, not like a cheap proprietary brand that might come with other printers. So you can find a lot of resources online for the Cura exporter. There are millions of free useful models online to download and help get started as well.
Being my first machine I really took my time setting up so that took maybe 2 hours? It comes with every tool you'll need for setup and maintenance. The instructions were ok but there were much better user provided videos online that helped walk through each step.
After setup I was literally printing in 15 minutes! And almost nonstop since.
It does come with a decent amount of filament that will do a couple prints. I also ordered a $20 roll of also Voxelab filament which has worked pretty good. It's not the best filament I've used since, but you basically get any good Star rated filament to work with at decent price. So that's easy and nice. Filament also lasts a lot longer than you expect over many prints.
Other notes: prints can actually take a lot longer than a beginner might think especially depending on size. Even what you might think. It's a patient sport lol, not like sci fi movies with a quick easy button. Simple small projects can easily end up being 8 hrs+
I've heard of people printing one object that will take 3 days.
You will fail a lot at first, and can get frustrated, but you'll learn to work through those things and learn along the way, with lots of great resources. Just be warned. You'll also succeed more than fail and make really stuff.
Not everything comes out perfect either as in you might have to do some sanding etc depending on what you want final results to look. It's not a limit of the machine. It's just the nature of PLA filament printing. Even for professionals.
Also this is not really the type of machine that could excel at doing detailed miniatures like they use in gaming. That would be more for the resin printers. The two types of platforms can have a lot of cross over though, and I think you can do a lot of stuff those don't do. But PLA can just sit in your office no fumes etc. Resin needs good ventilation, safety equipment and is messier. Just differences of notes for expectations.
Good Luck and have fun!
GREAT BANG FOR YOUR BUCK
Cappy✓ Verified Purchase•July 29, 2023
I strongly recommend the Voxelab X2 to anyone wanting to get started into 3D printing. I purchased an Ender 3V2 for my first printer in July 2021. In Sept 2021 I purchased the Voxelab X2 . The X2 is almost identical to the Ender 3V2 and is $50 cheaper, plus it has some features the Ender 3V2 dosen't have. The Voxelab X2 comes with an automatic Filament Feeder and a Color Display . The Ender display is not color and it's harder to read if you are not directly in front of it. The Ender has a storage drawer for your tools that the Voxelab X2 doesn't have, but the Automatic Filament Feed & Extract feature on the Voxelab X2 far outweighs the storage drawer for me, and I really like the easier to read display on the Voxelab. The assembly of both printers is about the same. They both come about 80% assembled and both come with all the tools you need to complete the assembly. The assembly instructions require your attention and should be followed carefully. Look at the diagrams, read the instructions, and don't jump ahead of yourself or you will be disassembling and re-assembling. The Voxelab X2 came with a bag of EXTRA screws (labeled EXTRA Screws) plus there were additional extra screws in the individual bags labeled for each step of the instructions. Both printers came with a small amount of filament so I recommend you purchase additional filament when you purchase your printer.
I did my first print on the Voxelab X2 (see Photos) and it was the TEST print provided on the 8GB Micro SD card supplied with the printer. I spent about 15 to 20 minutes leveling the Bed, which is the key to a good print, and my first print on the Voxelab X2 came out GREAT. The automatic filament feeder works great, and I even tried the automatic filament extraction feature and was very pleased with the results. I really think that for the price the Voxelab X2 is a great way to get into 3D printing and would recommend it to anyone considering their initial forage into the 3d printing world. For the approximate $50 difference in price between the Ender 3 V2 and Voxleab X2 the Voxelab X2 is the winner by far. The quality of both printers is very good and they operate the same. It's hard to tell one from the other sitting side by side and the Voxelab X2 has additional features the Ender 3 V2 doesn't. Both printers provide you with extra 0.4mm print Nozzles and other items so there isn't a significant difference, other than the price, between the two. So, "Bang for your Buck" the Voxelab X2 is the way to go.
I did my first print on the Voxelab X2 (see Photos) and it was the TEST print provided on the 8GB Micro SD card supplied with the printer. I spent about 15 to 20 minutes leveling the Bed, which is the key to a good print, and my first print on the Voxelab X2 came out GREAT. The automatic filament feeder works great, and I even tried the automatic filament extraction feature and was very pleased with the results. I really think that for the price the Voxelab X2 is a great way to get into 3D printing and would recommend it to anyone considering their initial forage into the 3d printing world. For the approximate $50 difference in price between the Ender 3 V2 and Voxleab X2 the Voxelab X2 is the winner by far. The quality of both printers is very good and they operate the same. It's hard to tell one from the other sitting side by side and the Voxelab X2 has additional features the Ender 3 V2 doesn't. Both printers provide you with extra 0.4mm print Nozzles and other items so there isn't a significant difference, other than the price, between the two. So, "Bang for your Buck" the Voxelab X2 is the way to go.
Works great ... for a short while
Beth✓ Verified Purchase•July 24, 2023
My 19 yr old son has had this for about 9 months. It seemed sturdy making the trek from home to college to his dad's and back home. Unfortunately, it shot a couple small parts off into the nether in the middle of a print, regardless of every part of it being tightened and readjusted after every relocation. It is now a $300 paperweight, until we can find someone who makes replacement parts or sells OEM replacements.
Great printer: set it up CORRECTLY and EASILY here's how
PC IndustryVet✓ Verified Purchase•July 12, 2023
Fantastic prints right out of the box, but you HAVE to know how to set up a printer. Assemble it using a Youtube video not the instructions, it's EASIER. Verify the geometry: make sure it's square in all directions on the framing/uprights or loosen and adjust (video). NOW, the trick is BED LEVELING. Start with 4 wheels about 70% of FULLY TIGHT. You want the springs COMPRESSED so things don't get out of adjustment too easily. Loosen the Z end stop if it isn't "clicking" just a bit before the nozzle touches the bed (two allen bolts, loosen, slide it, get "click", tighten them, check and repeat as necessary to get a "click" just before nozzle touches the bed. NOW level with a post it note, go around 4-5 times if you have to, each time should require LESS turning of a knob in a corner to get the paper to "drag" gently out. Righty Tighty,,, THEN get a test print (thingiverse) that prints a "CHEP TEST PATTERN" of single layer squares to use as first print. It should print the square, and 3" behind the print head you should NOT be able to easily slide the fresh printed plastic with the PAD of your finger: it should STICK DOWN. Then check THICKNESS of this plastic around the square, adjust the bed a tiny bit and repeat the print until it prints with equal thickness and you are READY TO ROCK AND ROLL. Always let the bed cool down to release prints, jerking at the machine gets things out of WHACK. Instead, buy a small USB fan and turn it on when the print is complete, aimed at the bed, and it will cool in a couple minutes, or later on, when experienced, when printing lots of repetitive parts (e.g. Gridfinity), figure out where in the Gcode you can insert a "M140 S20" line of Gcode (start about 75% down in the print file) so that just a minute or two after completing the print the BED HAS COOLED TO RELEASE ALL BY ITSELF and you will then be a Jedi Master. If you're not printing things requiring high details (e.g. functional prints), then consider a .6 nozzle which will print faster with little noticeable difference and likely never EVER jam unless you store your filament in a dust storm. ENJOY
Page 1 of 2